Today, more and more owners of personal plots are trying to equip a recreation area with maximum comfort, where the pool occupies a dominant place. A large selection of ready-made structures offered by manufacturers allows you to install any type of pool in a fairly short period. However, if reliability and durability are needed, then your choice should be to cast a concrete bowl yourself. Thanks to this technology, you can build a pool of any shape, and even supplement it with equipment and accessories in accordance with personal preferences. This article will discuss how to make a concrete pool.
Monolithic pool bowl - all the pros and cons
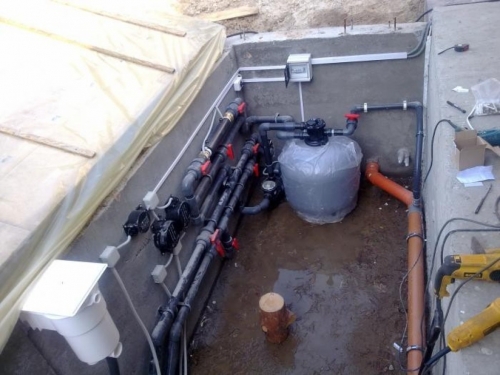
The technology of a concrete pool involves high costs. Here it will be necessary to develop a project, rent special equipment for digging a pit and mixing concrete mortar. You will also need space for a technical room where rigid PVC pipes and additional equipment will be placed.

However, all efforts will be more than rewarded, because this design has:
- durability. The service life will be at least half a century, such performance characteristics no pool made from cutting-edge materials can distinguish itself;
- aesthetics. For finishing, you can choose any cladding, including ceramic tiles or porcelain mosaic. The materials are distinguished by an unlimited choice of colors. And they will last ten times longer than, for example, a film coating;
- originality. The shape of the bowl can be absolutely any, even a non-standard configuration. The size of the pool depends on the aesthetic preferences of the owner and the free space on the site;
- functionality. The pool can be made into a skimmer or overflow. This means that the design will allow for the placement of all the required equipment (filtration system, automatic top-up, heating, circulation pump, etc.);
- comfort. The physical and technical properties of concrete can muffle noise and reduce vibration of operating devices. This is an important factor when operating a pool.
All the positive aspects of a concrete pool will take place only with the right approach:
- to project development;
- to choice finishing materials;
- to carry out all technological processes.
Cost of building concrete pools
The approximate cost of a pool can only be found out during the design process. The final price will become known only upon completion of all work, because during the construction process any ideas may arise that affect the cost of the project.
In any case, the following factors influence the price level.
Bowl size and shape
- As a rule, a 2-cube bowl is sufficient for relaxing treatments. The most popular pools hold about 8 cubic meters of water. For swimming, you will need a bowl that can hold 30 cubic meters.
- The recommended depth of the pool for children is 1 meter, for adults - 1.6 m. If you plan to install a diving tower, then the depth of the thicket should be at least 2.5 m.

- Concrete bowl rectangular shape, with a volume of 30 cubic meters. will cost approximately 450,000 rubles. The more complex the configuration, the more expensive the construction will be.
Facing material
To finish the surface of the bowl are used various materials. Their price is per 1 sq. m will determine the total cost of the cladding. For example, let's take three options located in different price segments.
- Budget. Russian ceramic tiles can be purchased for 400-600 rubles/sq.m; they fully correspond to the expression “cheap and cheerful”. This also includes Chinese glass mosaic, its price is 500-700 rubles.
- Middle segment. This category includes polypropylene film (with or without a pattern). Its cost ranges from 1,000 to 1,500 rubles. (Russia). Material with patterns from foreign companies is twice as expensive.
- Premium class. This segment involves cladding made from ceramic products from Italian manufacturers. The cheapest ceramic tile costs 1,500 rubles. per sq.m., but the maximum cost is 70,000 rubles (handmade).

Pool type
The amount of funds required to purchase the appropriate equipment will depend on what type of pool was preferred (skimmer or overflow). It is impossible to list all the components of the system, so here are only the main elements necessary for cleaning and heating water.
- A domestically produced filtration system will cost 7-10 thousand rubles. Imported equipment will cost from 25,000 rubles and above.
- The price of the simplest electric heater ranges from 20,000-40,000 rubles.
- The cost of a chlorine generator, which will make water crystal clear and safe, is approximately 7,000 rubles.
- Hydromassage equipment will increase costs by 200,000 rubles.
Additional accessories
- Various accessories will help fill the relaxation area with real comfort: a vacuum cleaner, chemicals, protective film, stairs, handrails and much more. An artificial waterfall for a recreation area (from 40,000 to 500,000 rubles) will help emphasize the respectability of the owner.
- You can hide from the hot sun and at the same time protect the water surface from leaves using a canopy (awning) or covered pavilion. The material and complexity of the supporting structure will determine the total cost. According to the most conservative estimates, the canopy will cost 20,000 rubles.

- For internal illumination of the pool bowl, you can purchase LED spotlights with moisture-proof properties. The price of a cheap lighting device is 2,200 rubles.
Concrete pool design
The versatility of this technology is amazing. A concrete bowl can be cast not only for the construction of a full-fledged swimming pool, but also for garden ponds and for children’s “paddling pools”. The choice of shape and size is limited only to:
- free area;
- terrain;
- landscape design;
- the owner's imagination.
In most cases, pools are built in the form of a regular rectangle, popular sizes: 5x10, 6x3 and 8x4 m. A non-standard configuration will require more complex formwork, but this will be justified if the bowl needs to be placed in a limited area.
DIY concrete pool construction
Choosing a location for a swimming pool
- The area intended for construction must exceed the actual dimensions of the bowl. This is due to the fact that for the functionality of the pool it is necessary to lay underground communications, as well as provide space for installing a technical room.
- You should not place it near buildings. The absence of shade will allow the sun's heat to be used to warm the water. It is not recommended to choose a place near trees - foliage and dry twigs will quickly clog the water surface.
- When developing a project, it is important to take into account the location of the foundations, including buildings in neighboring areas. Take into account the depth of underground communications.
The water exchange system can be of 2 types.
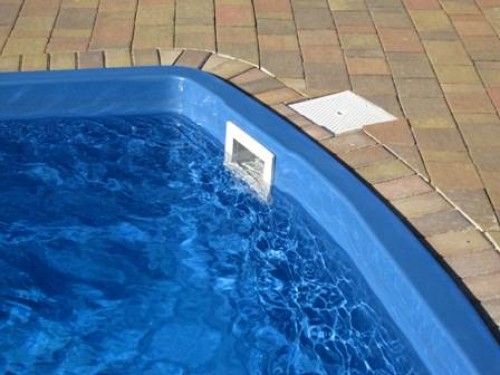
- Skimmer. This system is relevant for pools with right angles. Contaminated water under the influence circulation pump passes through the skimmer and bottom drain and enters the filtering equipment. After rough cleaning, heating and disinfection, the water returns through special holes to the pool bowl. The waterline is located in the middle of the skimmer window. The bottom of the pool is cleaned of debris with a vacuum cleaner.
- Overflow. The water in such a pool reaches its edge. Excess is removed through overflow gutters. Water enters a container equipped with an automatic top-up device. From the storage tank, water moves into the cleaning and heating system, and then again enters the bowl.
An overflow pool will cost more than a skimmer pool, but this system provides a higher degree of water purification.
Marking the area for the pit
- The boundaries of the future pool bowl are marked with a strong rope. In this case, the length, width and depth increase by 1 m. For routine inspection or repair of the pool, it is recommended to make hollow sections in the places where pipes and important components pass.
- The thickness of the bowl walls for an average volume of water is 40 cm; for a children’s “paddling pool” and small reservoirs, walls about 30 cm thick are allowed.
- The depth of the pit for the technical room must exceed the lower level of the pool. For convenient operation, the height of the room is made about 170 cm.
- When excavating soil, a slope of 5-7º is maintained on the walls of the pit. This technique will prevent them from falling off during ongoing work. It is also necessary to slope the bottom of the bowl towards the drainage system; this parameter should be within 3-4 cm per meter.
- Crushed stone will serve as additional drainage. To do this, a small hole is dug at the bottom of the pit, which is filled with coarse gravel. The workpiece is compacted tightly.

- Next, a sand cushion with a thickness of at least 30 cm is arranged. For reliability, you can lay reinforced concrete piles, they will be able to prevent uneven subsidence of sand under the influence of weight finished bowl. The next 10 cm layer is crushed stone 20x40. When filling and compacting materials, it is important not to “lose” the slope of the bottom.
Waterproofing concrete in a swimming pool
- Waterproofing the bottom of the pit is done using conventional bitumen-based roofing felt. The sheets of material should extend onto the walls by at least 25-30 cm. Ruberoid is laid with an overlap of 10 cm.
- If possible, you can use more modern materials with waterproofing properties. For example: rubberized coating, film or membrane.
- The bottom of the pit is reinforced with thin concrete. For final alignment, beacons are used, which are installed at the desired slope. The concrete solution is distributed evenly as a rule. After the mixture has set, the guides are dismantled.
Formwork
- To construct a structure for pouring walls with concrete, waterproof plywood with a thickness of 20-40 mm is used. If the shape of the bowl is complex, then edged lumber with a thickness of at least 40 mm is used. All boards are subject to processing, they are covered with paint, drying oil or varnish.

- The bowl is reinforced with steel reinforcement with a diameter of 8 to 14 mm. For rectangular pools, the rods are fastened with knitting wire in the form of a mesh with cells of 20x20 cm. For other cases, the metal rods are welded according to the shape of the bowl.
- The armored belt should cover not only the bottom of the formwork, but also extend to the entire height of the double-sided walls. To ensure that the rods remain in the thickness of the concrete, clamps and metal stands are used. For the bottom of the pool, you can take pieces of broken brick.
- All formwork elements are tightly connected to each other with screws, nails, and metal corners. Internal struts must be installed, as well as external supports, and the more often the better. This stage should be given due attention, because the concrete mixture has quite an impressive mass.
Pouring a concrete pool bowl
- The grade of concrete for the pool is selected to be at least M250. If mixing will be done manually, it is recommended to use cement grade no lower than 500. The proportion of sand and Portland cement is 2:1.
- So for 1 cu. mortar needed: 260 kg of cement; 440 kg of sand; 800 kg of crushed stone or gravel; 150 liters of water.
- Before starting work, you should provide for the depth of the bowl (when dividing into an adult and a children's compartment), technological openings for the passage of pipes, equipment, lighting, etc.

- To achieve a monolithic structure, pouring is performed without interruption. As the formwork is filled, the mixture is “punched” with a shovel or metal pin. It is mandatory to compact the mass using a vibrator.
- Such equipment will allow you to get rid of the formed air gaps, thereby increasing the strength of the walls. When the level drops, the solution is added and re-exposed to a vibrator.
Internal waterproofing
- After the concrete has hardened, the formwork elements are dismantled. Next, all equipment components are connected, the functionality of each element and the system as a whole is checked.
- The inside of the bowl should be treated with special solutions. As a rule, before this, the cement surface is cleaned of dust and other contaminants.
- The waterproofing is applied with a brush with synthetic bristles onto slightly damp concrete. The second layer is applied after the previous one has dried. The treated surface should not be exposed to sub-zero temperatures and mechanical stress for 3-4 days.
- At the same time, the coating must be periodically moistened by spraying water. Peeling and cracking indicate a violation of the application technology.
- More detailed instructions are indicated by manufacturers on each package of waterproofing material.

Pool lining made of concrete
- Among the finishing materials, ceramic tiles and mosaics are especially popular. A wide range of colors of these materials makes it possible to realize your wildest fantasies. The only requirement for such types of coating is the presence of an anti-slip layer.
- Before applying moisture-resistant tile adhesive, a reinforcing mesh is attached to the surface. The lining starts from the bottom of the bowl. In order to have entire tiles in the visible area, it is necessary to calculate how many elements will fit in a vertical row. In this case, the bottom tiles are simply cut to the required dimensions. In your calculations, do not forget to take into account the seams between the tiles.
- The joints are sealed with grout, which must withstand moisture and temperature changes. The color of the grout material is matched to the tile or you can play with contrasts.
Lighting
It is better to invite professional electricians to connect lighting fixtures. After all, lighting should be safe first and only then effective.

- The selection of spotlights is simply huge. It is worth noting that special devices have index IP54. Typically, cases are made of stainless steel or plastic; for more expensive models, bronze is used.
- The lighting elements are halogen lamps and LEDs. The cost of the latter option is undoubtedly higher, but LED lighting is more economical in terms of power consumption and is more durable.
Pool safety covers
- Covered canopies will not only protect the water surface from leaves and small debris, but will also help to significantly reduce energy costs. The principle of arranging a greenhouse is applied here. This approach will extend the life of the pool.
- Metal-plastic or polycarbonate are perfect for these purposes. Of course to budget options these canopies cannot be attributed.
- On winter period the pool is covered with an awning, ready-made solutions are presented in a huge assortment. A similar design can be made on your own. A metal frame is installed around the perimeter of the bowl, and a polypropylene film is stretched over it.
Pool made of concrete video
The popularity of swimming pools in local areas is just beginning to gain momentum. Today there are many specialized companies ready to complete a project of any complexity. However, the cost of installation is beyond the reach of many site owners.
Anyone can build a “primitive” pool on their own; significant difficulties may arise if a complex hydraulic structure is planned. There are big costs ahead: labor, materials, time, but nevertheless, the return in the form of a wonderful vacation spot for many decades is guaranteed in the future.
A swimming pool in a private home has become the norm, and owners of country houses are increasingly installing concrete pools in their yard, rather than inflatable or composite ones. A swimming pool is not only a wellness treatment and a fun holiday, but also an organic element of the exterior of a personal plot. Durability of the structure, reliability and strength of the material are the qualities that attract private owners to do-it-yourself concrete pools.
A pool with concrete walls is an expensive, labor-intensive and technically complex pleasure, but its service life easily exceeds the mark of one hundred to one hundred and fifty years, which is facilitated by the installed skimmer, waterproofing and painting with hydrostone paint. Therefore, when choosing which pool to build at the dacha with their own hands, developers push financial costs into the background, trying to increase the quality and time characteristics of the structure.
Pool designs can be different - from prefabricated units and elements, monolithic construction, combining possibilities. But any project requires a multi-layer outer and internal waterproofing concrete pool - all walls and bottom. A do-it-yourself concrete pool is a classic of reinforced concrete structures, but the construction of concrete pools has many options - these are structures with bends, cascades, waterfalls, with the installation of hydromassage devices and artificial underwater currents. The difference in designs is determined by the following factors:
- Pool location (internal, external, adjacent, with canopy);
- Bowl size (decorative design, for dipping, swimming pool);
- Shape of the structure (rectangular, square, oval, polygon, round, curvilinear, diamond-shaped);
- Type of construction (prefabricated, monolithic, combined);
- You can install a skimmer or overflow.
Construction materials
It is recommended to take concrete grades M 350-M 400, with frost resistance parameters F 100, water resistance parameters W 6. To model your pool, you need a heavy concrete solution with hydrophobic and plasticizing additives. The required density of the solution is obtained using a vibrator and a vacuum pump - this method minimizes the size of the capillaries so that cavities do not appear in the concrete.

Composition of the solution for filling the pool bowl - the proportions of the components are indicated for 1 m 3:
- 0.60 t – Portland cement M 400;
- 1.60 t medium-fraction sand;
- 60 kg – silica;
- 0.8 t fiber;
- 1 kg – plasticizing additives;
- W/C ratio – 0.3.
First, water is added to the concrete mixer, then fillers and cement. If the bowl is large, building a pool will require ordering the solution from the manufacturing plant with delivery. To build a concrete pool, it is recommended to follow the following steps in turn:
- Develop a project and construction manual - it could be a pool made of concrete blocks, a monolithic bowl, a prefabricated structure or a pool made of a concrete ring;
- Prepare the foundation for pouring concrete or installing blocks;
- Install embedded structures;
- Assemble the formwork;
- Concrete and reinforce the bottom of the pit;
- Perform layer-by-layer concreting of the bowl;
- Lay waterproofing layers on the walls and bottom of the pool;
- Finish (plaster and paint the pool) and decorate the area around the pool;
- You will also need special paint for concrete pools - it must be waterproof and durable. Hydrostone paint fully corresponds to these characteristics.
Construction of a concrete pool
The first is choosing the shape of the bowl, clarifying the dimensions and location of construction. The location of construction depends on the size of the structure. The simpler the bowl geometry, the easier it is to build a pool. The standard design is a rectangle or oval. But for any bowl shape, it is necessary to dig a recess at the bottom in order to install drain pipes and related equipment in it.

- The area should be well lit by the sun, there should be no trees or buildings shading the mirror nearby;
- For large structures, geodetic surveys should be carried out to determine the level groundwater. Based on this, the type of waterproofing is selected.
Pit
Manual digging of a pit is very labor-intensive, and this is where the ability to rent an excavator comes in handy. All that remains to be done by hand is to trim the walls and bottom. Before excavating the soil, the contours of the bowl are marked using a rope stretched between the pegs. The markings are made with a margin of 70-80 cm in order to make the formwork, and after dismantling it, backfill the foundation. The depth and width of the pit should also be half a meter larger - for arranging a sand cushion and filling the bottom with concrete.

The bottom foundation slab and the walls of the bowl can withstand equal loads from the mass of water, so waterproofing and bedding can make the structure stronger ( step-by-step instruction):
- Drain plastic pipe placed in a special trench leading from the pit to the side wall. If the bowl is large, then several drains are made in different directions, and a skimmer is installed for each drain. Pipes must be laid with a slope of 10 mm per 1 m of pipe;
- The soil at the bottom of the trench is compacted with a tamper and insulated with geotextiles;
- A two-layer waterproofing - roofing felt - is laid on the geotextile;
- At the bottom there is a cushion of sand and granite crushed stone 20 cm thick.

Before building the reinforced frame, formwork is made around the perimeter of the trench. To create a reinforcing mesh, the following steps are required:
- For an armored belt, reinforcing bars Ø 10-16 mm are needed. In the curved places of the bowl, reinforcement Ø 10 mm is knitted;
- With a foundation slab thickness of 200 mm, the frame should have a thickness of 100 mm and be buried 50 mm into the concrete on all sides;
- The rods in the first row are laid in cells of 20 x 20 cm, and tied together with soft steel wire. At the same points, vertical rods are tied that will hold the second row of the frame. Tie a mesh similar to the first tier to the resulting racks.
- When laying horizontal rods, you need to bend them near the walls of the bowl at an angle of 900 so that after pouring the concrete, the ends of the rods are higher than the bottom surface - the rods of the wall frame will be tied to them.
To concrete the bottom, you need to prepare a large volume of mortar with waterproof additives, with which your DIY pool will be stronger and more durable.

Working with solution
To prepare the solution yourself, you need three people - one prepares the mixture, another delivers it to the construction site, the third lays and levels the concrete. Preparation of the solution and concreting must be continuous, each new layer must be compacted. After filling the bottom, it is covered with polyethylene and left for 10-14 days. The thickness of the bottom and walls of a pool bowl with a volume of up to 15 m3 is 20 cm. The reinforced frame for the walls is mounted as follows:
- The installation principle is the same as for the bottom slab: the frame must be completely in concrete, immersed in concrete to a depth of 50 mm, the vertical rods of the frame are attached to the rods of the bottom frame;
- During the pouring process, you will need to install pipes for water nozzles, lighting sockets, trays for electrical cables, and a skimmer into the walls;
- The formwork can be constructed from any available material;
- All concrete works for one node (wall or bottom) are carried out in one day. The formwork is dismantled 28 days after pouring the solution.
Plastering and waterproofing
A fiberglass plaster mesh is attached to the walls, the plastering solution is prepared in proportions 1:2 (cement M 500 - sand). The strength of the plaster layer is ensured by the addition of microfiber latex admixtures.

Then lighting fixtures, drains and nozzles are installed on the sealing cord, all this is opened with sealant and reinforced with cement.
To waterproof walls you need:
- Apply to the inner and outer surfaces of the walls liquid solution waterproofing agent;
- The pool test is carried out with water - you need to take a full cup of water, mark its upper level, and do not drain it for two weeks.
- Fill the pool with water, mark its level on the wall, and do not drain it for 15 days. With the exception of a few liters of water that have evaporated, the level should remain the same;
- For finishing, you need a special paint for concrete pools, preferably hydrostone, which also has waterproofing properties. If you do not use hydrostone, you can lay ceramic tiles using water-repellent adhesive. Before painting the walls of the bowl, they must be painted with a water-repellent primer.
The sun will not always heat the water in the bowl, so it is recommended to install heating elements. Not only hydrostone paint and waterproofing, but also a thermal insulating gasket help reduce heat loss. Thermal protection is done by spraying special substances. Without the help of specialists, you can make thermal insulation with foam plastic boards with a density of 35 kg/m3 and higher. The tile seams and the skimmer along the entire perimeter are sealed with water-repellent sealant.

The last stage of construction is backfilling concrete structure. The space between the concrete and the soil is filled with previously removed soil. If the soil in the area is heaving, then backfilling is done with a mixture of soil with sand and crushed stone.
Swimming pool at the dacha made of a concrete ring
In a small area you can build a swimming pool using concrete ring, the standard dimensions of which are 1-2.5 m. How to do it:
- The pit is dug along the diameter of the ring, the bottom is concreted, as for a regular pool;
- A ring is lowered onto the hardened bottom, and then all subsequent work is carried out - hydro-, thermal insulation and the rest of the finishing - plastering and painting with hydrostone paint.
- In order not to concrete the bottom, you can install a ring with a lid - you will need to seal the hole in it after the drain pipe is brought out through the hatch.
In autumn, the water from the bowl needs to be drained to a level below the nozzles, but not all of it, so that the ice minimizes the pressure of the earth on the walls. You can throw containers filled with sand into the water, a layer slightly above the water. This technique eliminates the ice pressure on the concrete.
How to build concrete pool on one's own updated: December 26, 2016 by: Artyom
To paraphrase the classic, we can say that installing a swimming pool in a house is personal plot or at the dacha - this is not a luxury, it is a necessity.
The construction of private swimming pools on an individual plot has become standard, like the construction of or.
The only difference is in the design and scale: a small pool in the bathhouse, a decorative pool in the yard as part of the composition landscape design or construction of large sizes and volumes - indoor and outdoor swimming pools, which are located on the street, with all the associated fixtures and accessories.
Briefly about the main thing - how to get a swimming pool
You can get what you want in two ways:
- First, buy a ready-made pool.
But before purchasing, please consider the following:
It costs expensive;
It is impossible to buy a concrete pool ready-made. This means you will have to pay for the project, for materials and for labor. Also, return VAT to the state;
- Secondly, make the pool yourself.
This seems like a difficult task only at first glance. In fact, you already have everything you need: desire, opportunity and our instructions. This means that building a swimming pool should not cause any difficulties.
And physical fatigue will quickly pass when you splash around in the pool, which you made with your own hands.
Which pool is better to choose for a summer residence - types and types

Requires special knowledge for arrangement

It is cheap, convenient to carry and store, but is not very practical and has an extremely short service life.

Sold ready-made.

Purchasing such a structure (especially a large one) entails difficulties with delivery and installation, which cannot be done without special equipment (trailer, crane, excavator).
 Plus, it involves digging a pit, which is also quite problematic.
Lightweight and durable. The design principle is similar to the previous version. Causes difficulties during transportation and installation.

The best and most justified option of all of the above.
This pool is ideal for a summer house or country house, where you will use it seasonally.
 It can be made from concrete blocks, but it is better to pour a monolithic one. Despite the fact that this is the most complex and expensive design, its reliability and durability are beyond doubt.
 Disadvantages of a concrete pool and how to eliminate them
- problems with the water supply system. As a rule, they appear as a result of errors during their laying and installation of pipeline systems. If the work is carried out correctly, no difficulties arise;
- Possible water leakage. This significant problem can be eliminated with the help of several layers of good waterproofing, the use of high-quality concrete and compliance with all rules for their installation;
- peeling of ceramic tiles or mosaics. Eliminated by using high-quality special-purpose glue;
- spread of fungus.
 The appearance of fungus can be easily eliminated by regular cleaning and treating the surface of the bowl with special disinfection solutions.
Regular care and implementation of the above actions is the prevention of fungus formation.
Permission to build a swimming pool
In fact, an outdoor pool in a yard or plot can be built without approval from Rostechnadzor.According to Article 51 (clause 17) of the Town Planning Code of the Russian Federation, auxiliary use facilities do not require a documentary permit for construction. But there are some nuances here, it all depends on the parameters of the structure, if it is small in volume decorative or Children's swimming pool, then no questions asked, but if the permanent structure is for navigation, i.e. sufficient depth, length and width, then it is better to draw up documents.
If the pool is not registered in the BTI, accordingly, it will not be on the certificate of ownership, and it will not be included in the technical passport. In the future it will be possible to legalize it, but it will cost more than registering it right away.
Building a concrete pool with your own hands - instructions

Installation work - construction of a concrete bowl for a swimming pool
Preparing the site
To do this, standard procedures are followed: clear the area of bushes and trees, and also cut off branches that may hang over the pool. Material from the site
Excavation work - digging a pit for a swimming pool
 Of course, digging a pit can be done without the use of special equipment. But only if you have a small and shallow pool, you have a lot of time, effort and help.
 As a rule, the cost of renting an excavator and digging services will be approximately the same, the difference is in time.
 Construction of a pit for a swimming pool
- increase the dimensions of the pit. They should be larger than the size of the future bowl. This is done in order to place technical equipment there and arrange a cushion under the concrete. And also for the construction of formwork.
- presence of an angle. When digging walls, make sure that there is an angle of their deviation relative to the vertical. This method will prevent soil from falling into an already dug pit.
- Availability drainage systems. To ensure that the water that splashes out of the pool does not turn into puddles and does not destroy the landscape design, it is necessary to provide a place for its drainage.
- First of all, it is necessary to lay all hydraulic communications.
- provide for the possibility of draining water.
 To drain, the bottom of the pool is sloped at 5-7% (2-3 cm of slope per 1 meter of bottom), which should be directed towards the drain hole.

Arrangement of the pillow
(concrete footing)A gravel-sand cushion is needed to ensure better pouring of concrete. Usually it is a mixture of sand and crushed stone, which compacts well. Cushion height 300-350 mm.

Bottom waterproofing
The more options for possible leakage we take into account and prevent, the longer the service life of the concrete pool will be.
It will come in handy.
For an oval pool, reinforcement no thicker than 10 mm is used. This is due to the fact that reinforcement of this diameter is sold in coils. And, therefore, you can independently adjust its length. The spacing of the reinforcing tracks is 200x250 mm.
 For a rectangular pool, arbitrary installation of reinforcement with piping in increments of 200x200 cm is allowed.
You need to put something under the reinforcement, for example, a brick, so that it remains in the middle of the concrete base during the process of pouring the concrete solution.
 After installing the reinforced frame, fill the bottom of the pool with concrete solution. When pouring, try to avoid the presence of voids filled with air - this will reduce the quality of the surface.
 We are waiting until the concrete dries and you can safely move on it.

The principle of reinforcement is identical to the previous one.
The number of tiers is determined by the height of the bowl.
Installation of formwork for a swimming pool
The material used for formwork is a wooden board (painted or oiled) or, more conveniently, plywood (preferably moisture-resistant or laminated). The use of plywood allows you to create bent shapes with a minimum of effort, which is important when building a pool of complex or oval shape.


In order to avoid deformation of the formwork under the pressure of the weight of the concrete solution, it is recommended to install stiffeners and spacers at a distance of 500 mm. A beam with a cross section of 50x50 is suitable for spacers.
Installing plywood formwork is more expensive, but the surface quality of the concrete bowl is almost perfect.

Note:
the sheathing for the steps is mounted separately.
Pouring the walls of the pool bowl with concrete
 We wait until the concrete hardens. In this case, it is better to cover it with something to avoid destruction from exposure to temperature or moisture. And also periodically moisten with water.

If you do not plan to use a metal ladder, but want to make the procedure of immersion in water smooth, you need to provide concrete steps.
The formwork for the steps is installed when the entire concrete bowl for the pool is ready.
It is better to use plywood for the manufacture of formwork, because... it allows you to create bent shapes and does not require additional cleaning.
Construction of a concrete pool - video on pouring a concrete bowl
Finishing and lining of the pool bowl
The stage involves a set of activities:
Sanding pool walls
 Grouting is done manually or using a special grinder.
Waterproofing is applied using special liquid solutions, between the layers of which reinforcing fabric (mesh) is laid.


When performing this type of work Special attention should be given:
- seams between the bottom and walls of the structure;
- seams that appeared when pouring concrete;
- place of communications entry;
- chips, gouges and cracks.
Finishing
Before doing this, it is important to check the quality of the waterproofing. To do this, you need to fill the pool with water. Measure the water level. Then wait 10-12 days. And measure the water level again. Changes in this parameter are an alarming sign. This means that the waterproofing was done poorly and there is a leak somewhere.
The amount by which these two indicators differ can say a lot. For example, a slight discrepancy would indicate that the water could simply evaporate under the influence of heat.
The following materials are usually used for finishing:
 facing tiles;
 mosaic;
 PVC film (the cheapest option).

The choice of finishing material is influenced by factors such as:
Easy to care for;
- availability;
- ease of installation;
- price;
- possibility of replacement;
- appearance.

Concrete pools: how to build a concrete pool with your own hands, technology for building a concrete pool
Concrete pools (pools made of concrete) probably most accurately describe the concept of a “stationary pool”.
A concrete pool is the type of pool that, according to the owners’ plans, should last as long as possible. For many years, concrete pools have been considered the most stable hydraulic structures.
The construction of a concrete pool is best left to professionals. In addition to quality work done, you can demand a warranty from the construction company. Often those who want to save money build a concrete pool with their own hands.
If you decide to carry out this labor-intensive task yourself, you need to study in great detail all the stages of this process. If you miss even the smallest nuances in the future, you may face major problems.
When building a concrete pool, you must accurately determine the shape of the pool and its dimensions. Building a concrete pool is quite expensive. Here, under no circumstances should you skimp on building materials.
When building a concrete pool, like any other pool, it is necessary to take into account the amount of groundwater and at what depth it is located.
The construction of reinforced concrete pools involves the construction of the most stable structure, but compared to others, such a pool takes the longest to build. The technology for building a concrete pool involves constructing the pool in stages.
Concrete pools: stages of construction

Concrete pools have the following advantages

Concrete pools: reviews and disadvantages
You can read various reviews about concrete pools on the Internet. Some people point out the advantages of concrete pools, while others believe that the disadvantages of concrete pools cancel out all their positive aspects, making you think about alternative options. The disadvantages of concrete pools include the following: 
- high cost of building a swimming pool;
- long period of construction and finishing works.
- there is a need for restoration when there is a sharp change in temperature.
Many owners of private houses dream of building a concrete pool with their own hands, but do not know how to do it correctly, because the finished structure must be not only attractive, but also durable. This type of construction has its own characteristics, which only an experienced specialist can handle. This applies to situations where it is necessary to equip systems for drainage, filtration, and water circulation.
Short description
A concrete pool is a rather expensive, labor-intensive and complex hydraulic structure. Its service life can reach 100 years. The durability of a concrete pool largely depends on the design, the quality of the materials used building materials and compliance with all required standards. The hydraulic structure can be assembled from individual elements or a solid monolith. But for each situation, the specialist must provide for the presence of internal and external waterproofing.
An interesting fact is that you can make a concrete pool on almost any garden plot, since the master can use any type of modification. Finished design may have peculiar bends, waterfalls, cascades, as well as hydromassage. Thanks to this, concrete pools began to differ in appearance. The main differences may be related with the following factors:
- Size. A pool may be designed for splashing, swimming, dipping, or as a decorative accent.
- Method of arranging a bowl. Today there are three options: cast, prefabricated and monolithic.
- Design. The structure can be a skimmer or overflow.
- Location. External, internal, nearby standing pools, as well as structures with a sun canopy.
- Form. Each specialist can build an oval, round, square, rectangular, polygonal or even shaped version.
Main disadvantages and their elimination
Many pool owners are well aware that during the active operation of a hydraulic structure, certain problems may arise. All of them can cause a lot of inconvenience, but even they can be dealt with on your own. The most common disadvantages include:

Required materials and tools

The craftsmen claim that the purchase of all necessary building materials must be carried out after the project for the future pool has been prepared, and a place for its construction has been selected. Only in this case can you avoid unexpected financial expenses by preparing only the most important and necessary things.
To build a concrete pool with your own hands, must be purchased:
- clean sand;
- crushed stone of medium fraction;
- strong and durable cement grade M500 or M600;
- reliable material for waterproofing;
- metal mesh and reinforcement;
- wooden beams and boards for arranging formwork;
- durable geotextile.
Don’t forget about the tools, without which construction work is simply impossible. These include:
- Sander;
- concrete mixer;
- specialized tool for tying reinforcement.
Main stages of construction
 Almost every builder comes across concrete, so a pool made from this material is the most affordable option. But the construction of a hydraulic structure has its own subtleties that must be taken into account.
To make it easier for a craftsman to build a concrete pool, the entire work process needs to be divided into several main stages. This construction technique will protect you from the most common mistakes.
Drawing up project documentation
This stage should always be the first, since all ideas must be described in appropriate documentation. The project must include all calculations, drawings, geodetic survey results, architectural solutions, as well as estimates. At the legislative level, both specialized and independent development of documentation is allowed.
 First of all, you need to determine the exact location for building the pool. The key role in this case is played by the depth of groundwater. The main danger is related to the fact that close proximity is fraught with rapid destruction of the bottom of the pool (this applies even to monolithic structures).
The master will also have to decide on the size of the structure, since the power of filtration and water supply, as well as the level of material costs, will depend on this. An important factor is the distance of the object from the trees. It is worth considering that all the foliage falling from trees and bushes will clog the pool bowl. As practice shows, the least amount of hassle and financial investment is needed for those structures that have a rectangular shape.
Preparing the pit and laying pipes
When a master is working on a pit, he must ensure that it accommodates the bowl of the future pool, as well as external waterproofing and gravel backfill. The upper edges of the bowl should not be lower than the foundation of the adjacent building. That is why it is best to calculate the depth of the pit in advance, so as not to redo everything several times. For marking, you can use ordinary pegs and a cord (the size allowance should be in the range from 40 to 60 cm).
The bottom of the pit must be leveled and compacted, but there must be a slight slope for good drainage of water. Only after this the bottom is filled with 40 cm of sand and gravel (no more than 18 cm).
This procedure is carried out in order to create a high-quality drainage cushion. It is also worth considering that even before concreting begins, the master must install the drain pipe at an angle of 7˚. There must be a special valve at its output end.
To install a high-quality drainage system around the entire perimeter of the pit, a system of PVC pipes. In the future, special pumps will be used to pump out water. When the bottom is thoroughly compacted, a thin cement screed is made over the backfill. When it has hardened, a layer of primary waterproofing from sheets of roofing material is laid on top of it (all sheets should overlap exclusively). The material is rolled out to the full height of the pit walls.
 Areas where two strips touch should be lubricated with bitumen mastic. If the master has professional tools, he can use a hair dryer. Reinforcement of the pit should be done as carefully as possible, so as not to damage the waterproofing layer during this procedure. Two layers of mesh must be laid on the bottom and walls of the pit. It is worth noting that the curved edges of the rods must be buried in the bottom mesh system. The entire above-ground part is reinforced with three layers of mesh at once.
Creating durable formwork
For this procedure, it is advisable to prepare high-quality boards, strong beams, thick plywood or corrugated sheets. The entire surface of the pool walls must be covered from the inside with film. The master is obliged to monitor the verticality of the formwork being created. In addition, it is necessary to strengthen its ability to withstand the pressure of heavy concrete. All ends of the reinforcement should be slightly below the top edge of the formwork.
Pouring concrete mixture
Experts note that excellent results can be achieved if concreting is done in one go. At the first stage, the bottom itself is poured, and only then the entire space between the pit wall and the formwork. It is advisable that the thickness of the concrete does not exceed 28 centimeters. You can improve the quality of pouring using a special vibrator.
Concrete should be supplied from the concrete mixer in a continuous stream. Of course, such an effect can only be achieved by those companies that are professionally involved in pouring the solution.
 If the master prefers to use a high-quality hydrophobic self-expanding cord, then the concrete can be poured in two steps. It is worth noting that it is better to give preference to a product with a cross-section of 3 cm. The cord is laid at the junction of new and hardened concrete. When it is exposed to moisture, its volume increases five times. This approach avoids the formation of so-called cold joints, which cannot maintain the necessary tightness.
It is important to remember that at the first stage only the bottom is concreted, and only then the vertical walls. For reliable setting, all joints must be cleaned of dust and other construction debris. When the main stages of the work are completed, the master can pour concrete into additional elements (seating areas, steps).
The technological break must last twenty days. The main role in this case is played by the size of the pool. After this period, all formwork is removed and the surface is leveled with special latex mixtures and plasticizers (the applied layer should not be more than 4 cm). Next, you need to install the embedded elements: skimmer, bottom drain, nozzles.
Laying internal waterproofing
Many masters consider this stage one of the most important. For work, it is customary to use an elastic two-component mixture, which is applied to PVC film or an adhesive primer. To give the material the necessary strength, builders use reinforcement technology with a specific synthetic mesh. It is necessary to approach the waterproofing of embedded elements with special responsibility. This stage involves a third technological break, after which the necessary hydrotests are carried out (the pool is filled with water to the very brim for 2 weeks).
Final finishing
 When all construction works completed, you can begin finishing the pool. In this case, it all depends on the taste preferences of the owner and his family. It is worth noting that this stage can only be started when the concrete pool bowl has dried. Tiled and mosaic types of coverings are especially popular. Some craftsmen prefer to cover everything PVC film, which can be painted in any color and is an imitation natural stone or marble. But a geo-textile must be glued under the film.
Modern finishing also allows for the option when the entire inner surface of the bowl is painted with two-component epoxy paint, which must be applied with a roller (the layer of paint material should not exceed 1 mm). Already on the seventh day the pool will be completely ready for use. It is also worth noting that after a cold winter, the paintwork will most likely have to be renewed. This is due to the fact that severe frosts and thaws negatively affect the structure of the paint. But even this small drawback can easily be eliminated in just a few hours of work.