Many owners raise poultry. The best option is chickens. They are undemanding to living conditions, but it is necessary to build a good chicken coop. For a small family, it is enough to have 10 laying hens. To do this, you will need to make a chicken coop with your own hands for 10 chickens. Drawings and detailed instructions will help you build a quality structure.
You can make a beautiful and spacious chicken coop yourself
Read in the article
How to make a chicken coop with your own hands for 10 chickens: drawings and requirements
To get started construction work, you should familiarize yourself with the basic requirements for such a structure:
- placement of the building. A rectangular chicken coop should be placed from east to west. Chickens lay eggs better if there is enough daylight, so windows should face south;
- When creating a warm chicken coop with your own hands, it is worth remembering that the room should not be hot, since at temperatures above 25 degrees the chickens will not lay eggs. But also in winter time it is necessary to create heat. In cold weather you will also need a structure. The temperature must be at least 12 degrees;
- it is better to locate the building away from noisy places;
- high humidity can cause poultry diseases, so ventilation is necessary;
- The dimensions of the room are selected taking into account the fact that two chickens can be accommodated per square meter. In cramped conditions, chickens lay eggs worse.
Helpful advice! When designing a poultry house, you need to take into account that over time the number of individuals may increase and more space will be required.

When arranging a room, it is worth equipping the windows with shutters made of, and for walking, provide an area under a tree or under.
chicken coop cage
Features of chicken coop design
Drawings and photos will help you create a competent project for a chicken coop with your own hands. It is important to choose the right size of the building, which depends on the planned number of birds. The type of structure depends on how many birds will live in it and on the types of materials.
Features of installing the simplest chicken coop at the dacha with your own hands: stages of construction and photos
When deciding how to make a chicken coop with your own hands, you should familiarize yourself with the main stages of installation.
The table shows the main steps in constructing a simple poultry house.
| Image | Stages |
 | Construction (only for structures with large livestock) |
 | |
 | Selection and installation of flooring |
 | |
 |
You can build a chicken coop from scrap materials. In order to save money, you can use a room without erection or use a base on posts, for which leftovers or cobblestones will do. The floor can be made of adobe or earth, and the roof is made of durable plastic, tin or slate residues.

Nuances of creating a foundation
For a do-it-yourself chicken coop for 20 chickens, a photo of which can be seen in this review, you will need a more durable one. Depending on its type: or columnar - you will need a concrete mixture, a composition of or.

The foundation is erected in accordance with certain rules:
- the area is cleared and the top layer of soil is removed, about 25-55 cm;
- Sand and gravel are used as a cushion;
- the formwork is made of boards, its width is 25 cm;
- rods are used for;
- Concrete grade M300 is used.

Construction of the building can begin after the concrete mass has hardened. It is worth considering that the size of the site should be equal to the dimensions of the future chicken coop.
For creating columnar base Marking will be required, which is done using metal rods and rope. Then, cabinets are installed around the perimeter, which are placed at a distance of a meter. In this case, the supports should protrude 25-30 cm from the ground. They are strengthened with cement mortar bricks.
Chicken coop walls
When building a chicken coop with your own hands for 10 chickens, you need to prepare drawings of the walls. Wood is in demand as a raw material for walls. They are used for cladding walls. In this case, the joints must be thermally insulated. In addition to boards, you can use plywood or clapboard. Adobe brick is considered a good material. The combination of straw and clay allows you to retain heat.

Installed according to the standard pattern. As insulation to separate the foundation and beams, roofing material is used, which is laid in two layers. Floor joists are also made of timber, which is laid edgewise. In this case, voids and cracks are sealed with remnants of timber and flax-jute fiber.

Roof, ceiling and floor of the building
To create a winter chicken coop with your own hands for 10-20 chickens, high-quality floors and roofing are of great importance.

The arrangement has some features:
- it is better to use a gable type roof, which will protect against the accumulation of moisture and snow;
- coating material: roofing felt or slate;
- thermal insulation is performed using mineral wool or.
In a gable roof, you can build a small attic where you can store bedding for chickens and feed. After installing the ceiling beams, the ceiling covering is laid. In this case, boards are used, and expanded clay and coal slag are used for insulation.

When building a chicken coop you need to do well. If they freeze, the room will be cold. It is recommended to use thick boards for the floor. First, untreated boards are laid, then a layer of vapor barrier material is laid, and treated boards are placed on top.
Note! When arranging a pitched roof, it is necessary to ensure that the slope does not point towards the poultry walking area.

How to make ventilation for a chicken coop for 20 chickens with your own hands: drawings
Particular attention should be paid to a do-it-yourself chicken coop. The ventilation device is responsible for supplying fresh air. This is especially important in the cold season, since birds are rarely outdoors. A budget and uncomplicated option is natural ventilation, which consists of ventilating the building. In this case, the exhaust window should be small and located on the ceiling or above the door. Such a scheme has many disadvantages, since heat will also leave the room along with the air masses. At the same time, heating will require a large amount of resources.

A more reliable option is an exhaust system. It makes sense to install it if there are at least 20 chickens in the chicken coop. You can build such a structure with your own hands:
- in two holes are made for pipes, the entrance for the passage of air should be placed away from the perches;
- instead of a pipe, you can make special wooden boxes, but they need to be painted and;
- fresh air pipes are located at a distance of 35-40 cm from the roof, and the exhaust pipe rises 1.5 meters above the roof;
- To protect against precipitation, the upper ends of the pipes are equipped with small umbrellas.
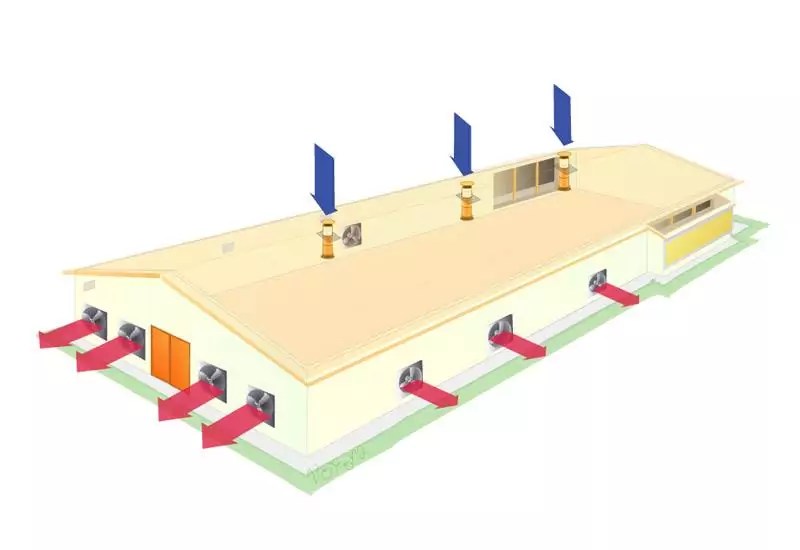
For uniform circulation, it is better to place the pipes on opposite sides of the room. In this case, it is used, which is mounted in the window. You need to turn on such a system manually. There are also special sensors that allow you to control the humidity in the room.

How to arrange a chicken coop inside?
After completion of the main work, the interior of the room is arranged. The construction of comfortable perches is of great importance. In this case, the length of the perches and their number are calculated. These elements are best made from . The perches are ground to a rounded shape so that the chickens do not get injured. Perches should be installed at a height of 65-75 cm, and 55-65 cm should remain between perches. It is recommended to place special pallets or trays under the perches. This will make the cleaning process easier. It is better to make the perches removable to make sanitization convenient.

It is worth equipping nests in the form of boxes, which should be darkened. They are installed in a separate place, and the drawers are covered from above. A separate entrance is recommended for changing bedding and collecting eggs.

Another important element is the feeders. They can be made of wood and installed on a small hill. Bedding is made of peat, straw or sawdust. They come in different depths. When soiled, deeper bedding is dug up. In addition, bedding is optional for the chicken coop in winter.

Lighting Features
Good food ensures the growth and physiological development of birds. You can create a well-equipped and lit chicken coop with your own hands for 10 chickens: drawings, detailed diagrams and photos will help you do this. High-quality lighting affects the following parameters:
- number, size, density and weight of eggs;
- chick development;
- digestibility of consumed feed;
- periods of egg laying and their duration.

When planning a lighting system, you need to know some features. Chickens do not see well in the dark, so in the evening, do not turn off all the lamps at once. When all the birds are settled on the perches, you need to turn off the remaining lamps.
For hatched chicks, lighting with a brightness of 35-45 lux is required. Then, as the bird grows, the light intensity gradually decreases to 6-8 lux. An adult bird will need a light of 10 lux.
A device for smooth switching on of the light is recommended, since if the light is turned off abruptly, the bird may become frightened. This is especially true for breeds that are bred to produce eggs. Chickens should also be accustomed to the dark from the third day of life, so that if the lights go out, the birds will not trample each other.
Helpful advice! If birds behave aggressively and pluck each other's feathers, then a reduced lighting intensity can solve this problem.
 Heating system in a building
 It is worth insulating doors and windows, since most of the heat escapes through these openings. It is also worth building a deep litter. This design consists of a layer of slaked lime and 10 cm of shavings, sawdust and straw. Natural heat-insulating materials are also used: peat, foliage and even manure. Natural composting allows heat to be released.

Every owner wants his chickens to grow quickly, well, and lay more eggs. However, it is often forgotten that this is only possible with good conditions life of a bird in which it will feel comfortable. This is why it is a mistake to house chickens in barns and outbuildings. It’s worth spending a little effort and time on creating a suitable “house” and the result will not be long in coming. This article will talk about how to make a winter chicken coop with your own hands for 20 chickens.
Some owners keep birds in a chicken coop all year round, while others leave them in this yard building only for the summer. First of all, decide what you will do, because understanding the temperature conditions and the weather in general outside the chicken coop will matter during construction.

Building a warm chicken coop with your own hands
Before you begin construction, you should choose the type of chicken coop that is optimally suited for your goals, as well as decide on the necessary materials and make a detailed plan for the future poultry house.
If you have started building a winter chicken coop with your own hands, first of all take care of insulating the room - and then you can be sure that even in frosty weather there will be fresh home-made eggs on your table.
Helpful advice! At the construction planning stage, include a vestibule in your plan: its construction does not require much effort, but can significantly reduce heat loss.
There are several types of buildings, and when choosing the appropriate option, you should take into account both your capabilities and the area on the site that you are ready to allocate for a poultry house, as well as the comfort of the inhabitants of the chicken coop. One of optimal options is a chicken coop with a courtyard - it consists of two parts and is the most convenient for birds, although it takes up a little more space than conventional poultry houses.

Two parts of such a chicken coop:
- Inner room.
- Yard fenced with lattice.
In this design, the chicken can, if necessary, sit inside or walk in the fresh air.
How to build a warm chicken coop: choosing the type of foundation
The foundation is the basis of any structure, which is why it is so important to immediately determine its type. First of all, it is worth carefully weighing all the pros and cons of each option.
Advantages and disadvantages of different types of foundations for chicken coops:
| Foundation type | Advantages | Flaws |
| Tape | High reliability indicator | High cost, justified when building a house, but not when building a chicken coop |
| Columnar | Cheap and simple design | Less reliability compared to the tape version |
| Pile | High reliability and simplicity of design: using modern screw piles, two people can easily handle the construction of the foundation | Relative high cost: a pile foundation is cheaper than a strip foundation, but more expensive than a column foundation |
How to make a columnar foundation: step-by-step instructions
The most common choice is a columnar foundation: it does not require much time and effort, while guaranteeing the reliability and stability of the building. Let's figure out how to make such a foundation yourself:
- start with markings. To do this, take a rope and several thin long pegs or metal rods;
- Next, you need to place pegs in the corners of the future structure and tighten the rope. Carefully ensure that the markings are even. The rope should be taut, but at the same time spread along the top layer of the earth;
- inside the marked area, dig a 15-20 cm hole - you need to remove the top layer of soil;
- dig holes for the posts. Their depth should be approximately 60-70 cm, and their width should correspond to the parameters of two bricks, that is, approximately 50-55 cm. The distance between the pits should be maintained at 1 m. The cabinets must be installed along the entire perimeter of the future chicken coop;
- After finishing digging holes, pull another rope over the rods. It should be at a height of 20-25 cm above the ground. To ensure that the structure is smooth and neat, use a level;

- It is necessary to pour a small layer of sand at the bottom of each hole. The thickness of this layer should be 5-7 cm;
- then fill in the same layer of gravel - both layers serve as a cushion for the future foundation;
- Place two bricks at the bottom of the hole. Next, put a cement solution there in a ratio of 1:3;
- lay two more bricks across. Repeat the steps until the height of the pedestal reaches the level of the top rope;
- if the height of the column is insufficient, level it with cement;
- to protect the foundation from the destructive effects of moisture, it basement part should be covered with gravel.
How to make a chicken coop for wintering chickens: choosing materials
In order for the design to be comfortable and durable, the appropriate materials should be selected correctly. To build a poultry house you can use:
- foam blocks;
- shell rock;
- wood;
- brick;
- cinder blocks.

Let's look at the features of the most popular materials:
- Foam blocks: not the most budget-friendly, but the most comfortable option for birds.
- Brick: the most durable material, the construction from which retains its integrity and functionality for decades.
- Wood: the most popular solution, characterized by efficiency, practicality and durability if the beams are properly processed. In addition, such a house looks stylish and will harmoniously fit into the landscape of any site.
The material for the foundation is selected according to the following principles:
- For pedestals under a columnar foundation, any available material will do. Popular options are regular stone or old or new brick.
- Reinforced concrete is used to make strip foundations. The frame is assembled from metal reinforcement; components for making concrete mortar are also needed.
- Pile foundation made using special piles made of reinforced concrete or metal. The most modern option is screw metal piles, which can be easily screwed into the ground without the help of professionals.

How to insulate a chicken coop for the winter with your own hands: choosing insulation
The optimal material for wall insulation is polystyrene foam.
Helpful advice! When laying insulation, be sure to ensure that the foam is closed, otherwise chickens may peck at the material. Geese perceive polystyrene foam as food, so if these birds are kept on your property, you need to take special care to ensure that the insulation is closed.
If the coop is made of planks, be sure to put mineral wool between the two layers.
How to heat a chicken coop in winter if you plan to keep birds in it all year round will be discussed below. For additional insulation, choose expanded clay, rolled materials or coal slag.
An important part of the chicken coop is the roof - the temperature inside the building will depend on its reliability. It is important that there are no cracks in the roof and that it does not leak. First of all, decide on the material suitable for roofing work. This capacity may include:
- corrugated sheeting;
- metal tiles;
- slate.

The type of roofing material in the case of a chicken coop does not matter much. The main purpose of the roof is to prevent moisture from entering the house, so the main task is to properly lay the roof to avoid leaks.
Choosing the optimal location for the chicken coop on the site
To choose optimal place for a chicken coop, easy to build and comfortable for chickens, follow simple principles:
- in the lowlands, as a rule, it is very damp: in the spring the ground dries out more slowly after the melted snow, and after the rains puddles appear there. Thus, it is better to place the poultry house on a hill - in addition, it is more convenient to walk chickens there;
- birds love peace, so it is worth placing the chicken coop away from active recreation and sources of noise;
- the well-being of birds is directly proportional to the amount of sunlight they receive, so if possible, you should make sure that the windows face south;
- overheating is harmful to birds, so in extreme heat it is worth shading the windows;
- the chicken coop should be located close to a person’s home so that you can regularly monitor the birds;
- Place the house on dry, sandy soil. In the case of clayey, swampy or simply damp soil, you should first drain it;

Helpful advice! Use drainage channels or holes and then fill them with sand. In the future, you can use drainage channels, ponds or pits for chickens to bathe. The ideal place for poultry farming is with a slope to the southeast.
- make sure that the area you choose for building a poultry house is reliably protected from cold winds - planting in the form of shrubs and trees is optimal for this;
- near the chicken house there should be a suitable area for walking, where there is an opportunity to shelter from rain, piercing wind, scorching sun and other unpleasant weather phenomena;
- It is worth equipping a small pond for swimming chickens.
Choosing a location is one of the most important stages in the instructions on how to build a winter chicken coop, because an unsuitable location and uncomfortable conditions for the birds affect their health. Birds become lethargic and sickly, lay less eggs, and problems with fertilizing eggs are also possible. As a result, the chicken coop brings in less and less income.
Make sure that the conditions for keeping the chickens are balanced: with high humidity, the chickens become tufted and lethargic, and if in the heat under the scorching sun the chickens do not have shelter in the form of trees, bushes or other sources of shade, there is a risk of dehydration, which threatens the death of the birds.

Helpful advice! It is possible that in the future you will need to increase the number of birds. Therefore, if possible, position the chicken coop so that, if necessary, additional buildings can fit next to it. Even if 20 chickens are enough for you to provide eggs for the whole family, it is possible that in the future you will decide to raise birds for profit.
Building a chicken coop for 20 chickens with your own hands: drawings
Regardless of the chosen type of poultry house and the materials for its construction, in order to understand how to build a warm chicken coop with your own hands, you need to make drawings. They must be detailed and contain all dimensions. The drawing must be made in three projections.
As a result, you can easily figure out how to make a winter chicken coop for 20 chickens with your own hands: the drawings add clarity, allow you to calculate how much materials will be needed, and help you avoid mistakes at the stage of constructing the poultry house.
At the drawing creation stage, you need to decide on the type of roof. Best Choice is a gable roof with an attic - in this case, you can store all the necessary equipment, food, etc. there without cluttering the living space or taking up space in the chicken coop. Less practical and convenient, but still valid, are the options for a pitched roof or a flat roof.

Photos, drawings and design sketches found on the Internet will also help you build a winter chicken coop for 20 chickens with your own hands.
Calculation of the size of a chicken coop for 20 chickens
There should be at least 1 m² of space per two chickens in the house. In addition, keep in mind that some space will be taken up by drinkers, feeders and other auxiliary elements. Thus, in both the summer and winter versions of the chicken coop design for 20 chickens there should be a minimum of 15-20 m² of area.
Related article:
Advantages and disadvantages of such storages. Criteria for choosing a design, step-by-step installation with your own hands. Popular brands of cellars and their features.

The height of the chicken coop should be at least 2 m to ensure a comfortable stay in the room not only for the birds, but also for the people caring for them.
Please note that birds feel discomfort in a confined space, which can cause illness. Therefore, sometimes it makes sense to sacrifice the number of livestock in favor of more comfortable living conditions for birds.
For example, 20 birds housed in a 20 m² chicken coop will produce more eggs than 30 chickens housed in the same area.

Construction of walls for a poultry house: technologies and materials
If you are building a chicken coop from wood, you should prefer frame technology for constructing walls. You will need supporting beams, boards or plywood. Take care of wall insulation: it can be single-layer or double-layer.
Walls are also made of timber or logs. This option has a number of advantages: the finished building stores heat well, and is also strong and durable. As a result, the poultry house will retain its performance characteristics for many years.
When brick walls The principle of construction is very simple. The main points are to prepare a high-quality solution that can ensure the durability of the building, and also do not forget to leave space for windows and doors.
Ventilation in a chicken coop in winter: diagram and description
Ventilation plays an important role in the design of a chicken coop, because fresh air is very necessary for birds. It is a common misconception that there must be warm, suffocating air in the poultry house. In fact, ventilation in the chicken coop in winter is the key to the health of the chickens, and you should take care of this element before you start building the roof.

To understand how to make ventilation in a chicken coop, consider several options:
- It is best to make a couple of ventilation ducts. They should be placed at different ends of the chicken coop. Place one end of the ventilation duct at ceiling level, and the other 0.5 m lower. Provide dampers in ventilation pipes to easily influence the flow of fresh air and the temperature in the chicken coop in winter.
- The second option for making ventilation in a chicken coop with your own hands is to make special holes in the floor. In winter they are closed with plugs, in summer they use grates that do not hold back fresh air. As a result, a comfortable microclimate is always maintained in the poultry house.
Features of the interior decoration of the poultry house
No less important components for the comfort of chickens, along with insulated walls and a leak-proof roof, are the internal elements of the poultry house: drinkers, feeders, perches and nests. Birds can be released into their new home only after the chicken coop has been equipped with everything necessary.

How to make perches, nests, drinking bowls and feeders
In order to build perches, you will need a block:
- Choose a beam with a cross-section of about 30x40 mm or slightly thicker.
- Slightly round the top edges of the block.
- Choose a non-accessible place in the chicken coop.
- Secure the perches. Please note that the distance between them should not exceed 30 cm from each other.
The optimal perch length for 20 chickens is at least 6 m for all perches. The calculation is very simple - to prevent birds from crowding, each chicken should have at least 30 cm of perch. To make house cleaning easier, place waste trays directly under the roost.
Nests can be open or closed type. Covered nests are the best option, as birds feel safer in them. However, they are more difficult to construct, and it is permissible to make do with open-type nests. The size of such a nest should be at least 30x40 cm. The optimal material for constructing nests is wood: boards and plywood are best suited.

Ten nests are enough for 20 chickens. To ensure comfort for the chickens, line the bottom of the nests with sawdust or straw. It is also worth lining the floor of the entire poultry house with sawdust or hay - this way you will provide comfort for the chickens and ease and speed of cleaning for yourself.
To prevent debris from getting into bird feeders and waterers, place them some distance above the floor.
Chicken coop lighting in winter
In a summer chicken coop it is easy to do without light. However, if you plan to use the coop year-round, you will need a coop light during the winter. By running electricity and turning on the lamp from autumn to spring in the dark, you will extend the day for laying hens, which will have a beneficial effect on their activity.
This will require certain energy costs, but they will more than pay off with year-round excellent health and good egg production of chickens.
Helpful advice! Cover the lamp with a shade to avoid dust and also protect it from hay or cobwebs.

Heating a chicken coop in winter: features and options
To ensure comfortable conditions for chickens at any time of the year and in any weather conditions, it is important to take care of heating. The temperature in the chicken coop in winter (for the hens to lay eggs) should not fall below 0 - in this case, the hens feel good and continue to produce eggs.
Do-it-yourself electric chicken coop heating for 20 chickens: photo and description
If electricity is supplied to the chicken coop, there are two optimal ways to heat the room:
- fan heaters;
- infrared lamps.
When choosing a fan heater, you should give preference to programmable models. They are more expensive, but in the end they will recoup the money spent with noticeable energy savings. As a result, you will pay less for the winter than with a conventional device.

Automation is adjusted according to one of two principles:
- by time;
- by temperature.
In the case of a poultry house, you should prefer a temperature-adjustable option. It allows you to maintain the temperature that should be in the chicken coop in winter.
For example, when the temperature in the poultry house drops to 0°C, the device turns on, raises the temperature to 3°C, and then automatically turns off.
Helpful advice! You can choose the fan heater settings yourself. This heating option is convenient, practical and very effective.
Choosing an infrared lamp for heating a chicken coop
A popular decision is to buy an infrared lamp to heat the chicken coop. The principle of operation of such a lamp for heating a chicken coop is fundamentally different from conventional devices: this type of heater does not affect the air in the room, but objects falling into the zone of exposure to the rays.

The main thing is to place the infrared lamps for the chicken coop correctly. They should be placed above perches, and a few should be hung above the floor. Thus, when the chickens get cold, they gather in the area of the heaters. As a result, the overall temperature in the room may remain cold, but the birds will be warm.
However, it is worth considering that red lamps for chicken coops quickly burn out due to constant switching on and off. Therefore, try not to turn them off unnecessarily. Such a lamp can work uninterruptedly for months without requiring a shutdown. At the same time, they do not require large energy consumption, so there is no need to worry about the electricity bill.
Please note that there is a distinction between infrared lighting and lamps for heating chicken coops in winter. It is important not to confuse them if you decide to buy an infrared lamp for your chicken coop.
Please note that during operation the surface of the lamp heats up, and the design of the device is not designed for such loads. Finding ceramic sockets is difficult, and plastic ones do not hold the lamp very well.

Helpful advice! Place the IR lamp for heating the chicken coop in the wire cage. This way you will ensure fire safety without reducing the efficiency of the device. If the lamp accidentally falls out, there is no risk that the birds will get burned, the lamp will break, or the bedding will ignite.
There are also other possibilities, but they are noticeably inferior to an infrared lamp. For example, oil radiator is one of the most impractical options for heating a poultry house: it is characterized by high energy consumption with a minimum amount of heat generated.
There are highly efficient homemade heaters with an open spiral, but they have a high fire hazard. Considering that you regularly leave the device on without supervision in the chicken coop, such a heater poses an unnecessary risk.
How to heat a chicken coop in winter without electricity
If there is no electricity in the chicken house, or you want to save energy, you can find ways to heat the chicken coop in winter without electricity.

Scheme of construction of a winter chicken coop from insulated
One of them is a potbelly stove and a heating boiler. A convenient, but complex and cumbersome option is to install batteries and operate a heating boiler. The options are simpler - a potbelly stove, a wood-burning boiler or a small brick stove, which is easy to install yourself.
The main thing is to route the pipe through the chicken coop so that it provides the maximum amount of heat. An iron stove or pipe can be lined with bricks for greater efficiency. Heated brick retains heat for a long time, and if the chicken coop is well insulated, this heating is enough for 2 days of a comfortable temperature in the poultry house.
Do-it-yourself heating of a chicken coop in winter using sawdust
You can achieve a comfortable above-zero temperature without additional heating in the chicken coop using the heat released by sawdust during decomposition. However, keep in mind that this option only works if the building is well insulated:
- pour sawdust on the floor;
- the first layer should be filled in the fall, on the eve of the onset of the first cold weather;
- the layer thickness should be 10-15 cm;
- leave the layer for 1-1.5 months.

This bedding option is superior in its operational characteristics hay, because due to the good regulation of humidity by sawdust, chickens do not get sick. Moreover, birds love to rummage in the litter, and thanks to constant movement, even with infrequent walking and good nutrition, laying hens will not become excessively fat.
After 30-50 days, add a new portion of sawdust: the need to add a new layer is noticeable by the appearance of old sawdust and its smell. The thickness of the new layer should be about 10 cm. After a while, repeat the procedure. As a result, by the end of the winter season, a layer of sawdust about 50 cm thick forms in the chicken coop.
Thanks to the layer of sawdust, even in cold weather, the temperature in the poultry house does not fall below 0°C, and when burrowing into the litter, the chickens are in comfortable mode about 20°C. The birds dig holes and perch in them, the sawdust is crushed, and as a result of the reaction a large amount of heat is released.
Helpful advice! In the spring, all the sawdust mixture should be taken out to. After a short time, you will receive excellent fertilizer.

In advance, in the fall, it is worth filling the board in front of the door - then the litter, reaching its final thickness, will not spill out through the door. This will make it somewhat difficult to walk through the door, but it will eliminate the resulting draft.
Winter chicken coop: buy or build?
There are many advantages to building a chicken coop yourself: it is much cheaper than purchasing a ready-made one (from 25 thousand rubles and above), and most importantly, a home-built poultry house meets all the needs and is designed individually for your site. You can allocate an ideal place for it and even provide for the possibility of expanding the farm in the future.
However, sometimes it is better to buy a winter chicken coop for 20 chickens: not everyone has the energy and time to design, select materials and build a poultry house. In addition, this requires some experience. In this case, it is better to buy a ready-made poultry house, equipped with everything necessary, than to keep birds in conditions unsuitable for them or to build a chicken coop without having the necessary tools and skills.
The chicken coop is a real home
The winter period brings with it frosts, snowfalls and decreased daylight hours, which can greatly affect egg production. The optimal conditions for the winter maintenance of laying hens are as follows:
- Temperature allows values from + 12 to + 18 ° С. Any fluctuations in it reduce egg production. Heating is used depending on the region.
- Suitable air humidity and (60−80%) is constantly maintained due to ventilation. Drafts are not allowed.
- In order for eggs to appear regularly, you need to take into account lighting. In winter it gets dark early, so you need to add additional lighting to the chicken coop so that the total daylight hours is 14-15 hours.
- No gaps in the walls are allowed. Poultry house windows should be tightly closed.
- At placement of heating elements You need to take into account that chickens are curious creatures and can get injured or ruin the heating.
- Before placing chickens in the poultry house, it is necessary to completely disinfect the room with lime.. To obtain an aqueous solution, take 2 kg of lime and 10 liters of water.
Why do chickens need a chicken coop?
A chicken coop is an integral part of keeping birds on the site. This building serves to protect the chickens from external adverse conditions: weather conditions, other animals, people. Every bird needs a place where it can safely lay an egg. Nests are installed in the chicken coop where the chicken feels protected. The poultry house not only protects the hens from the sharp claws and teeth of cats or foxes, but also serves as a comfortable sleeping place: the chickens sleep on a perch, often huddled together.

Chickens happily roost
Main types of chicken coop construction
Determining the type of DIY winter chicken coop to build for 10 chickens or more is necessary in order to decide what materials will be needed. If chickens are kept only in the summer, then the structure will be light and uninsulated. For winter, it is necessary to include wall insulation and room heating in the plan.
The vestibule in the chicken coop will not require a large consumption of materials, but will serve as an additional shield from frost.


Chicken coop with vestibule: less heat loss
When choosing the type of building for a dacha, the space for it is taken into account. It is important for laying hens to have a run, so a yard is included in the plan. Typically, a poultry house consists of a courtyard, a vestibule, and a roosting area, which is divided into a nesting and feeding area.

How well the chickens will lay eggs directly depends on the internal structure of a comfortable chicken coop.
The buildings can be solid, made of concrete, brick, foam concrete, or lighter ones - wooden frames. The more massive the structure, the stronger the foundation needed for it. A dugout chicken coop will be inexpensive. The walls of this building are very low, the window with double frames is on the south side. By winter, such a structure is covered with earth, insulating only its upper part.
Necessary materials for building a winter chicken coop
To build a warm chicken coop with your own hands, you need materials such as foam blocks, shell rock, wood, brick, cinder blocks, and plywood. Of course, you shouldn’t immediately purchase everything mentioned; you need to choose the best one for your budget and type of construction.
The popularity of wood is due to its qualities: durability, practicality, relative cheapness and aesthetics. Foam blocks and cinder blocks increase strength, brick will also last for decades. The foundation is erected using stone, broken brick, and reinforcing mesh. A pile foundation is considered a good option.

A chicken coop made from pallets is a cheap option to build with your own hands, but short-lived
Insulating a chicken coop - choosing insulation
Do-it-yourself chicken coops for laying hens are built quickly, but for winter use they do not forget about insulation. Foam boards are best suited for insulation, but we must not forget that chickens are capable of pecking at this material. The foam should be closed from prying bird eyes. Expanded clay, coal slag, straw and mineral wool are also used as insulation.
IMPORTANT!
No amount of insulation will help if the roof is made poorly!

The roof is made of corrugated sheets, slate, and metal tiles. Moisture should not get inside the room. The inside of the roof can also be insulated with straw.
Choosing the right location for the chicken coop on the site
When making a winter chicken coop with your own hands, especially if you are building it for 50 chickens, take into account the place where the poultry house will be located. You should not build a building in a low area. Spring waters and summer puddles are not considered the most suitable place for keeping birds.
Chickens do not like noise: if you want fewer eggs, build a poultry house near outdoor activities or a road. You need to understand that egg production depends on light, so the windows face south, but do not forget about shading in the heat. The soil should also be prepared: the swampy area should be drained. Since drafts are poorly tolerated by laying hens, the place should be protected from winds.
We found out what the location of the chicken house should be before we started construction and arrangement. The photo below shows how well laying hens feel in the right place.

Calculation of the size and area of a chicken coop for 20 chickens
To make a chicken coop with your own hands, you need to know how to calculate the required room dimensions. The formula is: 2 chickens = 1 m² + water bowl, feeder, perch, nests. Therefore, the project includes at least 15-20 m². The height of the room is not lower than 180-200 cm.
ADVICE!
If the site allows, make the house larger, because a larger room will increase the number of eggs from laying hens.

Building a chicken coop with your own hands, drawings, instructions
How many birds would you need to build a chicken coop with your own hands, 10 chickens or 50, but you definitely need drawings. It is best not to be lazy and make a drawing in three projections indicating all dimensions.

The drawing provides a complete understanding of all the nuances of the future construction and helps to calculate the consumption of materials

Assembly diagram
The drawing is done either on paper by hand or in architectural computer programs. The main thing is to strictly take into account the dimensions of each element.
Choosing the type of foundation for a chicken coop
Without a foundation there can be no quality construction. For a home chicken coop you can build strip foundation. However, although this is a very reliable option, it is also the most expensive. A column foundation is inexpensive, but is inferior in reliability to a strip foundation. A pile foundation is reliable and simple, but it will not be as cheap as a columnar one. It all depends on the financial side and the desire for durability.
Walling
The walls are built based on what material is used. For a wooden barn for chickens, which you build with your own hands, you make a frame with load-bearing beams. In parallel with the construction of walls, they take care of insulation. The photo below shows several examples of wooden chicken coops.
Bricks and foam blocks are laid using a good cement mortar. According to the drawings, space is left for windows, ventilation and doors.

A chicken coop made of foam blocks is more practical
Photo of the arrangement of the chicken coop inside. Everything with your own hands
From the inside, you can lay sheets of plywood on top of the insulation or build an internal plank wall. Sometimes the walls are covered with old linoleum. It depends on the materials at hand and the wishes of the owner of the chicken coop. It is not necessary to cover the floor; it is enough to sprinkle it with a small amount of earth and straw.
We offer an educational video about setting up a chicken coop:
Making a perch for laying hens with your own hands. Nests, feeders, drawings and tips
Perches are the easiest to prepare. Drawings will only be needed if you are making a perch from wooden slats. In the drawing, markings of the future structure with the indicated dimensions are made. All that remains is to transfer everything from paper to material. If you make a perch from thick tree branches, you will need to take two bars with a cross-section of about 40 mm and smooth the upper parts. Branches are nailed onto the bars.
Basic Rules:
- the distance between the rows of the perch is 25-30 cm;
- the structure itself must be in a non-passable place;
- for 20 chickens there is 6 m of the length of all perches;
- One hen has 30 cm of space on the pole;
- litter trays are placed directly under the perch.

Drawing of a perch for laying hens

The perch is an essential element of the poultry house
Nests can be made open or closed. If this doesn’t matter to you personally, then the chicken will choose the closed option because of the feeling of security. Nests are made from wood, plastic containers or baskets. Regular size nests for laying hens - 30 by 40 cm, 10 nests are enough for 20 birds. The bottom is lined with straw, which is changed once a week.
Different options for chicken nests.
Feeders are made of plastic, wood, iron. But whatever material you choose, the feeder should be some distance from the floor to avoid contamination of the food.
Ventilation device in a chicken coop in winter
Ventilation is necessary to allow air to circulate freely in the room as a concern for the health of the birds.

Ventilation diagram in the chicken coop
If the ventilation holes are equipped with valves, then you can independently control the air flow, thereby regulating the temperature inside the house. Ventilation holes are located either at the top of the coop or in its floor.
Lighting device
If the chicken coop is used year-round, then it is necessary to take care of lighting during the cold season. Additional illumination should be carried out from the end of November to the beginning of April. All energy costs are recouped by the number of eggs.
ADVICE!
The lamps can be covered with a shade - it’s beautiful, and less dust gets inside.


Light inside the house is necessary in winter
How to heat a chicken coop in winter
We have covered the issue of maintaining heat using insulation, and now we are explaining the importance of heating a winter poultry house. Chickens- laying hens very sensitive to temperature conditions, since in case of heat or cold the number of eggs is reduced. Even if today you allowed the temperature to drop and tomorrow you solved the problem, the chicken will not immediately begin to lay eggs at the same level. Therefore, the issue of winter heating must be studied carefully.
How to insulate a chicken coop for the winter using electricity
It is not difficult to triple the heating of a bird house using electricity. To do this, you can install a fan heater or an infrared lamp.
Thermal fans are selected with the possibility of programming. The cost of such an installation will be recouped by the high egg production of pets and significant energy savings. Automatic adjustment works either by time or by temperature. The latter mode is preferable because the optimal room temperature will always be maintained.
An infrared lamp heats a room by exposing objects in its operating area to its rays. Such lamps are suspended above the perch and floor. Interestingly, the room will be cold, but the laying hens will be warm. Infrared heating is short-lived due to frequent lamp switching. It's better not to turn them off at all.

Methods of electric heating of a poultry house

Example of heating arrangement
How to heat a chicken coop in winter without electricity
Anyone who finds heating with electricity unsuitable will be interested in learning about methods of heating without electricity:
- Potbelly stove, heating boiler: although this is convenient, it is, however, quite massive. It is not difficult to install a boiler or stove, but it is better to take this into account at the stage of drawing the chicken coop. A heating pipe is laid around the perimeter, and the stove is lined with brick. This measure will help retain heat longer after the boiler is turned off.
- Sawdust. This wood product generates some heat as it decomposes. A 10-15 cm layer of sawdust is poured onto the floor in two stages: in the fall and before the first severe cold weather. The humidity with sawdust will be optimal. Chickens always dig into such flooring with interest. The layer is added every 1.5 months, the total thickness of the embankment by the beginning of spring is about half a meter. Chicken droppings, when mixed with sawdust, do not emit any odor and serve as an additional catalyst for decomposition.

Heating a chicken coop without electricity

Heating the chicken coop
Where can you buy a ready-made winter chicken coop for 20 chickens - prices, stores
Despite the fact that a home-made poultry house will be cheaper and will meet the owner’s needs, you can buy a ready-made version. As a result, both time and effort are saved. In the absence of construction experience, it is problematic to immediately build a poultry house, and it is not always clear the first time how to properly equip a chicken coop for laying hens inside with your own hands.
You can make a mini-chicken coop for 10 chickens with your own hands or purchase it in well-known and reputable stores via the Internet. If there are stores specializing in outbuildings in the city, this will be even easier. The cost of a winter chicken coop for 10-15 chickens, depending on the materials, is high: on average 120,000-165,000 rubles. The project and drawing will cost less: 20-25 thousand rubles.
It is no secret to many that the comfort of keeping affects the health of chickens, especially in winter. Comfort in a chicken coop is created by proper lighting, ventilation, sufficient space for walking, convenient location of nests, feeders and drinkers. All this together allows birds to lay eggs in larger quantities. Therefore, during the cold period it is necessary to build a warm room for chickens, the independent construction of which will not be difficult.
Is it really necessary to build a warm chicken coop?
From the end of autumn to the first month of spring, unfavorable conditions for chickens begin, which creates difficulties for poultry owners.
If in spring and summer the chicken is active: it moves, digs in the ground, bathes in water, then in winter, due to many factors, its activity decreases.
The summer chicken coop does not require additional insulation and lighting
When temperatures drop and daylight hours shorten, birds' ability to lay eggs decreases or even stops completely. That’s why it’s so important to make a chicken coop that will provide:
- temperature level of at least 12 degrees and low humidity;
- artificial lighting - to increase daylight hours;
- the presence of low perches and egg-laying sites;
- the internal area of the room is 1 m2 for 1–7 individuals (depending on the breed).
Meeting these requirements will allow poultry to comfortably overwinter without losing weight and laying eggs daily.
A properly built chicken coop can significantly increase the egg production of birds.
Options for warm chicken coops for the winter
A standard chicken coop is a utility room, next to which there is a place for birds to walk.
The site has a fence made of chain-link mesh with small cells that protects the chickens from predators. If the farm has no more than one and a half dozen birds, then this is an ideal option. It is possible to arrange a chicken coop with a greater level of comfort, with external and internal walking areas, but then it will take up a large area. This option is not suitable for small plots of land.
The winter chicken coop is built on a foundation on which a thick wooden floor is laid, and the walking area is covered with a roof.
Considering the number of individuals, the following types of chicken coops are used:
- From 10 to 15 individuals - a mini-chicken coop up to 10 m2 with a walking area of 4 m2. Such an area will ensure free movement of both adult birds and young animals in the case of breeding chicks. It is also required to be equipped with a window and a ventilation grill.
The mini-chicken coop is equipped with a covered run and a box for collecting eggs.
- From 20 to 30 individuals - a full-fledged room up to 20 m2, a height of 1.8 m and a walking area of 6 m2. These dimensions allow you to build a perch in several tiers and install up to 7 nests. If the area personal plot enough, it is better to build a chicken coop with a vestibule: it will provide the desired temperature in the main room in winter.
It is advisable to build a winter chicken coop with a vestibule to protect chickens from drafts
- More than 50 individuals - a room of about 40 2, up to 2 meters high and a walking area of 12 m 2. Such a chicken coop requires additional thermal insulation, ventilation and installation of heating equipment. It is better to place the perches opposite the windows, and the nests (up to 10 pieces) in the back of the room.
Large chicken coops are built on high stilts, and the walking area is made under the premises
If the area of the personal plot allows, then the chicken coop will be equipped in a completely enclosed room, inside of which there will be a walking area, which will prevent the birds from hypothermia and ensure their free movement even at low air temperatures in winter.
The winter poultry house can be completely enclosed, providing the chickens with a warm place to roam
When you need a chicken coop at minimal cost, there is an option to build it like a dugout. The height of the walls does not exceed 0.5 m, and for insulation they are covered with earth. The roof is also insulated. The southern wall is equipped with windows with multi-layer glass. And the fallen snow additionally provides thermal insulation.
Another low-cost option is a poultry house made according to frame technology: made of small cross-section timber, sheathed with plywood sheets, OSB, planed boards. Thermal insulation material is laid between them; its thickness depends on the climate. To protect against rodents, the insulation is covered with a metal mesh. This increases costs, but subsequently removing rodents is even more expensive. During construction, it is better to follow the rules for constructing frame houses.
In winter, it is mandatory to regulate the humidity level in the chicken coop, which is ensured by installing ventilation.
Video: fully autonomous warm poultry house on stilts (with bottom rung)
Material selection
The best option for a warm poultry house is wood. At frame construction the timber is covered with dense rows of OSB sheets, hiding the cracks. When construction is carried out using brick or cinder block, good thermal insulation is necessary, since brick has high level thermal conductivity. What material will be used for the chicken coop depends on preferences and financial capabilities.
An insufficiently insulated roof will become a source of heat loss and increased humidity in the room, and the cost of heating the chicken coop will increase. For insulation, it is recommended to line the inside with foam plastic or felt. A permanent roof is made over the winter walking area - a continuation of the roof of the chicken coop itself.
For the winter period, it is preferable to have a chicken coop with a gable roof so that snow does not accumulate on it.
Wood is often used in the construction of poultry house walls due to its environmental friendliness and low thermal conductivity. Even if the frame is erected from metal, it is better to use plank cladding.
The metal frame is always sheathed with wood so that the desired temperature balance is maintained indoors in winter.
To facilitate constant cleaning inside the chicken coop, its floor is made by pouring concrete. The service life of such a floor is long, but it requires good thermal insulation so that the birds do not freeze. In winter, the wooden floor is additionally treated with special moisture-resistant compounds, and the top is covered with a thick layer of straw and hay bedding.
The floor in the chicken coop can be made of concrete, but be sure to cover it with a thick layer of straw
To give the entire structure of the chicken coop rigidity and strength, to avoid distortions of the walls and the appearance of gaps, as well as to raise the walls themselves above the ground, a light strip foundation is used. This also helps keep you warm in winter.
The following materials are used to build a main wall:
- Shell rock is a porous limestone of natural origin with a low level of thermal conductivity. Most suitable for building a chicken coop for 25–30 birds. The standard size of the block is 18x18x38 cm. It is laid using the technology of laying foam blocks or cinder blocks.
Walls made of shell rock are erected quickly and retain heat well
- Foam concrete is a common material that is harmless to health. There are no restrictions on the size of the building. The optimal material for wall construction is D400 foam concrete, the block size of which is 20x30x60 centimeters. The thickness of the masonry is determined by the climate of the area.
You can build a chicken coop from foam concrete very quickly, following masonry technology
- Brick is a building material with a low level of thermal conductivity and is durable. It is optimal to build large chicken coops from brick. The brick can be either solid or hollow.
The brick walls of the chicken coop can be lined with boards from the inside
Taking into account the service life of the chicken coop, the material from which the walls will be built is determined. For a novice poultry farmer, wood and plywood are the best choices. Over time, you can dismantle the structure or, conversely, add additional space. But if you are breeding a large number of poultry and building a chicken coop for a long time, then it is better to choose brick or foam concrete. You will also definitely need thermal insulation - foam sheets, mineral wool rolls or other modern material.
For the purpose of thermal insulation of the structure, natural insulating materials are also used: the walls are insulated with straw and hay, and the floor and ceiling are insulated with coarse expanded clay. There is only one negative side to the use of such insulation in comparison with modern materials - these insulation have high thermal conductivity, which requires their use in large quantities. And this is difficult when building a poultry house.
Detailed characteristics of modern building materials for thermal insulation:
- Polystyrene foam is a material with good insulation properties. Has a cellular structure. Thermal conductivity is only 0.047 W/mK, which is lower than that of foam concrete, brick and wool. Sold in sheets of different sizes. Easy to attach. Main disadvantage- susceptible to damage by rodents. To solve this problem, the foam is sheathed with sheets of plywood or OSB.
Polystyrene foam has good thermal insulation characteristics and is often used as wall insulation
- Mineral wool - has heat and sound insulation properties. Has a fibrous structure. Thermal conductivity is slightly greater than that of polystyrene foam, but it is not susceptible to damage by rodents. It is recommended to apply together with a moisture-proof and windproof film.
Mineral wool is resistant to damage by rodents, but absorbs moisture from the environment
- Extruded polystyrene foam is a material with a closed cellular structure, produced by polystyrene foaming. It has a long service life and excellent insulating characteristics. Its properties surpass almost all existing thermal insulation materials.
Expanded polystyrene has a long service life, but with long-term use indoors causes harm to health through the respiratory system
- Stizol is a foamed polyethylene. It has high thermal insulation and sound insulation properties, is not susceptible to moisture, and is durable. Produced on the basis of metallized film, foil or non-woven fabric. The optimal thickness for use is about 1 mm.
Stizol is used in construction as sheet insulation.
When choosing insulation, it is important to consider how much area it will cover. If the structure is small, use stizol or any polyethylene foam material. For structures accommodating 50 or more birds, it is advisable to combine materials: if the wall is insulated with expanded polystyrene, then the floors are insulated with expanded clay. And when are they required? minimum costs During construction, polystyrene foam and mineral wool are used.
When creating a project to build a chicken coop, you need to determine in what place the insulation will be installed: if it is planned as interior decoration, then when making calculations you need to increase the overall dimensions of the structure by the thickness of the material being laid.
Video: warm chicken coop with your own hands in 4 days
Preparatory work
The width of the foundation being laid should slightly exceed the thickness of the future wall. In this case, the wall is installed exactly in the center of the foundation. A concrete foundation will additionally provide thermal insulation and provide protection from:
- exposure to moisture on wooden structural elements, increasing the service life of the building;
- access to the chicken coop for predators and rodents, which can easily dig a hole underground.
There are other possible ways to protect against uninvited predators getting inside:
- make a foundation up to 30 cm high;
- place the structure on concrete pillars, raising the floor to a height of 25 cm from the ground;
- cover the walls with metal sheets, burying one edge of the sheet to a depth of 35 cm.
On the schematic image of the chicken coop you need to indicate the location of all parts of the building and internal equipment
During construction, it is imperative to install several windows on the south side of the chicken coop for natural light. But they should not be a source of draft.
Since in winter, chickens try to be as close to each other as possible, their placement is organized based on the rule: 1 m2 - for 4–7 individuals. If a meat breed is grown: 1 m 2 - for 3 individuals. For laying hens: 2.5 m 2 - for 10 individuals. The height of the room in this case is not more than 1.8 m.
The size of the chicken coop depends on the number of birds
For self-building a warm chicken coop, you will need the following:
- poultry house project with exact drawings and dimensions;
- building materials for the installation of formwork and pouring the foundation;
- locksmith and construction tools;
- building materials for the construction of a birdhouse.
Video: tricks in building and arranging a winter chicken coop
Self-made chicken coop: step by step instructions
At the very beginning of construction, markings are made for the foundation (base) of the chicken coop using wooden pegs and a rope stretched between them. The foundation of the fencing of the walking area is carried out at the same time as the foundation of the chicken coop.
Base
Sequence of work:
- A trench is dug for the foundation. The structure of the chicken coop does not have much mass, so the foundation is made of strip or columnar to a depth of no more than 45 cm. However, the use of a columnar foundation will lead to high costs for thermal insulation of floors.
The foundation for a chicken coop can be strip or columnar.
- At the bottom of the trench, rubble is poured and compacted first, and then sand, creating a so-called pillow (the thickness of the total layer should not exceed 5–10 cm).
- The formwork is being installed for pouring the foundation. The height of the formwork is equal to the height of the foundation. The upper edge of the formwork serves to level the poured concrete.
It is necessary to make the foundation according to all the rules so that it does not warp and crack after drying
- Reinforcement is laid inside the formwork and tied at the corners with steel wire.
- Concrete is poured into the formwork, leveled over the surface until cement laitance is formed and covered with a film. During the week, it must be watered daily with water to prevent cracks from appearing.
After 20–28 days, when the foundation has gained the required strength, you can begin to build the chicken coop structure. A layer of waterproofing is laid on top of the foundation to protect the structure from moisture.
Floor
From the place above which the floor of the chicken coop will be located, the top layer of soil is removed, then sand is poured there and compacted, and a layer of expanded clay is laid as insulation. A mesh is rolled out over the expanded clay and a screed is made using cement mortar. The thickness of the floor screed should be at least 2 cm. For several days, while the screed hardens, you need to water it with water. It is recommended to make the screed with a slope of several degrees, which will ensure free flow of water when cleaning inside the chicken coop.
For comfortable living of chickens, the floors in the chicken coop are covered with boards.
The arrangement of the walking area is carried out in different ways: either it is poured with concrete or covered with boards.
Sawdust, straw, and hay are used as bedding. Usually, during the cold period, the litter does not change, and each time a new dry layer is poured on top of it. This is how natural floor heating is obtained due to warm manure mixed with dry bedding.
Another option for arranging a walking area is to preserve the natural ground, which will allow the bird to search for insects, seeds and stones in the future.
You need to think in advance what kind of floor there will be in the bird walking area.
Frame
The sequence of work is as follows:

Roof
A sheathing made of unedged boards or sheets of plywood is nailed to the rafters. A special vapor barrier film or polyethylene is laid and secured along the sheathing. The film is spread in overlapping layers, and the seams are sealed with adhesive tape. Thermal insulation material (mineral wool board) is laid on it, and covered with waterproofing on top.
Most often, the roof of a chicken coop is made pitched due to the simplicity of its construction.
Next, through the waterproofing, transverse strips are nailed to the rafters with the required spacing, which depends on the type and size of the roofing material. If applicable soft roof, then plywood or OSB sheets must be laid on top of the planks, along which roofing material spreads. If slate is used, then wood cladding is not needed.
After completion of the roofing work, the frame and internal wall cladding are insulated.
Insulation of walls and floors
The work is carried out in the following sequence:

Polyurethane foam is also sometimes used as a thermal insulation material. But for its installation, specialists with equipment are involved, with the help of which this insulation is applied to the surface of the walls. The use of polyurethane foam is expensive, but the application process is not labor-intensive and provides maximum protection from the cold.
You can sheathe the outside of a winter chicken coop edged board or other façade material other than plastic, as it does not tolerate severe frosts well
A concrete floor, even with an expanded clay cushion, does not ensure heat retention inside the chicken coop in winter. For this purpose, the floors are additionally insulated.
You can lay infrared film on the floor and use a cement mortar screed on it. This heating system operates both periodically and regularly, ensuring the desired temperature in the chicken coop. Or you can use a less expensive option: cover the floor with wooden panels. These shields are boards tightly fitted to each other, attached to the joists. In winter, plant litter up to 15 cm thick is laid on them to increase floor insulation, and in summer they are removed from the chicken coop, cleaned and disinfected.
The arrangement of the chicken coop should be such that the birds are comfortable both in winter and in summer.
Sometimes electric heating devices are placed on the walls inside the chicken coop, and the installation sites are protected with heat-resistant material. But more often infrared lamps are suspended from the ceiling.
Lighting
The design of the poultry house must have windows. Despite the fact that they are a source of heat loss, their presence cannot be abandoned, since the supply of sunlight is required to maintain the health of the birds. Therefore, triple glazing is built into the windows, and a mesh is installed on the glass for the safety of birds.
In winter, it is imperative to ensure that the daylight hours are at least 14 hours. This is done with the help of artificial lighting. And when installing an automatic on/off system, you get rid of the unnecessary hassle of maintenance, although you will spend additional money on it.
Lighting devices can serve as heating, but must be safe for birds
At first, individual individuals will roost for the night directly on the floor. This is not dangerous if the floor is insulated and covered with shavings or hay. Over time, the birds will get used to and with the onset of darkness they will begin to move to the perch. But you can do it differently: wake the birds early in the morning, turning on the lighting for this, and allow them to fall asleep at sunset.
Ventilation
In a warm chicken coop, a ventilation device is required to vent excess moisture. To do this, install a section in the ceiling plastic pipeline, which rises 1 meter above the roof. So ventilation will be carried out naturally due to the existing pressure drop. If the air flow is weak, then additionally at the floor level (away from the nests) another channel is made, which must be closed with a grate. And the damper installed on it will allow you to regulate the ventilation speed. You can also install an electric fan in the wall.
The ideal humidity level is 65%. A decrease or increase in this indicator adversely affects the activity and health of the bird. To increase humidity, it is enough to install a container with water, and to reduce it, install a hood and hang an infrared lamp: it dries surfaces well.
The chicken coop must be equipped with ventilation so that the birds do not get cold from rising humidity.
Making perches
The perch is made of timber with a cross-section of approximately 4x4 cm or 6x4 cm.
All corners are ground into a rounded shape, and the surface is cleaned to a smooth state so that the birds do not injure their paws. You can also use a tree branch as a perch.
If several perches are installed, then the distance between adjacent planks should be about 30 cm in width and 20 cm in height. For convenience, a small ladder is attached to the lower perch.
Perches are mounted either between two walls, or in the form of a ladder installed across the room
To install perches, you must:
- Determine the place and height of the perch installation - attach one or more planks near the window at a height of 0.5–0.7 m from the floor level.
- Measure the width of the chicken coop and cut off the required amount of timber.
- On opposite walls, nail pieces of board 0.5 m each with grooves cut out for perches.
- Place perches in the grooves and secure with self-tapping screws.
Nests for laying eggs are made in the form of a half-open box, assembled from timber, boards or plywood. And sometimes ready-made plastic boxes are used as nests. If the nests rise to a certain height, then they are mounted on supports.
A ladder is provided to the nests for ease of movement of birds.
Video: do-it-yourself warm chicken coop
Tips for setting up a chicken coop in cellars or basements
There are some features of arranging a chicken coop in the basement:
- Use of bedding - sawdust or hay is used. Bedding from sawdust is replaced once every 6–7 days, from hay - once every 3–4 days.
- Lighting - an electric lamp with LEDs with a power of more than 5 W is mounted. Using a lamp, the required length of daylight hours is ensured: the longer it is, the more chickens will lay eggs.
- Insulation - use cotton wool or any roll insulation with a thickness of at least 5 cm. The use of a waterproofing film is mandatory.
- Ventilation - intake and exhaust ducts are installed. Direct ventilation of the premises is carried out periodically.
- Internal arrangement - the nests are made of timber covered with plywood. One nest is used for several chickens and is approximately 40x40 cm. The perches are attached at a height of at least 50 centimeters. It is allowed to connect the perch and nest by placing a board between them.
There are certain rules for arranging a winter chicken coop that must be followed.
Care after winter: how to treat walls
Sanitation of the poultry house is carried out annually with the onset of warm weather. This prevents the spread of infectious diseases among chickens.
During disinfection the following is carried out:
- Cleaning - all surfaces of walls, ceiling, floor, perches and nests are cleaned of dirt with a stiff brush and broom, and then washed with a solution of soda ash in hot water.
- Surface treatment - special products are used (a two percent solution of caustic soda or a four percent xylonaft emulsion). When preparing solutions, you should strictly adhere to the recipe and be sure to use personal protective equipment.
After processing, allow the chicken coop to dry completely for 5-6 hours, carefully ventilating the room.
There is always an opportunity to work on decorating the chicken coop
The construction of a chicken coop is a simple task and can be completely solved independently, without involving the services of third-party specialists. It is only necessary to study this manual well, as well as read the advice of other people involved in poultry breeding.
Many people purchasing a private house, are thinking about their own farming. For both beginners and experienced farmers, chickens are the first thing that comes to mind. Caring for this bird is available even to a younger student, and the profit is very impressive: their own eggs and meat. In a private household, it is most cost-effective to keep from one to two dozen laying hens. Let's take a closer look at how to equip a chicken coop for 20 laying hens on your own.
First of all, you should clearly determine the size of the chicken coop for 20 chickens. This will depend on how much range the hens have. If there is no space for an enclosure at all or if at all small area, then you can house no more than 3 chickens per square meter if kept on the floor. If it is planned to build a chicken coop with a paddock, then five or six of the chickens will be happy to live on a square meter.
The area of the chicken coop depends on the availability and size of the run.
Important! Do not build too large a room - if few birds live there, they will freeze.
But the size of the walking area is limited only by the capabilities of the owner. Chickens will be happy to explore both a small pen and a large area. It is convenient to enclose the aviary with a net, digging it 30-40 into the ground so that predators cannot dig holes. The site itself can be sown with grass or covered with sand.
We build a chicken coop ourselves
In any case, self-construction will be cheaper than buying a ready-made product. But, if you don’t have the time and opportunity to build it yourself, you can purchase an already made chicken coop with a run or order it according to your own drawings.
The standard set of tools that you will need to build a chicken coop does not require any unusual things.
 During construction you will need various tools.
 These are all those devices that can be found in almost every private home:
- hammers;
- nails, screws;
- screwdriver;
- saw;
- shovels;
- roulette;
- axe;
- plane.
These are the basic tools, but during the construction process something else may be needed due to available materials and changes in the project.
What materials will be needed
A chicken coop is a budget design, so what is available is used for construction:
- boards;
- plywood;
- bars;
- old window frames;
- old wooden door, in which you can cut a hole;
- any insulation;
- cement;
- crushed stone;
- roofing material for roof;
- ventilation pipes.
Most of these materials can be found on the site - boards, windows and doors are often left after the destruction of old buildings. They are perfect for setting up a chicken coop.
Construction of even such a small space as a chicken coop requires leisurely step by step action:
 First of all, you should draw a plan for the chicken coop.
 - The first thing you need to grab is not a hammer at all, but a pencil. Draw what the future chicken coop will be like. This will allow you to understand how best to install it and what additional materials to purchase.
- After the picture we move on to the drawings. Make a general plan - for 20 chickens you will need a building of 4-8 square meters. Thus, the dimensions of the house can be 2 m by 3 m and a height of 1.8 cm. These are approximate dimensions - you should adhere to the recommended planting norm and change the drawing in accordance with your site
- Place the door and windows on the drawing, do not forget about the place for ventilation pipes.
- The door should have a small threshold - this way water will never get into the chicken coop.
Foundation
The site for construction should be on a hill, this will protect the poultry house from dampness. The chicken coop does not need a foundation as such.
- Holes are dug in the corners of the proposed chicken coop, up to 50 cm deep and the width of a shovel.
- Bars 3-5 cm wide are installed in the pits.
- The bars and holes are filled with crushed stone.
- Next, cement is prepared and poured to ground level, completely strengthening the bars.
- After a day, you can start installing the walls - the cement will already dry.
Important! If the chicken coop is installed only for the summer, a wooden box placed on an earthen floor will be sufficient.
We equip the walls
After organizing the foundation, it is time to install the walls.
The following instructions will help with their equipment:
- The first priority is the organization of a crown made of timber.
- The number of perpendicular bars will be determined by the dimensions finishing materials– if the sheets are narrow, then additional beams will be needed. Everything is secured with self-tapping screws.
- Now the outside and inside of the chicken coop is covered with chipboard, fiberboard, plywood, and boards.
- Insulation, for example, mineral wool, is placed between the layers.
 The photo shows one of the options for drawings of a chicken coop for 20 chickens.
 Roof features
Any roofing material can be selected for the roof: slate, roofing felt or ondulin. It all depends on the capabilities, and based on this, specific techniques will differ. Let's clarify the basics of roof construction. It can be single or double sloped.
The first option will be a little simpler and cheaper, but the second one will be warmer and more aesthetically pleasing:
- The rafters are installed on top of the walls.
- The frame is nailed onto them.
- Insulation is laid on the frame.
- Now – the existing roofing material.
Important! When building walls and roofs, do not forget to install ventilation pipes.
The floor in the chicken coop can be made in three options:
- concrete;
- boards;
- Earth.
A concrete floor will prevent predators from entering the coop, but it is a fairly expensive design. In addition, concrete is very cold even in warm weather. The dirt floor is very cheap, warm when using deep litter, but easy to get into the coop.
A wooden floor is warm, predators cannot penetrate through it, and it is cheaper than concrete. Therefore, let's consider laying a wooden floor.
 It is easier and cheaper to make a wooden floor in the chicken coop.
 But, depending on their needs and capabilities, everyone can choose any other suitable coating.
Here step-by-step instruction making a wooden floor:
- You will need boards as long as one side of the chicken coop.
- It’s easier to choose any inexpensive material. After all, the goal of a chicken coop is to provide yourself and your loved ones with eggs at minimal cost.
- To prevent the wood from rotting quickly, logs made of beams are laid on the floor. Air circulation underneath will prevent the boards from becoming damp.
- Additionally, the sex tree is treated with any antiseptic, for example, Senezh.
- A frame of beams is laid on the floor.
- Lay boards on it, fitting them to each other and leaving no gaps. If the boards do not meet, the edges should be leveled with a plane.
- The finished floor can be treated with drying oil, so it will last even longer.
The roost is the most important place in the chicken coop. The bird will spend the most time on it.
 Each hen should have 25-30 cm of perch.
 They sleep and rest on it:
- For each laying hen, 25 cm of timber - if there are 20 hens, then you will need perches with a total length of at least 5 meters.
- Perches are installed either with a ladder or horizontally. You cannot install them on top of each other - the chickens will dirty the lower ones.
- Think about where in the chicken coop it will be easiest for you to clean - after all, it is under the perches that all the droppings accumulate.
- For manufacturing, you can use the same beam, 3-5 cm wide. All edges of the planes are rounded for the convenience and safety of the bird.
Internal arrangement of nests
It is impossible to imagine a chicken coop without a nest, because laying hens are bred to produce eggs. The nest can be budget-friendly - an old basin covered with straw. But, if the chicken coop is being built from scratch, then it is better to arrange neat nests in the form of two-story shelves or in the form of drawers protruding outward.
- Shelves inside the chicken coop are built quite simply - select a place for future nests, sketch out a drawing based on the dimensions of one nest 30x40x50 cm.
- For 4 laying hens you need at least one nest. This means that for 20 laying hens you will need at least 5 nesting boxes.
- The nest must have a high threshold, otherwise the chicken, when leaving, will touch the egg and roll it out.
- Nest boxes can be installed above perches - then there is no need to approach them.
- If the nest is installed separately from the perches, it is made at a height of 40-50 cm. If higher, then be sure to make poles in front for a convenient approach.
- The chicken coop definitely needs light to create long daylight hours in the winter. Lamps should be turned away from the nests - chickens like to lay eggs in a dark, quiet place.
- The feeder and water are installed separately, in an accessible place. The feeder should have high sides to prevent chickens from spilling food.
- A drinking bowl with water can be regular, bell-type, or can be carried out nipple drinker- this way there will be less dirt inside the chicken coop.
 Nests must be installed in the chicken coop where the chicken will lay eggs.
 How much does it cost to build a chicken coop for 20 chickens?
The cost of a frame chicken coop with insulation will consist of the price for:
- beam;
- boards or plywood;
- insulation;
- nails, screws;
- a small amount of concrete and crushed stone.
- roofing material.
Doors and window frames are most often used old ones - there is no need to install a new expensive door to the chicken coop. So it is quite possible to fit into a small budget so that the eggs in the end are profitable and not “golden”.
We invite you to watch a video review from a farmer, where he shows his winter chicken coop with a run for 20 chickens.