Recently it has increased, which means the workload has also increased. Today we’ll talk about how electrical wiring is done in an apartment or private house, and about the possibility of doing it yourself.
All work related to the laying, wiring or switching of electrical cables and protective automation must be carried out in strict accordance with the rules of electrical installations (PUE) and carried out in compliance with safety standards. Before starting such work, you should prepare everything necessary and arrange it so that it is in direct access.
Important! When installing sockets and switches, you must observe the height of their placement from the floor and the switching rules specified in the PUE. It makes sense to carefully study this document in order to avoid subsequent alterations.

How wiring is done in an apartment: basic rules for carrying out work
In order for such a task to be completed efficiently, you should draw up an approximate wiring diagram in the apartment, indicating the location of electrical points, their power consumption, and their connection lines. It is during such work that the load is distributed evenly among groups, each of which will be protected by its own separate circuit breaker. Household electrical appliances such as and should be separated into separate lines. Such devices require additional installation of an RCD or residual current circuit breaker.

Methods for connecting wires in junction boxes
Switching electrical wiring in an apartment can be done in three main ways:
- Conventional twisting is a fairly simple, but not always convenient method, the production of which can lead to heating of the connection if the traction is weak.
- Soldered twisting is a rather labor-intensive and time-consuming method, but the contact is tight and protected from heat.
- Application. Previously, screw clamps were used for these purposes, requiring additional time for installation. Today, WAGO contactors are becoming more and more common, which allow you to complete electrical work as quickly as possible.

Related article:
: advantages and disadvantages, requirements, varieties, subtleties of choice, review of manufacturers, installation technologies How to connect copper and aluminum wires - read our publication.
Types of cable distribution throughout the apartment and what the choice depends on
Electrical wiring in an apartment can be hidden or open (external). Each person decides which method to use, but it should be noted that hidden electrical wiring more reliable. This is applicable in buildings made of, or. As for panel structures that do not involve gating of walls, open routing of wires is more often used in them. It is worth noting that in this case it is mandatory to use, which, in addition to its aesthetic function, also has a practical one: it prevents the wire from burning out in the event of an overload or short circuit.
Drawing up an electrical wiring diagram for an apartment
Having decided where and what equipment will be located, it is necessary to divide all the sockets into separate groups, which will be powered by separate lines. Eg:
- Kitchen socket group.
- Socket in the kitchen, connected through a separate RCD.
- Living room and hallway.
- Bedroom and bathroom.
But lines are indicated on a separate sheet. Here you can divide groups into each room, but this will lead to an increase in the number of machines in. You can make a separate kitchen/bedroom, bathroom/living room and hallway.

Helpful advice! The hallway should always be switched to a separate lighting group. When repairing the electrical wiring in the apartment, it will be possible to turn off the necessary room, while the light from the hallway will enter it, because this room is adjacent to the others.
Calculation of cable cross-sections during electrical wiring in an apartment
This is one of the most important tasks when installing new wiring in an apartment, the correct solution of which will ensure the security of the entire home network. However, it should be understood that at the same time it is necessary to resolve the issue of ratings of protective automation. Calculations are made as follows. Looking at the drawn diagram, we summarize the power consumption of all household appliances that will be powered from each specific line. Next, the resulting value must be divided by the network voltage of 220 V. The final indicator will be the current consumption, measured in Amperes. This data will be useful for choosing protective automation. Well, the appropriate wire cross-section is selected according to the table presented below.

Schematic diagrams of electrical wiring in an apartment: examples of ready-made solutions
If it is quite difficult for a home handyman to understand exactly how cable laying diagrams in an apartment are drawn up, we suggest that you familiarize yourself with ready-made solutions. Perhaps using their example it will be easier to understand this issue. Approximate wiring diagrams for an apartment:
Drawing up electrical wiring diagrams in private homes: nuances of the work
If a voltage of 220 V is supplied to a private house, then there will be no difference in the circuits with apartment ones. The only exceptions are. And then, only the wiring in the distribution input cabinet will be different. Otherwise, if it is not in the house and (or) requires a voltage of 380 V, everything will be the same.
Good to know! It should be understood that if you have an electric water heating boiler, regardless of the voltage required for it, it is necessary to provide a separate line with the installation of a residual current device or a residual current circuit breaker on it.
Number of incoming phases and their distribution
Provided that a four-core cable (380 V) comes from the pole to the distribution board, you should understand how to correctly divide it into groups. Almost every home craftsman who has encountered electrical installation knows that when using zero and one of the three phases of a cable with a voltage of 380 V, 220 V is obtained. The main task of this stage of work is the uniform distribution of phase wires along the lines so as to avoid distortion and ensure network performance is at the proper level. There is an old saying - don't put all your eggs in one basket. It applies here too. If the house is divided into lines, there is no need to switch them into one phase. It's better to distribute. The same applies to the lines of the power group.
Examples of diagrams for performing electrical installation work
Just like in an apartment, do-it-yourself wiring from the panel is not a very complicated process, which only requires knowledge of some rules and strict adherence to the instructions. We invite you to familiarize yourself with ready-made electrical wiring diagrams in a private home. Examples of electrical installation diagrams for private houses:


Programs that help you create a wiring diagram for your apartment
On the Internet you can find many programs that will help you design your home electrical network. Among them there are both free ones and those for which you will have to pay some money. Among the most famous programs that do not require financial investments are:
- QElectroTech.
- Visio.
- NanoCAD.
- Compass-Electric.
- Eagle (Easily Applicable Graphical Layout Editor).
Similar programs can be listed for a long time. Free software is quite suitable for drawing up surface electrical wiring in a panel apartment or private house, but the limited functionality will not allow you to draw more complex communications. For such purposes, you should use paid programs. According to users, the best in this area is sPlan.

Installation of wiring in an apartment or private house: stages of work and step-by-step instructions
Any work, especially electrical installation, must be carried out in strict compliance with a certain algorithm. Everything must be done step by step, and not rush to perform any actions without completing the previous ones. Having made a diagram of the electrical wiring in the house with your own hands, we do the following step by step:
- We calculate the cable cross-section.
- We carry out marking and gating.
- We lay the cable in channels and perform switching in distribution boxes.
- We make connections in the distribution board.

Let's look at these actions in more detail.
What cables to use for wiring in an apartment or private house
Information on the choice of section has already been provided in our article, and therefore we will not consider the issue again. As for the number of cores, for single-phase systems without a two-core cable is used, and if without, then a three-core cable. For three-phase without a circuit - 4 cores, and with five-core products are used.
Marking walls according to the electrical wiring diagram in the apartment
Before wiring the apartment, you should correctly mark the cable routes and the location of power points. Having before your eyes, it will not be difficult to do this. To speed up and simplify the process, it is better to use a marker cord for marking routes. Although, if you have a laser level with a tripod at hand, you can use that.

Features of installing hidden and open wiring in the house with your own hands
Along the marked routes, it is necessary to secure it using cable ducts of the appropriate size for the wire or make grooves for laying the wires. At intersections (branches at) junction boxes are installed. Their size should be selected based on the number of connections that are planned to be made in them. When installing hidden wiring, it is necessary to use special crowns, with which a hole is drilled for socket boxes or round distribution boxes. For square ones, a punch hammer is used.
Brief step-by-step instructions for installing wiring in an apartment
Let us analyze the information presented in general terms using photographic examples.
| Illustration | Description of action |
 | Having completed the markings, we make grooves and recesses for installing distribution boxes and switches. All lines must be strictly vertical or horizontal. |
 | We install plastic boxes and socket boxes. Previously, it was allowed to install metal ones, but now the PUE prohibits this. |
 | We stretch the cables separately for each group. The work is carried out in stages with mandatory marking of the direction of the wire. |
 | When making connections in a distribution box, it makes sense to note where each wire goes. This will help in the future when making repairs. |
 | The laid cables will look like this. Now it remains |
Do you want to change the wiring in your apartment yourself? - It's possible! To do this, it is not necessary to have a valid electrician's permit or an electrician's diploma. It is enough to be an electrician at heart, and have a little technical education and understanding of what you are dealing with. If you don’t have enough practical experience, but you really want to change the wiring yourself, this article is for you.

Calculations and diagram

Single-line diagram according to GOST
First you need to draw wiring diagram for your apartment. To do this, you don’t need to be an engineer, because you don’t need a complicated linear diagram according to GOST. It is enough to draw a schematic drawing by hand. An electrical wiring diagram is needed in order to correctly distribute the cable throughout the apartment, and calculate its approximate amount, as well as determine the load on each future line.

Wiring diagram
Draw where you will have sockets and switches. At the same time, take into account what household electrical appliances you will include in them, how many and what kind of lamps you will use.
It is not recommended to hang more than 8-10 sockets on one line. Since all sockets in the line are pass-through, then with each subsequent socket there is a possibility of weakening the contact. Especially do not make many sockets on one busy line, for example in the kitchen; it is better not to save money and extend two lines to the kitchen.
Define required amount lines and the expected load on them. It is better to divide the lines into zones, for example: kitchen sockets, corridor sockets, bathroom sockets, room 1 sockets, lighting, etc.
Cable selection
In order for electrical appliances to operate without overloading the network, the cable of each line must be of the appropriate cross-section. And if there are several consumers on the same line (for example to the kitchen) (and there will be), then it is necessary to calculate their total power and leave cable safety margin, that is, select the desired cross-section (wire thickness). The power of all household appliances is always indicated by the manufacturer. For example: an incandescent lamp is 40W, and a hob is 6000W, etc.
In order not to bother with calculations, follow one simple rule. — For socket lines, use a copper cable with a cross-section of 2.5 sq. mm, for all lighting 1.5 sq. mm, and for the hob or instantaneous water heater 4 sq.mm - and everything will be fine with you!
Each device (consumer) has its own declared maximum power, measured in Watts.

Simplified power formula

The cable must be three-core (phase, neutral, ground). Zero is always blue, ground is yellow or yellow-green, phase is any other color. If you change the wiring, do not skimp on the material - always take a cable with a third core (with grounding), because all modern devices have an additional protective terminal, and automatic protective equipment only works using grounding .

To replace electrical wiring, it is best to use a VVG-ng cable. You can, of course, use NYM or PVS, but the advantages of the VVG cable over others are obvious. Firstly, VVG does not need to be crimped with sleeves (soft ones need to be crimped). And secondly, it is smaller and flat, which allows you to make smaller grooves, and it is possible to insert the cable into a thin slot (3mm for a three-core cable with a cross-section of 1.5mm)

Uncrimped wire with sleeve
Always take only cable in accordance with GOST! For example, an excellent cable is the Gostov VVG ng cable. This is a very important point in preparing to replace the wiring! You can save on automation or sockets (they can always be replaced), but don’t skimp on the cable - get a good one.
Marking
Determine at what height the sockets and switches will be located; the easiest way is to measure the lines of sockets and switches from the ceiling, because the floors in apartments are most often crooked. For example, if the height from floor to ceiling after renovation will be 250 cm, and you want to raise the sockets by 30 cm, measure 220 cm from the ceiling. If there are several sockets and switches in one group, draw a horizontal line along the level and place a mark every 7 cm (socket box size 71mm), the same applies to vertical groups.
For lovers of standards, so that it is “like everyone else” or “how they do it” - remember they don't exist! There are requirements for children's institutions, kindergartens and schools, where sockets and switches are installed at height not lower than 160 cm.. Everything else, especially in your home, you can do as you please. For example, some make sockets in window slopes or even in the floor.

Preparing for gating
Typically, wiring in apartments is carried out either on the floor or on the ceiling. There are other options, such as laying cables under baseboards or ducts.
Lighting lines, in any case, are laid behind a suspended or suspended ceiling; if these are not planned, then the ceiling needs to be chipped. And since, monolith of ceilings Ditching is strictly prohibited, you need to apply a layer of plaster to the ceiling, which will allow you to hide the cable without damaging the monolith. We strongly do not recommend ditching the ceiling yourself, since you need to know the technology for correct gating so that the whole house doesn’t collapse someday.
In cases where ceiling plastering is not planned, experienced craftsmen They find voids in the monolith slab with the old cable, and tighten a new one in its place.
Using a 70mm or 68mm concrete crown (attachment for a hammer drill), holes for the socket boxes are drilled. Using a wall chaser or grinder, grooves are cut out for laying the cable. There should be grooves in the walls strictly vertical, not horizontal or diagonal. The lines from the sockets to the panel are laid in the floor screed or along the ceiling.
If the ceilings are not wooden, then according to the PUE (electrician's bible), cable laying without corrugation is allowed! There is also no need for a corrugated floor screed; the most important thing is a high-quality cable with good insulation in accordance with GOST! Save on corrugation; if you don’t have drywall or wood (or other flammable materials), then you don’t need corrugation!
Noisy work
When you start hammering walls, don’t forget about the law. Make noise with a hammer drill apartment buildings It is possible only at strictly defined times; each region of the Russian Federation has its own rules. For example, in Dagestan you need to get permission from the elder, in Moscow they simply call the police without talking, and in Taganrog they start beating in response. It's better to start work on weekdays from 9 to 19, with a break for lunch from 13 to 15.
Grilling
Before you start dabbling, it is highly advisable that the walls and ceilings be plastered with a leveling layer of plaster. Firstly, you will not have any further problems with the final installation of sockets, since everything socket boxes will be flush with the wall, and not recessed into it (which happens when they are installed before the walls are plastered). And secondly, gating will occur much faster, since in some places it will not be necessary to saw the monolith.

Check in advance the places where you will be trenching so as not to touch communications, such as old wiring and plumbing pipes. If you can't determine where the old wiring goes, call an electrician, or simply turn it off in the shield (if you are going to change it all). For ease of work, make yourself a temporary carrier (extension).
The hole for the socket boxes is drilled to the full depth of the crown. To quickly drill a hole in concrete, mark a circle with a crown, then drill the maximum possible number of holes around the circumference with any drill, no less than the depth of the crown. After which, the cutting with a crown will go noticeably faster, one might say – it will go like clockwork. If it gets on the reinforcement, it is best to use another crown; in extreme cases, you can knock it off with a spatula. It’s better to use a hammer drill for help (don’t forget about neighbors and the police).
Working with a wall chaser or grinder
Grooves for laying cables go from the socket box to the floor or ceiling. You need to lower the groove down so that the cable lies quietly in the screed and does not stick out in the corner, so you need to know the thickness of the future screed, the same with ceilings. It is best to have a wall chaser with a vacuum cleaner for these tasks, but in extreme cases you can get by with a grinder, with diamond blade on stone. In the case of an angle grinder, take care of your health, wear a respirator and goggles. Close all windows and doors to prevent dust from entering adjacent rooms.

Cabling
Laying the cable on the floor is not difficult; it is enough to hold it to the floor in any way so that it does not float up when they make the screed. Usually they lay the cable along the walls (at a distance of 10-15 cm from the wall) so that later they know exactly where the cable goes.
It is worth noting that it is better not to lay cables under doorways! To lay the cable along the floor, it is better to make through holes between the rooms. Otherwise, there is a possibility of damaging the cable when installing the interior thresholds.
Laying the cable in the groove is also not particularly difficult. You can secure the cable in the groove using dowel clamps or ordinary alabaster (construction plaster). Alabaster hardens quickly, so it is also convenient to use for installing socket boxes. But before you smear the grooves with it, you need to remove dust from them and moisten them with water.
If the cable is securely fastened in the groove and does not stick out anywhere, the grooves can be covered with ordinary plaster mixture; this will save a lot of time.


About junction boxes
Junction boxes (or distribution boxes) are necessary for switching (connecting) wires in them and branching lines, for example, for a switch.
Today, professional electricians will tell you that There is no need to install junction boxes in existing apartments! They can play a cruel joke on your wiring. In the event of a short circuit, tearing, flooded neighbors, etc., you will need access to this very junction box. It’s easy to give up junction boxes - do all the switching in the socket boxes! For this you need DEEP socket boxes, in which all switching for lighting will take place. Typically, deep socket boxes are made for light switches, but if switching is needed to branch out socket lines, then deep socket boxes are also installed under the sockets.

Electrical panel installation
Most a budget option- this is the installation of all circuit breakers on the staircase in a common panel, where your old circuit breakers and counter are already located. To do this, it is necessary to route all the cables into the access panel. If you want a shield in your apartment, then you need to choose a suitable place for it.
Built-in or overhead shield is up to you. The built-in one looks more aesthetically pleasing, but the overhead one is easier to install. All lines from the apartment go to the panel, and from it one thick cable goes to the entrance panel, the cross-section of such a cable must be at least 6 mm, that is, a three-core cable, for example VVG 3 * 6.
Installation of circuit breakers
Each individual line is equipped with its own circuit breaker, with a rating depending on the cable cross-section. According to the rules, you cannot insert more than two lines into one machine; if you are trying to power more than three lines from one machine, you must install a special branching bus.
Today there are many ways to protect electrical wiring, even at the household level. The most necessary condition- this is the installation of circuit breakers for protection against overloads and short-circuit currents (conventional single-pole circuit breakers). It is also recommended to install an additional residual current device - RCD (current leakage protection).
It is best to install RCDs on the lines of high-risk areas: wet rooms, children's rooms. There is no need to install one common RCD for the entire apartment! They install one common RCD only for the purpose of saving. The consequences of such savings are a complex diagnosis of a fault in the event of a leak, + the entire apartment is left without light when it is triggered. On some lines, for example, lighting or street lines, an RCD is not installed.
Installing additional types of protection is already a luxury: thermal relay (protection from cable heating), lightning protection, stabilizer or protection against voltage surges (saves from 380V), fire alarm, etc.
Shield assembly
One of the most crucial moments is assembling the shield. If you are using a soft cable, then before inserting the wire into the machine, it must be crimped (to increase the contact area). Only phase wires are inserted into single-module machines (phase marking L - can be any color except blue and yellow), all others (zero N blue, ground PEN yellow-green) are inserted into their busbars. When using RCDs or difavtomats (automatic and RCD “in one bottle”), the neutral wire is inserted into its groove (marked N - neutral, blue. The common phase connects all the machines to each other, for this, instead of jumpers made of wires, it is better and more reliable to use special combs.
For all connections in the switchboard, it is very important to use wires of the appropriate cross-section, that is, it is best to separate the phases and neutrals across the circuit breakers using a cable with a cross-section of 4 sq. mm or 6 sq. mm. Also, after tightening all the cables and combs in the machines, it is necessary to check the reliability of their clamping. Since it often happens that the wire simply does not fit into the clamp, or does not hold well in it.

Final installation. Sockets and switches
Sockets and switches are installed last, after clean finish(painting or wallpapering). The most important rule good installation– this is a good contact!
Most of the outlets in your apartment are pass-through, that is, through them the cable goes in a loop to each subsequent outlet. To avoid problems with wiring in the future, firstly, do not buy cheap sockets (for example IEK), they have a very poor (to put it mildly) clamp and subsequently such sockets and switches can simply burn out. And secondly, pull all connections a second time! Check each pinched or twisted wire by tugging on it. If the wire jumps out of the clamp, it means you did not clamp it properly or the clamp was defective.
Among professionals, it is believed that the best clamps in sockets are produced by LeGrande and Schneider.
To ensure that the frames lie flat and tight, install a group of sockets or switches level, joint to joint, and screw them to the socket boxes with small self-tapping screws on two opposite sides, close to the wall. Then tighten the spacers inside the socket (if any). It is important not to touch the wires inside the socket with spacers or screws!
Monitor the position of the cable in the socket so that it does not fall on the spacers. Also, do not use screws that are too long, as they may touch the wires.
At each stage of repair, it is necessary to check the lines for operability, since after the final finishing it will be impossible to fix anything without damaging the finishing.
Electricity has been and remains a valuable benefit for a person’s daily living needs and his comfortable living. Electrical wiring in an apartment is a source of lighting, heating, and a supplier of energy for the operation of everything. household appliances. Today, the cable line system, like any communication, has high requirements, which necessitates the need to study installation rules and gain knowledge about the basic elements of electrical engineering.
Modern wiring
Before laying the wiring, you should pay attention to the type of distribution board, which must match the load of electrical appliances. Apartment electricity meters must be protected from mechanical damage and easily accessible. To do this, they must be placed in wall niches and in locked cabinets.
Most often they occur as a result of damage at the junction of wires. It is also necessary to pay attention to the placement and number of sockets. To avoid short circuits, do not install them behind electrical equipment, try to remove as much as possible from places where water gets in.
A small apartment, where in one room there are more than two sockets intended for the use of powerful electrical appliances, is considered a violation of safety regulations and threatens the wiring with fire. This can be avoided if you know exactly what cross-section of cables is best suited for the electrical appliance and what size of wires is needed.
In order for the electrical system of the apartment to work for a long time and not need repairs, it is necessary to make a correct calculation of the power of the entire wiring system in order to prevent overload and emergency shutdown.
Therefore, when assembling an electrical wiring diagram, switches and sockets are connected to the phase wire break, and lamps and chandeliers are connected to the neutral wire. It is prohibited to use devices that do not have a technical passport.
Control methods
When drawing up an electrification project, it is necessary to take into account the architecture of the room and its area. So, for example, to create a cozy atmosphere in a one-room apartment, the amount of electricity consumed depends on the power of ceiling and additional lamps, and the number of sockets for connecting household appliances. It is important to maintain a functional and uniform distribution of energy sources.
 When renovating a home at an early stage, it is important for owners to agree with professionals on the number of proposed sockets, switches, and ceiling lights. Before purchasing equipment for electrical wiring, it is necessary to accurately measure the area of the room, calculate the required lighting in watts per m², and determine what cross-section of cables can provide current.
You can get the total amount of electricity consumed by all electrical appliances in the apartment using a table. The calculation indicator will allow you to determine what maximum power can be used in your home, and based on this, choose the type of wiring. If in the future you plan to use electrical household appliances such as an air conditioner, electric stove, home theater, this will help avoid problems with wiring in the future.
Important points
When drawing up an electrical wiring plan, you need to take care of the financial costs of electricity consumption. To do this, it is important to purchase lighting sources with maximum light output and a long service life. When choosing fuses and current meters, expect that all electrical appliances will work simultaneously.
When using extension cords and tees, in order to avoid short circuits or fires, it is recommended to use modern electrical devices with zero contacts and overload protection. When carrying out residential wiring, care and strict adherence to installation rules are required.
It is strictly forbidden to lay wires and cables in the same pipe. They are not allowed to touch sharp objects, hang them on nails, paint them, or whitewash them. Electrical wiring in the room is carried out only using junction boxes and socket boxes.
Using the services of professionals, adhering to the drawn up project, observing all fire safety standards, the electrification of any home will be considered viable, durable, and economical.
Content:Quite often, during the operation of housing, various problems arise, including in the field of electricity. As a rule, this is due to the need for repairs, for which you will definitely need a wiring diagram for the electrical wiring in the apartment. It is compiled immediately after electrical installation work and is subsequently used during network repair and maintenance.
Connecting circuit elements together
Correct drawing up of an electrical wiring diagram in an apartment largely depends on basic knowledge of electrical engineering. Without a certain minimum, it is not recommended to do this enough difficult work. Most the best option is considered to be drawing up a wiring diagram. In addition to drawing up a detailed plan, the electrician can eliminate identified faults or replace worn electrical wiring along the way.
Before designing and drawing up a diagram of electrical networks for an apartment, it is necessary to find out what connection methods are used. All elements can be connected to each other in various ways:
- Serial connection. In this scheme, each element follows the previous one; there are no joints in the form of separate nodes. An example is a Christmas tree garland, where all the lighting devices are located in series on one wire. However, if at least one element in the circuit is damaged, then all other light bulbs will also stop working. This feature must be taken into account when drawing up the diagram.
- Parallel connection. In this case, the elements are not connected to each other, but are grouped into separate nodes. If any of the consumers fails, the electrical circuit will continue to function, providing current to other elements of the system.
- Mixed connection method. Parallel and series connections are used simultaneously on the same section of the circuit.
Methods for routing wires and cables
Choosing a method for distributing wires in a home electrical network is a very serious and responsible undertaking. This largely determines how all the electrical equipment in the apartment will function in the future.
The most popular method of wiring is to connect all components of the electrical network through distribution boxes. This installation diagram provides for an electrical panel installed outside the apartment on the landing. An electric meter and circuit breakers are installed in it. Next, a cable with a certain cross-section is laid from the panel, which is brought into the apartment. From it, using distribution boxes, wires are routed to each room according to a pre-designed diagram.

Another method involves a star connection. With this connection, each point - socket or lighting fixture - is powered from a separate cable line. Each line is connected directly to the panel, in most cases, together with a separate circuit breaker. This type of wiring is characterized by a significant increase in the number of wires and cables, as well as labor costs for their arrangement. Ultimately, the project becomes more expensive. However, if we fully take into account all the positive and negative aspects, we can conclude that such a system is much more reliable than a conventional one and allows you to control every element in the electrical circuit.
The “loopback” system is considered a cheaper connection. It is similar to the “star” option and differs in the ability to connect several consumers to one cable at once. This method is used in accordance with the individual characteristics of the premises and the entire apartment. In any case, each of these methods is rarely used in its pure form. As a rule, combined options are used in the circuits, which allows for the most efficient and safe wiring of home electrical wiring.
Distribution of consumers by groups
In addition to connections and connections, the distribution of all consumers located in the apartment into separate groups in accordance with their purpose is of great importance. Typically, the wiring diagram is made on different sheets, where each sheet corresponds to one group.

Such a breakdown will be even more effective when each group of consumers is connected to a separate circuit breaker. With this technical solution, in the future it becomes possible to carry out repairs of electrical equipment without completely turning off the power, but only in the part of the apartment where the work will be performed. In addition, separate lines have another important advantage: they do not require a cable with high power, capable of withstanding high loads. Such loads necessarily arise when several consumers are connected to one line at once.
An electrical panel located directly in the apartment makes it possible to connect each consumer to a separate machine. This scheme makes the operation of the network convenient and safe, solving in advance all problems that may arise in the future.
The standard division into groups could be as follows:
- Only lighting for living rooms, kitchens and corridors.
- Connecting power to living rooms.
- Connecting power to the kitchen and hallways.
- Lighting and power supply are separately connected to rooms with high humidity - the bathroom and toilet. This group should be highlighted because increased requirements are placed on it.
- If the kitchen has an electric stove, it must be connected to a separate line.
Additional safety is provided by installing a separate one on each group, which is also known as a residual current switch. These devices must be installed in the kitchen and bathroom lines.

After the groups are formed, the places where the main electricity consumers will be connected are determined. These include electric stoves, washing machines, water heaters, air conditioners, dishwashers and ovens. Places for installing sockets, switches, lighting fixtures and distribution boxes for electrical equipment of the apartment. Next, a conditional connection of the wires is made, and their length in each section is also marked on the diagram.
After preliminary sketches, a final version of the diagram is drawn up. It is applied to a precise floor plan: electrical devices are indicated by special symbols, and wires are marked with multi-colored lines so that power cables, lighting and grounding can be distinguished from each other. The diagram must contain the maximum number of sizes. The area of the rooms, the distances from the wires to the structural elements of the premises, heating and water supply systems are noted. Detailed diagram allows not only to significantly speed up repairs, but also to calculate all necessary materials and costs.
Standards, requirements and technical conditions
When drawing up an electrical wiring diagram in an apartment, it is necessary to take into account the basic requirements for its placement. In addition, there are norms and technical specifications requiring mandatory compliance.

The most important of them are the following:
- Sockets designed for 220V voltage should not be installed in the bathroom. It is allowed to install sockets for electric razors, the connection of which is carried out using a step-down transformer.
- The protection of an electric stove, if there is one in the kitchen, must be provided by a circuit breaker with a rating of at least 63A.
- The grounding contacts of sockets should not be connected to neutral conductors or to pipes of heating and water supply systems, as this is very dangerous to the health and life of people. The contacts are connected to the grounding system only using a special wire designed specifically for this purpose.
- The laying of wires can be strictly vertical or horizontal, as well as at right angles. This rule must be strictly followed, otherwise there is a high probability of damage during repair and construction work. The wires must not cross each other. If this cannot be avoided, then the distance between the wires should be at least 3 mm.
- Compliance with the standard distances between the cable and the structural elements of the apartment. The height of sockets and switches should be the same, ensuring safe and convenient operation.
A modern apartment cannot be imagined without good wiring. But even where it has already been carried out, it needs to be changed from time to time. Do-it-yourself electrical wiring in an apartment is difficult, but it is possible. And we will tell you how to carry out all the work.
We design electrical wiring in the apartment
Do-it-yourself wiring in an apartment begins with drawing up a plan, as in any other construction field. Only after this can you move on to practical work for installation of cables, sockets, switches. When drawing up a plan, you need to draw a drawing of the house (carry out design), be sure to indicate the connection points for sockets and switches, household appliances. To carry out this work as efficiently as possible, divide the stages into groups (for example, connecting sockets and lighting lamps is carried out separately).
Pay special attention to the bathroom, since this room is characterized by a high level of humidity, which means that the wiring requirements are more stringent. So, if it is advisable to make an RCD (residual current device). The principle is simple - during a current leak, the entire room is de-energized. You also need to choose the right machine for your apartment - a circuit breaker.
- for sockets, it is advisable to purchase a machine with a rated current of 16 A;
- for lighting - at least 10 A.
Now we will tell you how to install electrical wiring in an apartment yourself. The main thing is that you carefully study our recommendations without deviating one step from them.
How to conduct wiring in an apartment - installation methods
Wiring can be installed using two methods – closed and open wiring. Each option needs to be considered in more detail to understand the differences between them.
- Open wiring. Passes through pipes and baseboards. The height of the gasket in this case is not standardized. During installation, lighting and power wires must not be laid together. In this case, it is best to purchase safe skirting boards made of fireproof material.
- . This type of electrical wiring is carried out inside walls and partitions, in suspended ceilings. In this case, it is preferable to use cables that must be durable, protected from damage, moisture and fire.
Also, you should not buy cheaper ones. steel pipes for laying cables.
Installing wiring in an apartment - what do you need to remember?
Before connecting the electrical wiring in the apartment, you need to take several important preparatory steps. So, we have already talked about designing and drawing the circuit - a very important step on which the quality of installation depends. The next step is to make markings in the wiring diagram, along which the wires will be laid and a temporary shield will be installed.
It is advisable to start work by laying the main bundle of cables, their branches and indicating their turns. Do not forget that the cables must be arranged vertically or horizontally. After finishing, draw a diagram that you will need when carrying out the main work. After this, we need to purchase tools and other construction equipment (we select them based on the material of the walls and other surfaces):
- grinder for working with concrete and brick surfaces;
- assembly chisel – suitable for working with foam blocks and plaster.
This tool will be needed to create recesses in walls and other surfaces when laying wires. Next we proceed to preparing the electrical wiring - cutting the cables. When cutting them to the required length, do not forget to leave about 15 cm of cable in reserve for connecting the cables to each other. Next, you need to prepare a sealing mixture, which in its characteristics will be similar to that applied to the walls for finishing. It is needed to secure the wires in the groove and level the surface. Having prepared the solution, apply it to the walls and wait until the mixture dries a little, after which we smooth out the unevenness using a foam float.
Step-by-step installation of wiring in the apartment
Having completed the design, we begin to install electrical wiring in the apartment. But first of all, it is necessary to provide power to the working tool. To do this, we attach a socket and a 16 A circuit breaker to a piece of plastic, not forgetting to purchase a long extension cord that will be enough for your entire apartment.
The next step is to de-energize the house by turning off the apartment circuit breaker, remove the wires coming out from the meter and connect the temporary shed. After powering the house, you can begin work.
Important: to install electrical wiring in an apartment, it is advisable to use the help of a specialist electrician, or you need to act extremely carefully.
How to install wiring in an apartment - step-by-step diagram
Step 1: Grooving and installing socket boxes
The grooves for laying cables, as we have already said, must be either vertical or horizontal. Crooked grooves lead to accidents and injuries. To carry out the work, it is advisable to use a stepladder with a stop, which will protect you from falling and injury. We first mark the boundaries of the groove with a grinder, and then knock out the groove with a chisel, and also do not forget to knock out the places for installing the socket boxes. It is worth noting that this stage is characterized by too much noise, so it is better to talk to your neighbors in advance so that they do not complain about you. It is also worth remembering that any such work is carried out only on weekdays during working hours.
Step 2: Routing Cables
To lay the cables, first we measure the required lengths of pieces of wires and corrugation - we tighten the cable into the corrugation on a flat surface. After that, we put them in grooves and insert the ends of the cable into the socket box. After completing this step, be sure to coat the socket boxes with the prepared mixture or alabaster, and coat the grooves in small parts every 50 cm. To complete this stage, insert the ends of the corrugation into the input shield, lubricate with the mixture and do not forget to connect the wires to the terminal of the shield. After this, we install the VSC in its place, drill holes for fasteners and install dowels in the holes. After fixing the input panel, carefully insulate all the wires and lay them inside the switchboard.
Step 3: Finishing
The next step is finishing the surfaces. But before you start plastering the walls, you need to fill the socket boxes with paper, and cover the temporary shield with plastic film. In order not to accidentally break the seal from the meter, we also cover it to avoid problems with energy service specialists. Now you know how wiring is done in an apartment. But this is not the end of the work - you need to connect the remaining elements of the network. Let's get started!
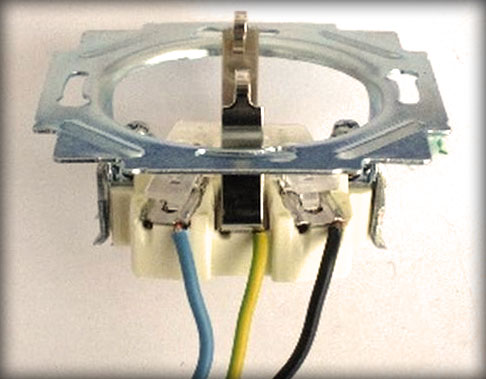
Installation of electrical wiring in an apartment includes the installation of sockets and switches. There are several rules that, if followed, will protect your life:
- Sockets should be installed at a short distance from the floor (in case of flooding of rooms, this will protect against electric shock);
- do not install sockets near sinks, gas and electric stoves, etc. (products can be installed provided there is a distance of 50 cm between the socket and the equipment);
- try not to install sockets in the bathroom (if necessary, install it at a minimum distance of 2.5 m from the source of moisture).
Now you can start installing the products. Before purchasing them, be sure to study quality certificates and other documents that can confirm the safety of sockets and switches. Installation of sockets can be carried out using two methods - open and hidden. In the first case, you need to use electrical outlets that do not conduct current. Products are attached to surfaces with glue or self-tapping screws. If you want to do hidden wiring, you need to purchase suitable products, which are first placed in installation boxes and then mounted in prepared holes in the partitions.