Having decided to create a heated floor system in an apartment or house, owners are faced with another choice problem - which heating technology for the lower part of the premises to choose. Now there are different types of systems on the market. Some of them run on water, others run on electricity. However, not everyone knows that there is also an electric-water heated floor - one of the newest technologies, which has already gained good authority among many craftsmen and those who have tried this floor heating system.
Why do people still argue about which floor is better - water-powered or electric-powered? The thing is that these heating technologies differ from each other in installation features and have certain advantages and disadvantages. And the choice is not always easy to make.

Warm floor - which is better?
Features of water floors
This is a rather complex system to install, which operates on a coolant such as hot water. The advantage of water heating is that this type is quite economical during operation.

The main disadvantage is the complexity and some installation features. For example, it is not in all cases allowed to connect a water heated floor to a central heating system - for this you must obtain permission from the management company. In a private house, installation will be required, which is also related to the operating features of this type of heating system. The boiler itself can, depending on its type, take up quite a lot of space in the house; this also needs to be taken into account when choosing this heating system.

Also, to install a water heating system for underfloor heating, a lot of preparatory work will have to be done. It is worth remembering that before putting such a floor into operation, the cement screed must dry thoroughly.
Features of electric floors
This heating system operates, as you might guess, on the basis of electricity. The heat generated by special cables or mats is transferred directly to the finishing floor covering, due to which the floor becomes tactilely pleasant, cozy and warm.

Electric heating floor connection diagram
The main difference from a water floor is that in this case the heating of the surface always occurs equally, while the water runs through the pipes constantly and has time to cool down before the next heating. This is both an advantage and a disadvantage of this type of heating.

On a note! Because of this feature, electric floors cannot always be used. Everything will depend on what kind of flooring is being laid, as well as on the location of the furniture in the apartment. However, the places where wardrobes and sofas are located can simply be bypassed when laying electric floors.
Electric floors are divided into film and cable. The first is laid on the surface of the screed directly under the finishing coating, the second, similar to a water floor, is filled with a cement screed.

With the help of both types of underfloor heating, you can easily install heating in any home. However, choosing between them is always difficult. But technology does not stand still, and now there is an electric water floor on sale that combines the advantages of both types.
Liquid electric floor
An electric water floor is a combined type of heating system that combines the advantages of both water and electric heating.

On a note! Calling such a floor water is not entirely correct. Some models do not use water as a coolant - antifreeze is pumped into the tubes. Thus, the correct name for this floor heating system would be “liquid floor”.

electric water heated floor
This type of underfloor heating is a system of tubes or one long, thick-walled tube. When the liquid heating system is turned on, the coolant is heated, due to which a certain pressure is created and antifreeze or distilled water begins to boil (different coolants are used in different systems). This is how thermal energy is generated.

Advantages of electric-water heated floors
In order to fully appreciate all the benefits of liquid heated floors, it is important to know its advantages, which distinguish this system from other analogues. And electric water systems have many advantages over conventional water systems:
- they do not need to be connected to a heating boiler or heating system;
- the system does not require a pump to operate;
- when installing the floor, you will not have to install a manifold and distribution cabinet;
- the volume of liquid contained inside the system is small, and therefore the likelihood of flooding of the apartment or even severe leakage of equipment is completely excluded;
- heating of the system is as uniform as possible, the liquid inside the tube does not have time to cool;
- ease of installation compared to water systems.

The liquid system also has considerable advantages over the electric ones:
- since the cable is constantly inside the liquid, its overheating and burnout are excluded, unlike an electric cable simply laid in a screed;
- Repairing a liquid floor is easy. For example, adding antifreeze or replacing a heating element can be easily done through a special installation box. And the damaged area can be identified by small spots on the screed;
- thermal energy is stored not only inside the screed, but also in the pipe itself, due to which the heating effect lasts longer.

If we compare liquid floors with film floors (which are also, in fact, electric), then the former can be used in a room with any humidity level, which distinguishes them favorably from the latter. Also, liquid-based floors can be installed under absolutely any floor covering.

Popular models of liquid electric floor
There are two main models of electric-water heated floors. These are XL Pipe (Korea, Daewoo Enertec) and Unimat Aqua (Korea, Caleo). They have design differences.
On a note! Unimat Aqua systems are also produced in Russia. And this is worth remembering when choosing products.
These are two absolutely different designs, which have only a general operating principle - the coolant is heated by electricity. But the heaters and heating mechanism are somewhat different.
This type of floor heating consists of one long thick-walled tube with a diameter of 2 cm, which is made of special type polyethylene. This element is a “container” for the coolant, which is a certain brand of antifreeze. A seven-core Teflon-lined cable made of chromium-nickel metal is laid inside the pipe. The pipe is sealed at both ends, due to which there is no circulation of coolant, which, in turn, eliminates the need to purchase any other equipment.
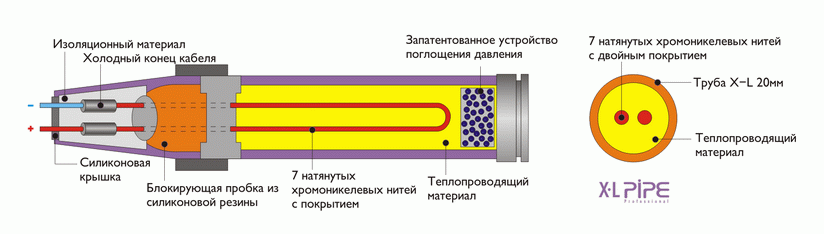
On a note! The approximate electricity consumption of this system is 14.5 watts/m2.
Heating due to the liquid system occurs quickly and evenly, allowing for heating of the entire surface of the finishing coating. At the same time, such a floor cools down for a very long time. The advantages of a liquid floor include the fact that it is not afraid of pressure from outside, that is, you can safely place furniture on the finishing coating where such a system is located - it will not cause any harm to the heating.

Installation of XL Pipe is carried out inside the screed, or rather, the laid system is filled with cement mortar about 4-5 cm thick. The pipes are laid according to a specific pattern. For installation you will also need a thermostat. At the same time, there are no special installation features for these elements - they are mounted in exactly the same way as when installing other types of heating. Unless you have to purchase a specific thermostat designed specifically for liquid electric floors. A mounting box 12x12x14 cm is also useful.

The XL Pipe system is reliability, safety and environmental friendliness in one type of equipment. The warranty period is 10 years, but in general, use the system when correct installation maybe about 50 years.

Table. Characteristics and cost of XL Pipe floors.
| Model | Length, m | Power, W | Cost, rub. |
|---|---|---|---|
| DW-010 | 14 | 560 | 5400 |
| DW-015 | 21 | 840 | 8000 |
| DW-020 | 28 | 1120 | 10700 |
| DW-025 | 35 | 1400 | 13400 |
| DW-030 | 42 | 1680 | 15300 |
| DW-040 | 56 | 2240 | 21300 |
| DW-050 | 70 | 2800 | 24300 |
| DW-060 | 84 | 3360 | 28000 |
Advantages of XL Pipe
This floor heating system has certain advantages:
- it is not a source of electromagnetic radiation;
- practically does not require installation of additional equipment;
- does not overheat and does not have a negative effect on the finishing coating;
- allows you to place furniture on top of you;
- repairable;
- economical (electricity costs are on average 20-30% lower than when using electric floor heating);
- relatively simple installation.

DIY XL Pipe installation
Step 1. The base of the subfloor is prepared - cleared of debris, all cracks and irregularities are corrected. Next, 5 cm thick extruded polystyrene foam boards are laid on the surface for thermal insulation.

Step 2. The plates are secured with special “umbrellas”. First, holes are made in the slabs for fastening material, then umbrella dowels are inserted into them.

Step 3. A reinforcing mesh with a cell size of 10-20 cm is laid on top of the polystyrene foam boards.

Step 4. The individual parts of the mesh are connected to each other by knitting wire.

Step 5. The heating cable is unpacked and checked for resistance.

Step 6. The XL Pipe is laid out on the floor surface from the mounting box according to the selected pattern in increments of 20-30 cm. The pipe is fixed using plastic clamps on the reinforcing mesh.


Step 7 A power cable is supplied from the thermostat to the distribution box.


Step 8 The wires coming from the pipe are connected to the power cable. The wires can be connected with special terminals.


Step 9 The ground wire is connected to the reinforcing mesh.

Step 10 A temperature sensor is attached at a distance of 5 cm from the system tube.

Step 11 The installation box is closed with a lid, the seams of which are sealed with sealant. That's it, laying and installation are complete, all that remains is to fill the system with a cement screed and wait for it to dry.

Video - Installation of XL Pipe without screed on a wooden floor
Capillary heated floor Unimat Aqua
The Unimat Aqua system is slightly different from the XL Pipe. Instead of one thick tube, it has a large number of small diameter tubes in its structure. That is why the system is called capillary. She connects to special device with a power of about 2.4 kW, due to which the coolant is heated and thermal energy is released. The system is closed, the pressure in it is created using the same device. The system also does not require the installation of additional heating equipment.

On a note! The volume of liquid inside the Unimat Aqua system is no more than 6 liters. The coolant is distilled water.
The heating area of one system is about 20 m2. That is why it is not used for spacious rooms, although several Unimat Aqua can be installed in one room. Service life is about 5 years.

Unimat Aqua is available in two types – basic and additional. The first consists of a control unit, an installation kit and two sections of connecting pipe. From all this a small pipeline is formed. The additional set consists of coils of small-diameter tubes, the quantity of which is enough to heat an area of 10-20 m2. Also used for installation are fasteners for tubes and material that reflects thermal energy. A standard cement mixture is used to fill the screed.

The main advantage of this system is the multifunctional control unit, which can:
- determine and control the room temperature or heating of the coolant;
- set the time for turning on and off the heating system.
The system is completely safe and can be installed even in a bathhouse. But Unimat Aqua has a certain drawback - it is similar to a water floor system. The coolant comes from the heating unit at a higher temperature, gradually cools down, and therefore the heating of the floors will be uneven.
Table. CharacteristicsUnimatAqua.
Installation of underfloor heating Unimat Aqua Caleo
Step 1. The surface of the subfloor is thoroughly cleaned of debris, all irregularities are removed.

Step 2. Select the location for installing the thermostat on the wall.

Step 3. A groove is made in the rough base or screed for laying the temperature sensor.

Step 4. Heat-reflecting material is being laid. The sheets are connected to each other with tape or secured to the base with a stapler.

Step 5. The floor heating system is laid out on the surface on the side where the thermostat is planned to be installed.

Step 6. Where the mat needs to be rotated, one connecting wire is cut. The strip rotates 180 degrees. The tubes must not intersect with each other.

Attention! The cut should only be made in the middle of the power wire. The maximum strip length should not exceed 25 m.
Step 7 The system is glued to the surface of the heat reflector using tape.

Step 8 Mounting wires are used to connect the mats to each other. To do this, the ends are stripped of insulation at the cut site. A sleeve is installed in this place, it is clamped with crimping pliers.

Step 9 A heat-shrinkable tube is placed over the wire. The power wire is connected to the connecting wire. The sleeve is crimped and heated with a special hair dryer. The sleeve is closed with a tube, which is then heated and shrinks.

Step 10 Next, the system is connected to the thermostat. The Unimat Aqua strip is attached to it using a connecting wire and special regulator clamps. The connection is made according to the diagram included with the thermostat.

Step 11 Holes are cut in the heat reflector to connect the future screed with the base of the floor.

Step 12 A temperature sensor is installed inside a corrugated tube. It is located along the rods of the system.
sensor for heated floor

Step 13 The system functionality is checked for 15 minutes.

Step 14 The system is filled with cement mixture and a screed is formed.

Video – Installation of Unimat Aqua floor
Liquid or water electric floors are an excellent alternative to other types of heating. It is easy to use, practical and performs its functions well. The use of such systems will add coziness to your apartment or house, making the flooring warm and pleasant.
To increase comfort in the house, many property owners install heated floors. In our article we will get acquainted with the varieties of such structures, describe how to choose heating elements and carry out their installation.
According to experts, electric floor heating comes in two main varieties: cable and film (infrared). Next, we will briefly look at each of the described technologies. As the name suggests, the first design uses a cable as a heating element.
The wiring is laid manually at a certain pitch, and near the enclosing structures the cables are mounted at a shorter distance relative to each other, in warmer places less often (when using film, this scheme is not used).
Cables can be single or double-core, although the latter variety is used more often. Experts note that the energy consumption of the heating element will depend entirely on the thermostat settings. The design of an electric heated floor can include self-regulating cables that set the heating temperature regardless of the controller settings.
A special feature of using infrared flooring is the fact that the released thermal energy is transferred not to air masses, but to surrounding objects that absorb and release heat. Thanks to these qualities, it is possible to achieve uniform heating of the premises. A heating element such as a film has a small thickness compared to the cable, which affects the size of the screed and the height of the premises. In addition, infrared heated floors are much more effective than their predecessor.
The film can be laid under any type flooring. If the heating system is mounted under tiles, then the base base must be leveled with sheets of plasterboard or plywood. This is due to the fact that the materials in question have low thermal conductivity and this will improve heat transfer. The main disadvantage of infrared flooring is considered to be the increased cost compared to its analogue.

How to choose electric heated floors
The choice of any of the described space heating systems is influenced by many factors. First, you need to pay attention to the use of the structure - as the main source of heating or as an auxiliary element. In the first case, it is recommended to use heated cable flooring, which is most often installed under the tiles laid in the bathroom.
When using such a system, the apartment owner or country house can save a significant amount of money on heating costs. It should be noted that the additional thickness of the screed in the described design will make the heating of the surface more uniform. The system has one small drawback: laying cables is much more difficult than installing film.
If a heated floor is used as an additional heat source, then it is recommended to use electric mats for its installation. This type of heating device is often used in small rooms that do not have central heating. According to experienced ones, infrared flooring can be installed under laminate, as well as under linoleum and other types of flooring.

The second nuance of choice is taking into account the area of the room where the heated floor will be installed. For the system to work with maximum efficiency, its area must cover at least 70% of the useful surface. It is not advisable to install heating elements in places where furniture is installed. In this regard, the layout of the rooms must be done in advance before installing the floor.
How to choose a warm floor so that it does not affect the load on the electrical network? Special attention you need to pay attention to the operating modes of the system. You can control the surface heating temperature using a thermostat. Also make sure that the electrical network of the apartment or country house can withstand the load from the heating system. For every square meter of heated floor, from 100 to 160 watts of power will be consumed. If the heated floor is used as the main heat source, the power increases to 180 watt/m2.
Cable heated floor for the bathroom
As we have already said, a “warm floor” system can be installed in virtually any room of the apartment, but it is especially necessary for the bathroom. When taking a shower in winter, a person’s feet move on cold tiles, which causes some discomfort and not only this, but also the possibility of catching a cold. Ceramic tiles are considered the main type of bathroom flooring. This material is always cold, but it can be heated to a certain temperature.
Principle of operation
Cable underfloor heating begins to work after turning on the thermostat to a certain temperature. After connecting the system to the power supply, the cable begins to warm up, which transfers heat to the screed and tiles. Electricity consumption depends on the set temperature, but to quickly warm up the surface, the regulator needs to be set closer to the maximum position, then set the required indicators. The generated heat will be repelled from the substrate and begin to warm up the screed, and then the tile. After some time, the flooring will become warm and comfortable to move around.
Preparing the base
You can lay the cable yourself, but the first stage of such work will be careful leveling of the base. The fact is that heating elements must be laid on a perfectly flat surface. In addition, the base layer is cleaned of debris and construction tools, and all contaminants present are removed.

If for some reason the base surface turns out to be uneven, then it is necessary to remove all the bumps with a hammer drill or other tool. Holes, cracks and chips are filled with cement-sand mortar; if necessary, the base is leveled using a screed. If the base layer consists of wooden planks or sheets of plywood, all irregularities are also hidden using quick-drying mixtures.
Leveling the subfloor prevents damage to the heating system during operation. The laid cable may run into bumps or fall into holes, which will lead to interruptions in the power supply. It has been noticed that such breakdowns are quite difficult to eliminate.
Substrate
After the base layer has been leveled with a screed, you can begin laying the underlay or insulation (usually penofol is used for this purpose). This material plays a huge role in the design of heated floors; its surface reflects heat rays in the right direction, making the heating process more economical. Penofol is made in the form of a self-adhesive gasket with a foil coating up to 14 micrometers thick. Such a product has a minimum thermal conductivity coefficient, which is 0.05 W/m*C.

The material in question is supplied to hardware stores in rolls; it is laid on the surface of the base in such a way that the foil is directed towards the top (repels heat rays). The joints of the panels are taped with construction tape. When working with penophenol, make indentations from walls and corners of rooms within 5-10 centimeters.
Cabling
After laying the substrate, you can proceed to the next stage of work, cable installation. This element is placed on a mounting tape, which is pre-fixed to the base surface. Some manufacturers can supply the market with ready-made structures in which the heating cables are already installed in the frame with a certain pitch. Such products are supplied to hardware stores in the form of rolls.

The mounting grid can also be supplied separately from the cable. Such a structural element increases the strength of the entire system and makes it possible to lay conductors with a certain pitch in a zigzag direction. In most cases, the distance between the turns is chosen as a multiple of 20-25 centimeters.
Thermostat installation and connection
Next, you need to install a thermostat in the “warm floor” system and connect all the parts. A device such as a temperature sensor is installed in any convenient place outside the bathroom. The thermostat is usually mounted at a height of 30 centimeters from the floor surface; it is connected to the heating elements using a wire that is installed in a corrugated tube.
Now you can check the performance of the system using a tester for this purpose. If everything is fine, you can start installing the screed. The leveling layer is usually made of cement-sand mortar or a quick-drying mixture. In any of the above cases, the thickness of the screed should be in the range from 3 to 5 centimeters.

To achieve a perfectly leveled base for the future floor covering, the solution is poured into the spaces between the previously placed beacons. After this, the mixture is leveled using the rule. After carrying out such work, the integrity of the system is checked with a tester and the solution is left until it reaches brand strength. This usually happens within 28 days.
Energy consumption
The heating elements are connected to the network only a month after the screed is completed, since overheating of the material can cause cracks to appear on the surface. Electricity consumption per m2 of coverage will depend on the power of the power cable, as well as the density of its installation. Such indicators can vary from 100 to 200 W/m2.
Price of cable heated floor
Many owners of city apartments or country real estate are interested in the price per m2 of heated floors. In this case, it is necessary to take into account the cost of materials and labor costs of workers. Thus, the price of an average quality thermostat ranges from 3,000 to 4,000 rubles, the cost of mats with cables laid depends on the area:
- 2m2 – 2800 rubles;
- 3m2 – 5300 rubles;
- 4m2 – 8000 rubles.

The cost of the specialist’s services should be added to the specified data. Professional builders will charge approximately 450 rubles for their work for each square meter of installed heated floor.
Infrared heated floor
This type of heating has a beneficial effect on human health, and this is confirmed by numerous user reviews. The fact is that the heated surface emits heat in the infrared range and this is better perceived by the body. The room temperature may be several degrees lower than standard values, but this is not felt at all, which ultimately leads to energy savings. Another advantage of infrared flooring is ionizing radiation, which leads to the destruction of pathogenic bacteria and viruses. Despite the huge number of advantages, the heating system in question has one significant drawback - its high cost.
Device
Infrared heating can be done using a special film or rod mats. These two elements are made in the form of rolls with conductive bars made of copper or silver. The stress is transferred through these tires to areas with sealed carbon fiber, which helps to release a certain amount of heat. The strips are divided into several sections, which have dividing lines. Using these designations, it is possible to cut the element into smaller parts, which is very convenient during installation. The width of standard products, depending on the manufacturer and brand, ranges from 50 to 100 centimeters, the thickness of the film varies from 0.2 to 2 millimeters.

We have figured out the installation of a heated floor, now we will familiarize ourselves with the procedure for its installation. In this case, the film can be laid on a pre-leveled base without a backing. If the heating system is used in the bathroom, sheets of plasterboard or plywood are laid for protection. Installing the film will not be particularly difficult; even an inexperienced builder can handle the installation of a heated floor, and you can make a floor in a small room in one working day.
At the initial stage of work, it is necessary to draw up a scale plan of the premises, highlighting the areas where the furniture will be located. The next important nuance of installing the coating is the choice of location for fixing the thermostat. Wiring is connected to this element of the system, a temperature sensor and a film heater are connected. Next, the rolls are placed on the base surface in such a way that they cover the usable floor area as much as possible and do not intersect with each other.
Electricity consumption
One of the important nuances of choosing a film floor is the energy consumption per m2 of usable area. In this case, there are two options for choosing heating systems. If the coating is used for additional heating of the room, then a film with a power of 150 W/m2 will be quite sufficient. In the case when the system is used as the main source of heating, more powerful models are needed, at least 250 W/m2. The maximum power ratings of a modern heated floor are 400W/m2.

Another factor in selecting power is the type of coating used. This is especially true for the floor in the bathroom or kitchen if it is made of ceramic tiles. Ceramics absorb heat well, so if the surface is not warmed up enough, the surface will feel cold to a person’s feet.
Film laying
At the initial stage of installation, it is necessary to lay expanded polystyrene slabs about 1 centimeter thick along the perimeter to a height of up to 10 centimeters (the insulation will prevent the release of heat through the enclosing structures). The insulation is also laid on the base surface; to increase the efficiency of the system, foil is laid on the coating. This material will direct heat flows upward, which will ultimately reduce financial costs for heating.
Next, according to the diagram drawn, the film is laid on the surface, while the rolls should be guided with a copper strip downwards. The top part should have a matte rather than shiny finish on the product. When laying each of the structural elements, make sure that air does not accumulate between them. If necessary, the rolls are cut according to the marked marking lines (indicated by a dotted line and a scissors symbol).
According to experts, it is best to install the mats if they are turned with the part with the contacts towards the location of the thermostat. When laying, place the strips so that there is a gap of several centimeters between them. If linoleum is used as a floor covering, the distance between adjacent mats is chosen as a multiple of 1 centimeter. Please note that tires must not touch or overlap each other under any circumstances.
When all the elements are laid on the surface, you can begin connecting the heated floor. This procedure is usually carried out using a cable that comes with the heating system. A contact is installed on a copper or silver conductive strip in such a way that one part of it is on top, the other is below the core. We install contacts on all tires and crimp them with pliers. On the side of the film opposite to the location of the thermostat, the bus is covered with insulation. After this, all the strips are fastened together and the surface of the insulation using tape.

Installation of a thermostat
Next we move on to installing the thermostat. They make a groove in the wall and run conductors from the film covering. Under one of the strips, a recess is made in the insulation material for the sensor. After fixing to the surface, this device is connected to a thermostat. The conductors are stripped and fastened to the contact part, the exposed areas are carefully insulated.
Connecting the entire system
Connecting the electrical supply to the thermostat must be done by a qualified specialist. After applying current, the system is tested; for this, the temperature on the device is set to within 30 degrees. After some time, check the fastening of the contact part and the quality of heating of the strips. If no problems are found, you can begin laying the topcoat.

Ceramic tiles can be laid on a small layer of adhesive (within 1-2 centimeters), but a plastic film must be laid under the parquet or laminate flooring, which will be used as waterproofing. If the coating is soft, then the surface of the subfloor can be leveled using sheets of plywood or OSB boards. These elements are attached to the surface using dowels or screws. When fixing such parts, it is necessary to ensure that the fasteners do not fall into conductive strips. After this, installation begins soft covering, carpet or linoleum.
Price
As we have already said, infrared heated floors have a significant cost, let's look at this issue in more detail. So, the price of a thermostat, depending on the model, will range from 3,000 to 4,000 rubles. The film itself has the following cost: 2m2 - 3800 rubles, 3m2 - 5500 rubles, 5m2 - 9000 rubles. The cost of a master’s services (if the work is carried out by a highly qualified specialist) is from 500 rubles/m2.
The feeling of even and pleasant warmth that an electric heated floor gives provides comfort in the room. But this type of heating has become popular not only for this reason. Modern intelligent control systems allow rational use of electricity and make this heating method economically profitable.
Types of electric floor heating
Depending on the type of heating element, electric floors come in the following varieties:
- traditional cable;
- innovative film;
- rod-shaped
Cable models can be supplied for sale in the form of a simple skein, sections, as well as mats made of a special elastic mesh. The latter option uses a thinner cable than other models.
Electric cable flooring is only convection, while film and rod models operate on the principle of infrared heaters.
Each variety has its own installation characteristics and restrictions on use. If you decide to install an electric heated floor, choose its characteristics based on what installation method is possible in the room.
Cable electric floor
The use of cable heating has already become a classic. For the manufacture of heated floors, both resistive and more complex self-regulating models are used. A resistive cable can be single- or double-core, and the second option due to its design features used for electric floor heating much more often.

The fact is that the result of the system’s operation is electromagnetic radiation, and the use of a two-core cable makes it possible to somewhat reduce its intensity. Self-regulating models are much more complex than usual heating cable. They are able to identify areas where overheating has occurred and reduce, or even completely turn off, the power.
Basic rules for installing cable heated floors
In general, the technology for installing electric heated floors is approximately the same, regardless of which type of floor is used. Using the example of laying a conventional heating cable, we will consider the main stages of this process. The features and nuances that characterize the installation process of other models will be discussed in the relevant chapters.
The installation of any type of electric floor begins with choosing a place to install the thermostat. A recess is made in the wall for the device and wires that will power the system. A conductor for connecting the sensor will also be placed in it.
After this, the floor surface is prepared. Thermal insulating material is laid on the leveled and cleared of debris surface. The heating sections are placed on top and secured with mounting tape.

By the way, using a cable makes it possible to choose the distance between the elements depending on the heating intensity required. For example, along the cold outer wall sections can be laid in smaller increments than in more protected parts of the room.
Important: Make sure that the heating wires do not intersect during installation!
After installation is completed, all electrical wiring connections are made. Then the internal sensor is installed. It must be placed inside a corrugated tube. This will protect the device from damage. The tube with the sensor and the connected wire is placed between the heating cable. All that remains is to test the system for functionality. If the resistance of the sections and the sensor corresponds to the data specified in the technical data sheet, then you can begin pouring the cement-sand screed.
After three days, the finishing coating is laid. The heated floor is connected only after the screed has completely dried - no earlier than 28 days. You can install a warm electric floor yourself, installation - the video of which is presented below - is not a very complicated process. The main thing is to follow the instructions given in this video. But if during the viewing process it turns out that you do not have any skills or you lack necessary tools, then use the services of a specialized company.
Heating mats - an option for heated floors under tiles
Warm mats are a variation of traditional cable flooring. They have the same heating element - a cable, but when making mats, models with a smaller cross-section are used. In addition, this flooring is sold ready-made - it is attached to an elastic fiberglass mesh. Most often, mats are used to heat ceramic tile floors.

The underside of the mesh is usually coated with an adhesive composition, which allows you to almost instantly fix the structure. Therefore, the installation of an electric heated floor in this case does not require the use of mounting tape. Once the heating mats are laid out and secured, the necessary connections and testing of the system are made. Then the surface is filled with mortar for fixing ceramic tiles and the finishing coating is laid.
Infrared electric floors
Infrared flooring with carbon heating rods is gradually becoming a strong competitor to other types of electric underfloor heating systems. Only the rather high price limits its widespread use for now. This is the healthiest way to maintain a comfortable temperature in your home. Those who have already installed a rod-based heated floor give mostly positive reviews about it.
Such a floor can be laid even under a surface filled with furniture, and can also be easily moved during use. Carbon rods are not afraid of overheating because they have a self-regulating function. The carbon mat is designed for installation using screed or glue. It is suitable for laying ceramic tiles, but can also be used under other surfaces.

To increase the efficiency of the system, a heat-reflecting film backing is first placed on the floor surface. To ensure reliable adhesion of the glue or screed to the subfloor, special holes are made in the insulation. Electric heated floors are laid evenly over the entire surface. If necessary, the mats are cut in those places where the connecting wire is located into pieces of the required size. After completion of installation and testing work, the surface is covered with a thin layer of cement-sand screed or glue.
The easiest way to install a warm electric floor is a film structure. It does not require preliminary measures to arrange the surface. This floor is laid on a heat-reflecting substrate, and the selected coating is laid on top.
Electric floor control
The system is not only connected to power via a thermostat, but is also controlled using it. This device monitors floor and air heating levels by reading internal and external sensors. Internal sensors are the main ones; they are installed when installing an electric heated floor in a screed or under a covering. Auxiliary sensors record air temperature. They are usually located on the wall.

The simplest thermostat is capable of maintaining a certain temperature in the room: if certain parameters are exceeded, it simply turns off the power and allows the system to cool down. A programmable thermostat for electric heated floors operates according to a more complex scheme. Its use allows owners to set the desired algorithm for heating the room.
Some models have a set of standard programs that take into account the time of day, weekends or weekdays.
They will independently turn on the power before the owners arrive and turn it off while no one is home. At the moment, there are already thermostats that are controlled remotely, via the Internet or a mobile phone. This allows apartment owners to adjust the program if plans change.
Of course, you will have to pay several times more for a thermostat with artificial intelligence than for a simple model. But the costs will be recouped due to the fact that the operation of an electric heated floor will be more rational and energy consumption will be more economical.
Electric heated floor: main and additional heating system
It is possible to use an electric heated floor as the main heating system only if the thermal insulation of the room has been carefully carried out. But even if this condition is met, this heating method is more suitable for areas with warm winters. In more severe conditions it will not be very effective and very expensive.
To maintain a comfortable temperature level only due to a warm floor, its area must be quite large - at least two-thirds of the entire area of the room.
Accordingly, if there is a lot of furniture in the room, the system will not perform its task fully. In addition, a power density of at least 150 W will be required.
 Warm floor for heating a balcony
 An electric heated floor is used as an additional heat source. This scheme works well on any type of floor and can be installed in houses made of any material. A distinctive feature is simple installation, which will appeal to an inexperienced master. This type of flooring is good for installation in rooms where it is very difficult to install a heating system. For example, a balcony or terrace. Sometimes, heated floors are used as the only heating method, in which case it is necessary to take into account upcoming energy costs.
Advantages of electric floors
Electric underfloor heating has a number of advantages, thanks to which it is often used in an apartment or private house.
- Possibility of heating the entire room or a separate part of it. Warm floors can be laid over the entire area of the room, or you can install it only in a certain part. In this case, space zoning is performed.
- Electric heated floors are convenient to use, since they are controlled using a remote control or a temperature regulator is used.
- It is possible to connect to the system " smart House" In this case, the heating can be controlled remotely.
- Simple and easy installation that does not require special tools.
- No possibility of leakage.
During installation, the floor does not take up a large amount of the room’s height, and therefore it should be used where this moment will not have a negative impact
Such floors are easier to use in high-rise buildings, since the standard water heating method places a greater load on the floors, while an electric heated floor weighs several times less.
 Warm floor
 But it should not be noted that this coating also has disadvantages.
Disadvantages of electric floors
These include:
- Possibility of a short circuit - this problem can occur with any electrical heating device and heated floors are no exception. This problem should be prevented by checking all cables before laying the flooring.
- Energy costs are not so much a problem as they are a disadvantage. When using such a scheme, increasing costs cannot be avoided - the decision depends on the intended use:
- If electric floor heating is used as a constant power source, then reliable insulation of the house makes sense. For example, make high-quality thermal insulation of walls. In this case, heat loss will decrease and, as a result, heating costs will also decrease.
- If the system is used as an additional heat source, then it makes sense to lay the elements where the greatest movement occurs. As a rule, the most frequent movement occurs in the center of the room, and accordingly the heating elements should be laid in the center. Thus, fewer elements will be required, and costs will be reduced by heating a specific area of the room, rather than all at once.
Radiation is sometimes cited as a disadvantage. But in fact, such a system is no different from any other electronic device, and therefore you should not be afraid of harm from it.
Types of electric heating
On the market for electric heated floors you can find several versions. Each has its own pros and cons. To understand which option is best suited to a particular home, you need to study each of them.
Electric heated floors are divided into 2 types according to their effect:
- Resistive - heating in this type is carried out by cables.
- Infrared - heating is carried out due to a special component that transfers heat to surrounding things.
Cable electric floor
The cable version differs in that it uses cables for the quality of the heating elements. Connected to electricity, they heat up due to which the surface is heated.
Solid wires
Single core cables are both a heat conductor and a heating element. If the installation of electric heated floors occurs with such a cable, then it is important that the ends of the wire meet in one place. This is necessary to connect the system to the control unit.

Twin wires
Twin-core wires are much more convenient to use. One core is necessary for heating, the other closes the circuit. When using these cables, it is not necessary for the two ends to meet. Therefore, it is more often used; it is much easier to bring one end of the wire to the control unit than to mount the system so that both ends meet in one place.
Heating mat
The convenience of the mats is that you don’t need to calculate the required power yourself, the manufacturer did it all. Mats are purchased depending on the number square meters on which the heating element must be mounted.
Infrared heating types
Rod type heating
A type of infrared floor is a rod electric heated floor. It resembles a rope ladder with wooden or metal rungs. But a rod with a heating element is used as crossbars.
The floor heating is carried out using this rod. And the “rope” is a polymer that can be cut to make installation. However, the cut polymer will need to be fixed into the circuit, since it plays the role of a conductor.

Film type of heating
Electric heated floors can also have a film appearance. In this case, the heating of the surfaces occurs due to infrared radiation. The elements responsible for heating transmit a thermal signal over short distances, heating what is located next to them. These elements are made of carbon paste, and copper wires encased in film are responsible for its heating. For installation, the film version is most often used, since it is easy to install.
 Film version
 The film floor has a very small thickness, and therefore it can be used where the ceilings have limited height.
Thermal sensor for electric floor
If you decide to install electric heated floors in your home, then you need to thoroughly prepare for this. In addition to materials such as concrete, flooring and others Construction Materials, you need to purchase the necessary set of heated floors and additional elements that will control the system.
These elements are:
- Thermal sensor - it shows temperature data.
- Thermostat – it is necessary to set the temperature to which the element will heat up.
Both of these elements work in pairs, as soon as the temperature sensor records the temperature to which the elements have heated up, the thermostat receives a command and turns off further heating.
Modern thermostats can be equipped with various parts that allow the installation of electronic heated floors. In this option, you can set the heating and shutdown temperatures, and the data can be stored in memory once; further control will be taken over by the thermostat system.
 Heat sensor
 In new models of the device, control can be carried out remotely by installing a SIM card. That is, in essence, the control sensor is transferred to the phone.
Via SMS message you can set the heating on and off time, and the floor heating temperature.
You can also turn off the entire system if necessary.
Calculation of the power of heated floors
Before choosing a heated floor, you need to calculate the area of the room and the power of the system, so that it can heat the home. First you need to decide in what mode the heated floor from electricity will be used. If the floor will be the main source of heat, then use complex circuit calculations. If the floor is used as an additional source, then the calculations in this case are much simpler.
When using a heated floor as the main heating system, an accurate technological calculation is required, which should take into account such aspects as the area of the house, the number of doors and windows, and possible heat loss. At the same time, when calculating the area, you need to pay attention to the furniture that will be placed in the room. Warm floors must be installed in spaces that are free of furniture.
The exception to this condition is heating rod elements. They can be laid over the entire area, as they are self-regulating.

When making calculations, it is important to correctly calculate possible heat losses. You need to pay attention to this data close attention, since incorrect calculations will lead to the fact that such a system simply will not cope with heating the room and the house will be cold. Possible heat losses are calculated using special tables. It is best to entrust these calculations to specialists. They will more accurately calculate the required system power.
If an electric underfloor heating will be used as an additional heat source, then necessary calculations can be produced independently. In this calculation, you need to take into account the type of floor used, resistive or infrared, the laying area, that is, the area on which the heating elements will be located and the power of the wire.
Laying rules
Before you begin laying floors, you must familiarize yourself with the laying rules. It is necessary to strictly follow the instructions, then you can guarantee the correct and smooth operation of the entire system.
Such nuances include the following requirements:
- Before installation, it is necessary to install the thermal insulation layer. This is necessary for all types of floors, since part of the thermal energy will not go down. In this case, heat loss will be minimal, and floor heating will occur faster. This way it will be possible to reduce electricity costs.
- When placing floors, it is necessary to take into account the location of furniture; heating elements cannot be placed under them, except for core floors.
- There should be a distance of 5 cm from the walls and at least 10 cm from heating appliances (radiators).
- When laying, it is necessary to observe the pitch of the wire, and also avoid crossing the wires.
- During installation, it is important to ensure that there are as few cuts for turns as possible. This way the integrity of the system is not compromised. All cut areas must be carefully insulated. Failure to comply with this rule results in loss of power and the possibility of a short circuit.

- Joining small pieces of flooring is also undesirable; the minimum section length should be at least 50 cm. When purchasing a heated floor, it is better to take it with a reserve.
It is imperative to install an RCD device; it will turn off the heat supply if problems arise. For example, if power is lost, the RCD will disconnect the system from electricity.
It is better to entrust all floor installation work to a professional electrician.
Also, for electric floor heating, it is better to allocate a separate line where only this system will be connected. Also, it is better to switch the system to a separate machine; in case of problems with electricity or the floor itself, you can de-energize the system with this device.
Installation of heated electric floor
Before choosing electric heated floors, it is better to clarify what kind of floor covering you plan to lay and how the base for the heated floor will be prepared. Depending on this data, you can buy a heated floor system.
There are three ways to install the floor:
- Screed installation.
- Installation on a screed, but secured with tiles.
- Installation under flooring, but not under tiles.
If you need to install an electric heated floor in a screed or under a tile, you will have to choose cable systems or rod floors.
Laying film flooring is only allowed under the floor covering. Moisture is harmful to this floor. Therefore, it is advisable to install it in rooms, and not in sanitary facilities.
The installation itself is almost the same:
- A layout plan is drawn up taking into account the location of the furniture and indentations. It is better to make a plan on graph paper, respecting the scale.
- A layer of waterproofing and a layer of insulation are laid, if necessary.
- The markings are transferred to the prepared base.
- The floor is laid according to the markings. All places that are cut, if necessary, must be insulated. Also, the position of the temperature sensor and thermostat is determined. The latter is installed on the wall and from the place of its installation you need to lower the groove to the floor.
- After laying all the elements, check the resistance.
- A pipe is placed in the groove, one end of which is connected to the thermostat, and the other has a temperature sensor. The end of the pipe with the temperature sensor is located in the middle of the nearby heating elements.
 Electrically heated layer cake
 Test work
After this work has been carried out, it is necessary to check the functionality of the sensor and thermostat, once again the resistance and the system are completely de-energized, and the regulator is removed. Then, the screed is poured and the tiles or flooring are laid. Moreover, if a screed is planned, then they first wait for the concrete to dry, then check the performance of the system again, and then install the floor covering.
It is worth checking how the temperature sensor is removed from the pipe; this is necessary so that later it can be easily replaced if necessary.
Energy Saving
The electric floor heating system has its pros and cons, which are described above. But, with proper design and use, this system will only cause positive emotions. You should not be afraid of high energy consumption and, as a result, increased payments. With a reasonable approach to use, the number of kilowatts will not increase much, and the heat in the house will be constant. This effect is achieved by using the floor only during hours when someone is at home.
Also, it would be a good idea to think about insulating problem areas: doors, windows, balconies. In this way, heat loss can be minimized; accordingly, the system itself will not work at full capacity. The effect of the work done can be seen on your heating bills.
Electric-water heated floors - design and installation features
5 (100%) votes: 3Until recently, the most popular and frequently used types of underfloor heating were water and electric. A new variation of floor heating is liquid electric floor heating. Despite the fact that such systems have appeared on the market recently, they have already won the love and trust of many users.
About. What is this heating system? we will tell you in this article.
You can find out the price and buy heating equipment and related products from us. Write, call and come to one of the stores in your city. Delivery throughout the Russian Federation and CIS countries.

Water electric floor XL PIPE
Design and features of liquid electric floor
The floor looks like a two-centimeter pipe made of structured polyethylene with . A cable is laid along the entire length of the pipe. The XL PIPE liquid electric underfloor heating system has a seven-core nickel-chromium cable, which is coated with Teflon. Laying the pipe together with the cable is carried out according to any of the existing schemes in a screed 4-5 cm thick.

Liquid electric floor installation
When electrical energy begins to flow, the cable heats up, as a result, the pressure increases and bubbles begin to boil. Such a heating system heats up in the shortest possible time and retains heat for a long time.
Heating costs are significantly lower than when using a conventional cable floor: electrical energy consumption is 14.4 watts per 1 m²; cooling of such a floor takes approximately twice as long as for a cable floor.
Advantages and disadvantages
Electric-water heated floors have many advantages over other types:
- They are as safe as possible for the human body, since the high reliability of the heating element reduces to zero the possibility of accidental fires. The heating element threads transfer thermal energy to the liquid and then to the floor covering. Thanks to this, the chromium-nickel composition does not overheat, thus the electrical cable is protected from burnout. These properties of liquid flooring ensure its long service life.
- Liquid electric heated floors can be installed under any floor covering; its heating is suitable even for laminate flooring. You can adjust if necessary temperature regime, thereby ensuring the most comfortable atmosphere in the room.
- Such heating systems do not generate electromagnetic radiation.
- The system is absolutely not subject to overheating. You can move furniture from one place to another without worrying about it, which cannot be said about classic electric floors. They are allowed to be installed exclusively in open areas.
- The heating element is covered with several layers of insulation, which ensures its long-term operation. Thanks to Teflon, the coating can withstand heat of more than 200°C. The material is characterized by high resistance to chemical processes and also has excellent dielectric characteristics.
- Such heating systems are quite economical.
- Good maintainability. In the case of a regular cable, it is quite difficult to determine the damaged area, so you have to lift the entire tie. In liquid systems, the screed can be opened locally; at the site of the leak, if the pipe is damaged, antifreeze will come to the surface.
The disadvantage is the high cost. As already noted, electric water floors are always installed in a screed. Considering the fact that the risk of fire is reduced to zero, such systems can be installed in a wooden house.
Scope of application
When such heating systems appeared on the market, the scope of application of heated floors expanded greatly. This is due to the fact that if previously they acted exclusively as a source of additional heating, today they are increasingly used as the main method of heating homes, replacing typical radiators.
Considering the fact that such systems are laid in a screed, you can choose almost any materials used for flooring as their location: tiles, laminate, natural stone. The exceptions are: parquet, carpet, cork panel. Their unsuitability is due to the fact that they do not allow maximum transfer of thermal energy into the room. In addition, wooden parquet can dry out when heated for a long time, and synthetic carpet fibers can poison the air with harmful substances.
Installation of electric-water heated floors
The specific set of tools needed to install an electric liquid floor will depend on what operations need to be carried out and what installation method you will use. Based on the installation method, you need to prepare for work:
- electric water floor tubes;
- expanded polystyrene sheets;
- mortar of cement and sand;
- drill;
- gypsum fiber sheets;
- insulation;
- self-tapping screws/umbrella dowels;

Installation of heated electric water floor
The sequence of work for laying a liquid-electric heated floor will be as follows:
- The first thing to do is to make preparations. You need to measure the area of the base and prepare all the necessary materials. To make the work process more convenient, it is better to draw a plan for the future pipe layout. This is necessary so that you do not have to lay the cable under large immovable objects, because this is impractical. It is also necessary to calculate the cable laying pitch. Most often, the step of laying an electric-water heated floor is approximately 20 cm. This distance can be adjusted, since in such a heating system a shorter step will not give absolutely any result, but making it longer (more than 30 cm) is also not worth it.
- The next stage is the installation of floor thermal insulation. This can be done in two ways: by laying polystyrene foam sheets and then securing them to the base using umbrella dowels, or you can place a lavsan metallized material on the surface. You decide for yourself which method you prefer.
- Then you need to reinforce the base. To do this, the surface must be reinforced with reinforced mesh. If reinforcement was used during rough screeding, the mesh must be laid on top of the cable.
- Let's move on to cable installation. You need to put it down. During installation, it must be immediately fixed and secured using plastic clamps on the reinforcing mesh. This is necessary so that during the process of pouring the solution it remains in its original position. In areas where the cable bends, it is necessary to make more frequent fastenings.
- Installation distribution box which will be needed for repairs. The body of the box must be raised so that its lid is located at the level of the surface of the future screed. Then the box needs to be firmly fixed in one place and glued waterproofing material, which is necessary to protect against water ingress when pouring the solution. After this, you need to insert the two ends of the laid tube into it.
- The next step is to connect the power supply. A wire is connected to the anode and cathode, which will stretch to the power source and regulator.
- Next you need to check whether the system is working. It is necessary to measure the insulation resistance of the heating cable and check whether its values correspond to those written in the instructions.
- Next we move on to pouring the screed. After the pipes have been laid and the system has been tested, beacons must be installed and a solution of cement and sand must be poured. A damper tape should be laid around the perimeter of the pouring area, which will reduce the load on the interior partitions if the screed expands.
- Installation of finishing flooring. After the screed has completely dried, you can lay the floor covering. To do this, you can use materials such as porcelain stoneware, tiles, natural stone, linoleum.
- If you cannot complete the screed, then you can resort to other methods of installing heated floors, for example, a polystyrene system.
The installation of a heating system of this type can become an additional load for the beams. That is why, before starting work, it is necessary to calculate the possible increase in loads on supporting structures.
In this case, it is better to use for thermal insulation mineral wool. It must be laid in layers on wooden beams laid crosswise, which act as a frame. Then polystyrene slabs are laid over the entire area, into which heat-distributing plates are mounted directly.