Modern stores offer a huge selection of various furniture for every taste. However, such furniture is usually very expensive, especially if you mean a good double bed made of quality wood.
A do-it-yourself wooden bed is much more economical than a store-bought one.
But you do not have to spend money on buying new furniture. An excellent solution to this problem will be a do-it-yourself double bed.
Preparation for work
First of all, you will need to draw up a drawing, as well as prepare materials and tools that will help you assemble the bed with your own hands. The amount of materials needed to assemble a bed depends on its dimensions. However, before determining the size of the bed and drawing up a drawing, you need to know the exact dimensions of the mattress.

Ready-made store products, as a rule, have standard sizes. If for some reason they do not suit you, you can make a mattress with your own hands. To do this, you need 2 pieces of foam rubber 125 mm thick. They should have different densities. The top layer should be denser (from 45 kg / m³), and for the bottom layer a material with a density of 35 kg / m³ is suitable. The width and length of the mattress are selected according to individual preferences. The most common option is 200x150 cm. A mattress pad of the appropriate size is put on the filler. As a result, you will get an excellent homemade mattress 150 cm wide, 200 cm long and 25 cm high.
To make a double bed, you will need to purchase the following materials:
- Boards measuring 200x30x2 cm in the amount of 3 pieces. Will be used to make the headboard, back and front walls.
- Boards measuring 250x30x2 cm in the amount of 2 pieces - for the side walls of the bed.
- Beam 200 cm long and 4x4 cm in the amount of 5 pieces - for supporting, bearing and legs.
- Rail 150x4x2 cm - with its help the headboards will be attached, it will also be used for the rack covering. Instead of a rail, you can use thick plywood.
- stain.
- Joiner's glue.
- Self-tapping screws.
You will definitely need a drawing of the bed.

To assemble a wooden bed yourself, you will need the following tools:
- Drill.
- Hacksaw.
- Electric jigsaw.
- Screwdriver.
- Cutter.
- Sandpaper.
- Metal ruler.
- Plane.
- Roulette.
- Square.
- Pencil.
Having prepared all the necessary materials and tools, proceed to marking the lumber and their further sawing. Here are a few key tips to keep in mind:
- First, prepare a drawing of the future bed, indicating the exact dimensions of each part.
- Make a list of bed parts and indicate the amount of material needed to create them.
- Marking lines for further cutting apply with a pencil or a cutter along the ruler.
- To make it easier, when making several identical parts, you can cut out just 1 and use it as a template.
- The surfaces of the saw cuts must be cleaned with sandpaper.
Step-by-step instructions for assembling the frame
Measure the mattress you will be using with your bed.
It should be freely located in the frame of the frame, however, there should not be large gaps either.

Cut 2 according to measurements taken. end boards and 2 long boards for sidewalls. Gather them into a rectangle. Use eyelets and wooden spikes to fasten the boards. Connections must be W-shaped. Cut sockets for such connections with a jigsaw or gouge with a chisel.
The depth of the grooves should be about 50 mm, and the width should be 20-30 mm. Lubricate the lugs with wood glue and connect. Align them at 90 degree angles and fix with clamps until dry.
A wooden bed on such a frame is a reliable and high-quality product. This design is an example of a traditional carpentry connection. If you are unable to make a middle eye connection, then you can use a tenon mount to fasten the sides of a wooden frame.
To do this, you will need to take the boards and prepare mating holes in their end sides, the diameter of which should correspond to the diameter of the wooden spike. Lubricate the spikes and holes with wood glue and assemble.
The easiest way to assemble the base of a wooden bed is to connect it with self-tapping screws with additional fastening using a metal corner.
Leg Installation Guide

The wooden bed in question will be installed on reliable and durable legs. To begin with, you will need to cut the bars of the same length, from which the legs will be made. The legs are mounted at the corners of the bed. They can be installed from the inside, outside or inserted into the frame.
If you decide to insert the legs into the frame, then it is recommended to use a spiked mount to assemble the structure. It is more reliable for such structures, so that the legs will not loosen for a very long time.
If your wooden bed is wider than 200-220 cm, then it is recommended to install an additional fifth leg. It is installed in the middle of the frame. In this case, it will be necessary to fix an additional longitudinal board and attach the leg to it.
Lamellar frame assembly procedure
It is also a lattice or a grid. The main function of this structure is to support the mattress. It is thanks to the lamellar frame that it will not be pressed inward, deformed and fall to the floor.

First of all, you will need to take the mounting rail and stuff it on the inside of the bed frame, on the end boards and sides. Make a marking in height of at least 100 mm from the top edge. Along the perimeter, the rail can be fastened with a dotted and solid line. Instead, a metal corner is also suitable.
Take a bar (a section of 30x30 mm will be enough) and make a frame for the lamella. It is fixed according to the internal size of the double bed frame. Fill the frame with a rail measuring 150x4x2 cm. It is attached across the length. The step should be 5-7 cm.
If you work in accordance with the previously given drawings, then you will not have any problems with the assembly of the product, and the finished wooden bed will serve you for many years without the slightest complaint. In conclusion, it remains to process the frame with sandpaper and open it with varnish.
Bed finishing
In order for the finished wooden bed to look beautiful and fit well into the interior, you need to choose a coating of a color that would go well with the existing environment. Thoroughly sand and clean the frame, soak it with drying oil and cover it with pentaphthalic or oil paint.
Before varnishing the wood, the surface must be given the desired tone with a stain. It is evenly applied with a brush. Wait for the material to dry and apply the varnish with a foam swab, brush or roller. It is recommended to apply varnish in at least 2 layers. Polish the dried surface with a felt or felt sponge.
Purchase a decorative paneled slab for the footboard and headboard. A carved wooden slab of the desired design can be ordered from the carpentry workshop. Ready-made carved planks are suitable for decorating side horizontal boards. Such decorations do not create a noticeable load and are easily attached with self-tapping screws, small nails or glue. When everything is ready, it remains only to put the mattress, and the wooden bed can be used for its intended purpose. Successful work!
Today, many people are concerned about the ecology of the home, including furniture made from natural materials that is safe for health. This is most relevant for furniture in the bedroom, and especially for the bed, on which a person spends a third of his life, rests, energizes for active work. Of course, beds made of natural wood can also be bought in the store, but such furniture is very expensive, and it can be problematic to find the right model in size, shape, color. Therefore, for many, the question arises of making a wooden bed with your own hands. This is not difficult to do, but the product will fit your requirements and will cost much less, because you will have to pay only for materials.
Consider the manufacture of the simplest model of a wooden double bed.
Necessary materials and tools
The amount of materials that will be needed to make a bed depends on its size. But before drawing up a drawing and deciding on the length and width of the bed, you need to know the exact dimensions of the mattress. Purchased mattresses usually have standard sizes. If for some reason this does not suit you, you can make a mattress yourself from two layers of foam rubber with a thickness of 125 mm: the lower layer is less dense (35 kg / m 3), the upper one is more dense (at least 45 kg / m 3). The length and width of the foam in this case, you can take the one that suits you. For example, 200 cm and 150 cm. A custom-tailored mattress cover is put on the finished layers. Thus, the mattress will have the following dimensions: length 200 cm, width 150 cm, height 25 cm.
For a bed of this size, you will need the following materials:
- boards 250 × 30x2 cm for side walls - 2 pieces;
- boards 200 × 30x2 cm for the front, back walls and headboard - 3 pieces;
- timber 200 × 4x4 cm for four bearing, supporting and legs - 5 pieces;
- rail 150 × 4x2 cm for lathing and fixing headboards - 25 + 2 pieces (can be replaced with thick plywood);
- self-tapping screws;
- joiner's glue;
- varnish, stain.
 Bed plan - clickable
You can not do without the appropriate tools:
- screwdriver;
- drill;
- jigsaw;
- cutter;
- hacksaw;
- plane;
- sandpaper;
- measuring tools - tape measure, metal ruler, square;
- pencil.
Having prepared the tools and purchased the necessary materials, you can start marking and sawing lumber. In this case, it is worth observing a few rules:
- first you need to make a drawing of the bed, indicating on it the exact dimensions of all the details; then it is desirable to make a list of these parts and the amount of material for them;
- the line along which the cut will be made must be marked with a cutter or a pencil along the ruler;
- when making several parts of the same type and size, you should first cut out one part, and then use it as a template;
- the saw cut surface must be cleaned with sandpaper.
Wooden bed manufacturing technology
Determine the location for the support bars on the front and rear walls. To do this, divide the length of the walls into three equal parts and make the appropriate markup. The seating depth of the mattress is 5 cm. Add to this figure the thickness of the rails (2 cm) and the supporting longitudinal bars (4 cm). You get 11 cm, which you measure from the top of the walls at the marking points.
Screw on the two support bars from the inside. When selecting self-tapping screws, consider the thickness of the bars and boards so as not to spoil the front surface of the product.

Screw the support bars to the side walls. To do this, measure 7 cm from the top of the board (the thickness of the rails and the depth of the mattress) and draw a line with a ruler. The support bars are screwed along the entire length of the side wall, retreating from the edges by 6 cm. Screw two vertical pieces of a 4 cm thick beam along the edges of the support bar so that the indentation to the edge of the board is strictly 2 cm.

Attach an additional headboard to the front wall. Pre-glue the edges with glue and perfectly align the workpieces. From the outside, reinforce the headboard with three slats, which are glued and screwed with self-tapping screws. The shape of the headboard can be chosen according to your taste.

Cover all blanks with stain, achieving the desired color. After that, apply quick-drying varnish twice.
Assemble the bed frame by connecting the workpieces to each other with self-tapping screws.
Place two load-bearing beams on the support bars of the rear and front walls and screw them with self-tapping screws. For better support, two legs can be screwed to the supporting bars in the middle with a height equal to the height of the side walls.

Lay the slats (or plywood, depending on the option) on the supporting structure, maintaining a distance of 4 cm between them and stepping back 2 cm from the front and back walls. Screw the slats with self-tapping screws. Lay the mattress on the finished bed.

As a result, you will get a classic wooden bed, very durable, eco-friendly, that fits into the interior of your bedroom. If there is a desire and certain skills, you can decorate the design with various decorative elements.
Plan and photo from Serjant (guns.ru forum)
In the apartment that we rented for a year, there was a Soviet "book" sofa and a bed with a metal mesh, which I took apart on the very first day and took it out to the balcony. Sleeping together on these devices was very uncomfortable.
In addition, we had an inflatable double bed, which everyone probably saw on TV. Such inflatable "furniture" is quite practical to use and is quite suitable for spending the night somewhere at a party or in the country. But sleeping on it every day is below average pleasure.
How to make a double bed with a minimum set of tools
Since it was glued with Chinese hands, after a couple of weeks it began to deflate spontaneously. Every evening you pump it up before going to bed, and in the morning you wake up with your back touching the floor while your head and legs are pulled up. When our patience ran out, we bought an orthopedic mattress measuring 160 by 200 centimeters.
At the moment, the choice of such mattresses is quite large in the price range from 4000 rubles to 1000 dollars. The device for all mattresses is almost the same, and the difference in price is due to the country of origin and the various materials that cover the spring frame. Of course, it was not without the participation of marketers offering the so-called "independent" spring system. Unfortunately, the big name is not quite true. Even sellers in salons say this without embarrassment, so it makes no sense to overpay.
The mattress was delivered to the apartment and the question arose of how to make a double bed with my own hands, using a minimum of tools that I had. The set consisted of a drill, an Irwin fine-toothed wood saw, and small items such as pliers, clamps, and screwdrivers.
The task was to produce not an exhibition sample of furniture, but a serviceable, and most importantly, a comfortable and reliable bed. Having sketched out a sketch of the future bed, I went to the nearest hardware store for materials.
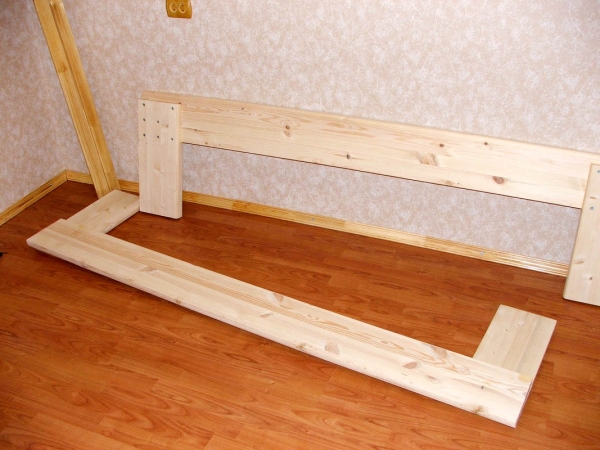
I needed 14 pieces of beams with a section of 40 * 50 mm, from re-glued pine 2100 mm long, 20 pieces of planed board 22 * 100 mm, two meters each, PVA furniture glue, self-tapping screws 65 mm and 41 mm. Actually, I made one mistake in the sequence of work. First, we purchased a mattress, and it was delivered only on weekdays, and I started assembling the bed frame on the weekend, without waiting for the opportunity to measure its dimensions in fact. The actual dimensions differ from the declared 1600 * 2000 mm by about a centimeter, down. I assembled the frame on stools or, as experts say, "on my knees".

For those who decide to make a double bed with their own hands, the presented method will not cause difficulties even if you have no experience working with wood. During the assembly of the bed frame, it is necessary to obtain a rectangle consisting of three "crowns" of the beam and having internal dimensions corresponding to the dimensions of the mattress.
I made the frame based on considerations of a tolerance of 1 centimeter in the black. That is, the internal dimensions of the resulting rectangle are 201 by 161 centimeters. Practice has shown that the value of this tolerance is quite sufficient and even 5 mm will do. But it is better, of course, to take measurements of an already brought mattress, and not to trust the dimensions declared by the seller.
To assemble a double bed with our own hands, we need a planed, preferably re-glued and dry pine timber with a section of 40 * 50 mm. The purchased timber must be sorted and selected 4 pieces of the most even and without knots. We cut the timber to size using a miter box. The entire final result depends on the accuracy of marking and sawing.
We should get two bars 1610 mm long. and two bars 2090 mm long. (2010 plus 2*40mm.). On a flat surface of the floor lay out the bars to get a rectangle. The bars must be deployed with the cleanest surface towards the floor, as this will be the top of the bed. The next step is to apply glue to the surface of the first row. After that, we fix the beam of the second "crown" with the help of self-tapping screws, observing the rules of overlap.

This stage is the most responsible for obtaining a geometrically correct design. Compliance with angles of 90 degrees is carried out on a square and be sure to check with a tape measure the coincidence of the length of the two diagonals. When installing the beam, it is enough to apply glue only on one surface to be glued and, after fixing with self-tapping screws, remove the excess that has come out. Glue remaining on the surface will make further grinding and processing difficult.
The double bed is assembled under a mattress 160 centimeters wide - a size too large so that the 22 mm thick boards (on which the mattress will lie) do not sag. Therefore, we install a stiffener passing through the longitudinal axis of the bed.


The double bed that I made with my own hands used 4 legs. I can recommend strengthening the structure with an additional central leg (as practice has shown, it is better to install it immediately, and not complete the structure when a deflection is detected).
The legs are assembled from two bars 40 * 50 mm and are installed at the "depth" of the two crowns of the bar. After the glue has dried, you can flip the bed frame to its normal position.
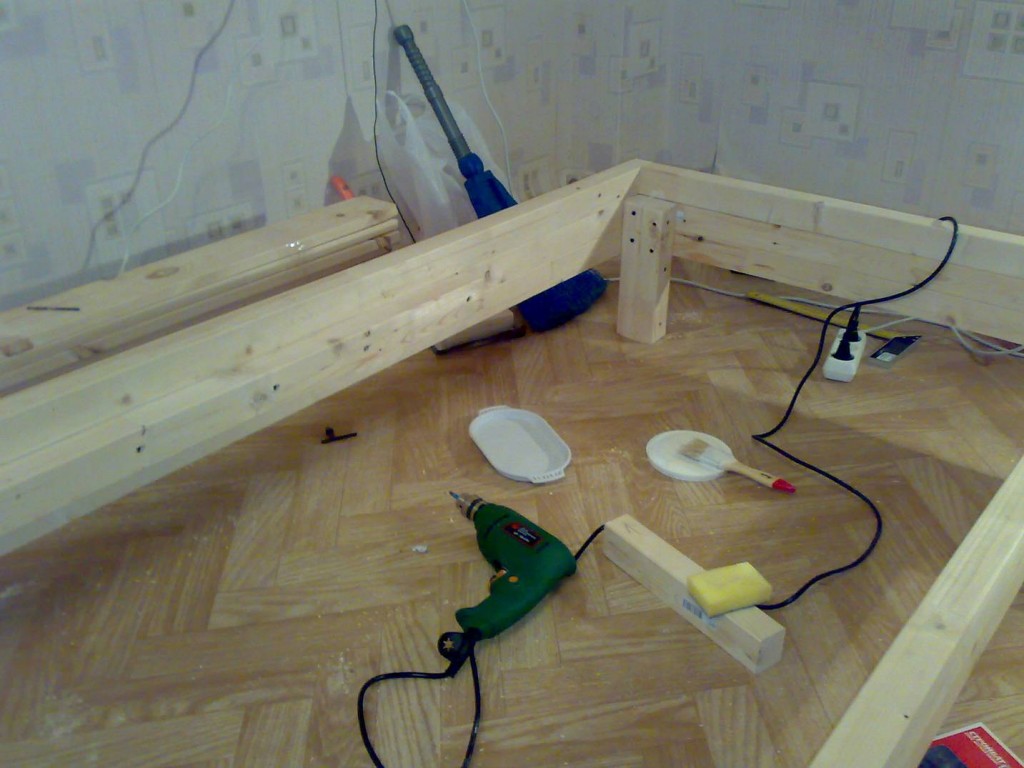
Along the long sides of the bed frame we fix the beam (I used the pieces left over from the perimeter assembly), which serves to install the boards. Actually, the mattress will lie on them. The upper crown serves as a guide for fixing the beam on which the boards will lie.
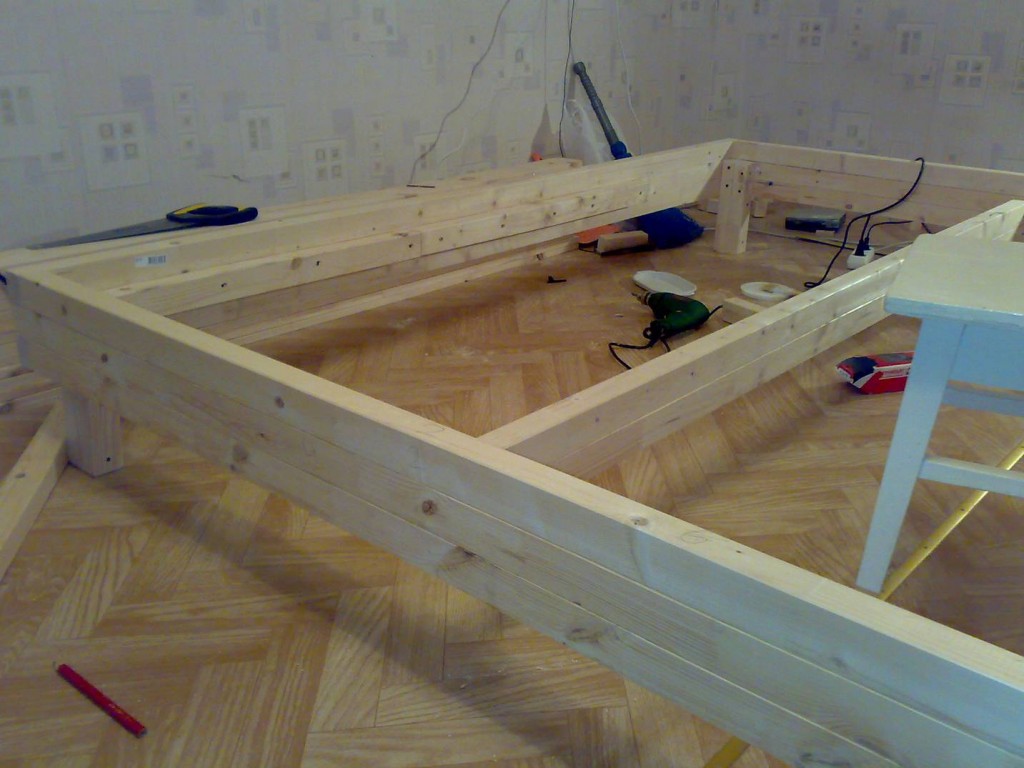
Boards for the base on which the mattress will lie, I did in a small minus in length. It is not known how the tree will behave during operation, and if it is fixed "in a thrust", unpleasant consequences in the form of squeaks are possible.

![]()

![]()
When laying out boards, it is most convenient to use two templates that are applied to the first installed board and set the step for installing the next one. In my case, the distance between the boards is 25 mm, but it is quite possible to make it from 10 to 40 mm. After the glue dries, the last stage remains - finishing.
It would seem that the ability to make beds with one's own hand should not be relevant for a modern person, because today even in remote villages you can order and deliver completely.
And yet, sometimes situations arise when such a skill can be very useful: suddenly you need a bed of non-standard sizes, there is no money for a quality model, and you don’t want to buy consumer goods, or you just want to show off your household skills.
Making a bed - basic rules and necessary materials
Before starting work on creating a bed with your own hands, you need to decide on the following:- What size and shape will the bed be?
- What material will it be made from?
- What will be its layout and design.
If there is no binding to a purchased mattress, the following design parameters are recommended:
- Double beds - 1.9-2.0 meters long and 1.6-1.7 meters wide (for large people, the dimensions can be increased to 2.4 lengths and 2.0 widths).
- Single beds - 1.9-2.0 meters long and 0.9-1.0 meters wide.
- The height of the bed (together with the mattress) can be in the range from 35 to 50 cm from the floor. Lower beds are not recommended even for children, since the space below 30 cm concentrates dust as much as possible.
- 1 or 2 sheets of MDF 16 mm thick, for the exterior of the bed;
- timber 50x50 - 8.0-8.5 meters;
- boards 40x100x2000 - 2 pieces;
- boards 20x100x1600 - 10-15 pieces (or plywood 10 (20) x2000x1600);
- self-tapping screws 5-6 mm. (preferably rough phosphated) - about 1 kg;
- nails 60x70 mm (with an annular notch) - 0.5 kg;
- bolts with washers 3x8x15 -12-15 pcs;
- universal corners made of steel with stiffeners 20-30 pcs;
- PVA glue and moment;
- stain and varnish on wood.
The first stage is the manufacture of the frame
When connecting the frame elements, along with the use of self-tapping screws, bolts and nails, it is recommended to use PVA glue. If they smear the holes from the inside before screwing in the screws, the fastening will be an order of magnitude more reliable.The frame assembly process is as follows:
- The boards intended for the front and back walls are divided into three identical parts each, and marked accordingly.
- Having added up the thickness of the planned mattress, rack perpendicular coating and load-bearing bars, the level of fastening of the support bars on both walls is determined. With the help of screws (self-tapping screws), these bars are fixed.
- The support beam is attached to the side walls at a slightly higher level (mattress thickness + slatted coating). A free distance of 6 cm is left on both sides of the sidewalls. Fastening is carried out from the inside with self-tapping screws, the length of which should not allow them to completely pass through the product.
- At this stage, you can process the materials with stain and varnish from the inside and out, or fix the decorating material on the outside.
- All walls are fastened together perpendicularly (the accuracy of the angles is checked with a locksmith square) using glue, corners and self-tapping screws.
- Longitudinal load-bearing bars are attached to the front and back walls of the bed, on the bars at the marking points. They are fixed with self-tapping screws at an angle of 45 0.
- In the openings left along the edges of the sidewalls, legs made from the remnants of the timber are installed. If a large load is planned on the bed, additional (fifth and sixth) legs are mounted in the middle part of the central load-bearing bars. These legs are made a few millimeters shorter than the main ones.
- A shield is added to the front wall, designed to serve as a headboard. It is fixed at the right level with several boards on the reverse side. A more durable design, in which the role of the headboard, front wall and bed base (instead of legs) is performed by a monolithic MDF board.
The second stage - interior decoration and decoration
After collecting the frame, it is necessary to make the flooring of the lounger. There are two popular options for building this place: from boards or sheet plywood.In the first case, the boards are laid on the supporting beam of the sidewalls evenly at a distance of 2 to 10 cm from each other, and are fastened with self-tapping screws to the side and central parts of the structure. In the second case, the sheets are attached around the perimeter and to the central beams in increments of 8-12 cm. Holes are made in the plywood sheets for ventilation with a diameter of 3-4 cm. The distance between the boards and the number of holes in the plywood depends on the planned load on the bed - the greater the load, the smaller the clearance and the number of holes.
You can make a mattress for an adult bed yourself by purchasing foam rubber of three degrees of hardness: from dense 45th to soft 25th, and glue them in six layers with PVA glue. The top layer should be completely rigid, and the middle layers can be divided into zones of different density in a checkerboard pattern. The foam rubber is not completely glued - from 60 to 80% of the area must remain free so that the material can breathe. These mattresses are not suitable for children's beds.
To decorate the bed, you can use varnishes and paints on wood, adhesive film or laminated panels, and the sidewalls are also upholstered with cloth, having previously fixed the foam rubber inside with a stapler.
Homemade bed options
If you need to do bed with drawers - during the assembly of the frame, it is necessary to install additional perpendicular racks made of chipboard, with a height from the floor to the load-bearing beams and a width corresponding to the boxes. Cutouts are made in the places of their fastening in the beams and glue, corners and self-tapping screws are used. Fittings are installed on the racks and boxes are inserted.For the manufacture of lifting beds you will have to make a double frame: the first part is an external box with load-bearing beams around the perimeter and center of the structure (bearing beams can be replaced with steel corners), the second part is a lightweight frame in the form of a mattress, with transverse rails for strength (you can buy a ready-made orthopedic base).
The second frame is attached to the base of the box at the place of the planned rise with the help of hinges, and between them a purchased lifting mechanism. In order to put things away inside such a bed, its bottom must be made of thick plywood.
Visual video example:
Creation bunk bed consists in the competent assembly of the structure of two frames, united by strong bearing racks. As racks, both monolithic furniture panels, which simultaneously serve as a protective fence for the second floor, and a thick beam, processed accordingly, can act. The main thing in bunk beds: reliable fastening of the frames and a good protective fence of the upper part.
So, making a bed on your own is, of course, not an easy task, but it develops craft skills well, makes it possible to give yourself or your family a bed that meets all individual wishes, and also allows you to save a lot. The cost of a high-quality double bed today exceeds 15 thousand rubles, and the materials necessary for the manufacture of the same product on your own will cost only 6-7 thousand rubles.
Even the simplest bed model is sold at a price of at least 7,500 rubles. For some, this is not money, but the main problem is different. Not every finished bed can be placed where you want - standard dimensions do not allow. And if we are talking about a small garden house, a modest veranda or a gazebo, then the size of the product is the determining criterion, and it is unlikely that anyone will purchase a bed for such use in a furniture store, given its cost.
The feasibility of making wooden furniture with your own hands is in many cases more than obvious. And how to competently approach the solution of this issue, what to foresee - we will consider all the nuances of organizing a “home-made” bed made of wood with our own hands.
On many sites, it is recommended that when choosing bed parameters, focus on standard mattress sizes (2000 x 1500). Argument - it should lie tightly in place. Whether this is true is up to the reader to decide. One has only to note that the beauty of making with your own hands is the ability to choose not only materials, but also the dimensions and shapes of any product.
The same goes for the mattress. If desired, it is easy to "design" it yourself. For example, from foam rubber sheets, which can be covered with a fabric (a cover sewn to size) will not be difficult. In extreme cases, the mattress can be ordered in a special workshop, according to an individual drawing. Therefore, it is hardly reasonable to “look back” at him.

So, let's start the instructions for making a wooden bed with preparatory measures.
Main - for the frame
High-quality wood blanks (board, timber) are expensive. What can you save on? For the frame, you should take even samples, with a minimum of knots. This will allow you to more thoroughly sand the tree (a grinder to help) and decorate it with high quality, and with anything. As a rule, home-made beds are varnished, and through its layer all defects are clearly visible. But for legs, slats, you can buy wood at a lower price. Given that these elements are not so conspicuous, second-rate products are enough.
The type of tree also matters. Since few people put home-made beds in living rooms nowadays (except from expensive wood, by special order), you should choose breeds that are less prone to decay (). After all, hand-made such pieces of furniture are installed mainly in rooms (or outside them), in which temperature drops and dampness are not uncommon.
Of the affordable species, larch and pine can be distinguished. Spruce, although it is a coniferous tree, should not be used. It has a soft structure, therefore, there is no need to talk about the strength of the bed. Its design will loosen rather quickly, and it will be necessary to systematically engage in repairs.
For bed finishing
Homemade beds are rarely painted. Basically, the material is polished with high quality and. Few people use a primer for surface treatment of wood, although the expediency of its use is obvious. First, penetrating into the structure, the soil strengthens its upper layer. Secondly, the consumption of paint and varnish is reduced, since the impregnation has already filled all the microcavities. And given the cost of high-quality varnish, which significantly exceeds the price of primers, this is an important aspect.

Drafting
You will have to answer two questions - how many people the bed is designed for, and how old they are. Recommended sizes:
- width: for one person - 95 ± 5, for two - 180 ± 15. For the so-called "one and a half" 130 ± 20 is enough;
- length: for a child - 150, for an adult - 200;
- frame height - within 40.
But it is worth recalling that this is not a standard, but just a recommendation. The choice of parameters is made arbitrarily, based on the specifics of the installation of the bed.

Lumber selection
The scheme of a wooden bed is simple, but it is hardly reasonable to use the same samples for the manufacture of the same type, but several different structural parts.
frame
For the side walls, a board (2 pcs.) 2,500 x 300 is taken. The thickness is in the range of 20 - 25. But there are options for the front and back. In order to reduce the cost of the product, ready-made plates can be used. For example, OSV or chipboard, but only laminated. A protective coating will add strength to the material, and will solve the problem with an attractive appearance.

Some craftsmen assemble the front and rear "shields" from the same board, then sheathing them with thin plywood. How much better it is, everyone will determine for himself, but the fact that it will take much more time to make such a wooden bed is unambiguous.
legs
A bar with a side of 40 is enough. The length depends on how much you want to raise the bed above the floor. Exactly the same wooden samples are suitable for use as frame supports. It is not difficult to calculate the total length of the workpiece, depending on the parameters of the bed indicated in the drawing.

Frame
A mattress will be placed on it. A thin, narrow board is quite suitable (the main thing is to correctly determine the interval between the elements), and a beam of small section. As an option - thick plywood or chipboard. The frame layout is so simple that it is not difficult to choose the optimal blanks.
Required tool
Explaining point by point what exactly is needed to work with wood is a waste of time for an economic person. You just need to remember about the level (construction). At each stage of assembling a wooden bed, you will have to control the strict symmetry of all its components. To determine “by eye”, whether it turns out to be even, means to doom yourself in advance to reworking the entire structure.

You will definitely need a carpenter's clamp. In the process of making a wooden bed, an adhesive is used. Each of them is characterized by its full curing time. Since the workpieces must be securely fixed during the drying period, a clamping device is indispensable. How to make it yourself, what modifications exist for domestic use,.
The assembly itself, according to a well-designed drawing and with the necessary tools, is done quite quickly.

The author considers it expedient to pay attention only to certain points.
- Any markup is a small error, which is quite natural if the wood is cut not by machine, but by hand. In order to achieve maximum identity of the same type of structural elements, it is necessary to manufacture one of them, the first one, with the utmost precision. Using it as a reference, all others are made according to this template.
- When surface processing wood blanks, it is desirable to at least slightly round the sharp edges. For a more thorough leveling of the base, it is recommended to use a household grinder. Working with this tool will give not only high results, but also great time savings. About varieties.
- The connection of structural parts only by landing on glue or with the help of fasteners (screws, self-tapping screws) does not guarantee the durability of a wooden bed. The structure of the material is quite soft. In the process of using the bed, one way or another, it will be subjected to at least minor dynamic loads. Especially when it comes to the "children's" version - kids love to jump on the mattress. The “shat” of the whole structure will appear quite quickly, which means that you will have to deal with its repair, and even with the replacement of individual parts.
The tenon-groove connection with gluing these places is a more correct solution. Typical parameters of lugs and protrusions: depth (length) - 45±5, width - 25±5. If necessary, to strengthen the structure, it is advisable to use a metal corner. Enough light, aluminum, "ten". These fasteners are installed from the inside, and after the final assembly of the bed and the laying of the mattress, they are completely invisible.

Everything else is at the discretion of the master. For example, front and rear wall are made either the same or different in height. The legs are both square and round. If you “turn on” the fantasy, then it is not difficult to make such a bed out of wood, which can be safely called “exclusive”. When the drawing is made independently, and the assembly is done by hand, there is no hard standard. And the main practical recommendations are given.
Good luck, home masters!