Well, I have finally grown up to real high-quality (and expensive) accessories from Blum. Consider installing components such as drawers on a full extension Tandem system.
They differ from tandems in the same way that roller guides differ from metaboxes. They serve only for mounting already assembled boxes.
The set for one drawer includes a pair of rails with integrated closers, as well as a pair of locks (left and right which are SOLD SEPARATELY (do not forget to buy).
The boxes themselves for the tandem system have a number of features. Let's start with the calculations, they, as usual, are unique for each system.
In width, we are repelled from the width of the box drawer front wall(insert) in width should be internal clearance of the box minus 42 mm
The height of the front (rear) wall should be 12-15 mm less than the height of the side walls.
Its height should also not exceed the height of the niche - 7mm (top) - 28mm (bottom)

Let's move on to the side wall. Its length is calculated based on the length of the guide itself (subtract 10 mm).
The height is 13-15 mm higher than the height of the front wall. If we take the height from the niche, then niche height-7 mm-28mm+13 mm.
Bottom dimensions (from DVPO) width = dimensions of the front wall = 16 mm.
bottom length = sidewall length
In addition, a more rigid bottom made of 16 mm laminated chipboard is practiced. At the same time, its dimensions should be equal in width to the width of the front wall, and in length by 32 mm less than the length of the side wall.
When using a thicker chipboard (other than 16 mm), it is necessary to mill a groove, as in the diagram.

Just in case, I will give one more scheme, this time a general one.

We assemble the box. We have already decided on the dimensions. A groove must be cut in the side walls. I made it on a milling table with a 3 mm cutter, you can successfully order it on a formatter along with a cut or cut it. 
The bottom and side wall should be combined like this: 
We tighten the walls with confirmations, and slide the groove in the bottom and fasten it to the front walls with self-tapping screws (we don’t put screws on the front from the edges - leaving room for locks). 

We fasten the locks (a pair of self-tapping screws into the front wall so that the lock does not protrude beyond the frontal plane of the box.

A pair of blind holes with a depth of about 10 mm is drilled on the back wall (we retreat 11 mm from the bottom edge, also 7 mm from the side (from the edge of the wall, not the box) and the diameter of the hole itself is 6 mm. 
There is no need to attach any guides to the box, which is very cool.
Let's move on to boxes. On the side walls we mark the fastening of the guides. To do this, we retreat 37 mm from below and draw a perpendicular from the front edge. On this line, we set aside 37 mm from the same front edge - it's easy to remember))). We get the attachment point of the fourth hole in the top row (for standard drawers with an overlay facade). We prick it with an awl. 
Now we lay the guide on the marking line so that the aforementioned fourth hole in the top row is exactly opposite the pinned hole. The rest of the top row should pass exactly above the marking line (that is, it should go in the center of all the holes in the top row - it seems to be clearer). 
We twist 2-4 self-tapping screws into the centers of these holes (depending on what you will store in the boxes, more can be). For control - the distance from the front edge of the rack to the edge of the rail should be 4 mm.
We collect the box.
We put forward the guides, put the box on them (locks to ourselves) and push it back until it clicks. That's it, the box sat in its place. 
It remains to fasten the facades. I did it traditionally with double sided tape.

To remove the drawer from the Tandem rails, you must press the red parts of the locks, after which it is easily removed forward and upward.
Tandem guides hidden from your view when you open the drawer, because they are actually under the drawer.
The original design of the guides for Tandem drawers allows you to maximize the use of the internal space of the product case, because the gaps between the outer part of the side wall of the drawer on the Tandem rails and the side of the case are only 4 mm per side. In boxes on roller and ball guides, a gap of 13 mm per side. But, this is not the main advantage of Tandem guides - the main thing is the smoothness and noiselessness of the box on such guides.
Let's figure out what Tandem guides are on the example of products Bloom. On the example of Blum, because they mostly copy their products, especially Chinese manufacturers.
Tandem slide drawers are made from chipboard or wood, just like the roller slide option, but the quality level of these slides is completely different.
Tandem rails come in both full and partial extensions. In addition, the rails can be equipped with the Tip-ON opening system, which does not require a handle, or the BLUMOTION soft closing system.
Types of guides for TANDEM drawers:

Drawer on guides of concealed extension Tandem.
1. Runners TANDEM (partial extension) and TANDEM plus (full extension with system) with TIP-ON.
TIP ON within the terminology ofBloomthis is a mechanical system for opening facades without handles, and this name is used to open both drawers and doors. A slight pressure on the front is enough to open it.
The "combat" set of TANDEM and TANDEM plus guides with the TIP-ON system, so to speak, includes: two guides for 30 kg (without a system BLUMOTION), locks for attaching the drawer to the rails, the systemTIP-ON for TANDEM.

TANDEM and TANDEM plus guide set with TIP-ON system.

The price of guides with a length of 500 mm of partial extension TANDEM with the TIP-ON system is about 670 rubles.
The price of guides with a length of 500 mm full extension TANDEM plus with the TIP-ON system is almost one and a half times more expensive than 970 rubles. The price in different regions for guides is different, but in general, the difference in price is this.
2. GuidesTANDEM BLUMOTION (partial extension) and TANDEM plus BLUMOTION(full extension).
GuidesTANDEM of this type are equipped with a mechanism BLUMOTIONis a built-in soft-closing system.
The set includes two rails (for 30 or 50 kg) with integrated BLUMOTION soft closing system and locks for attaching the drawer to the rails.

Set of TANDEM and TANDEM plus runners with BLUMOTION soft closing system.


The price of TANDEM partial extension runners 500 mm long with the BLUMOTION soft closing system is about 480 rubles.
The price of TANDEM plus full extension runners 500 mm long with the BLUMOTION soft closing system is almost twice as expensive as 920 rubles.
As with the use of metabox rails, you can increase the height of the back wall of the drawer and add railings. In addition, by adding more cross separators, we again get a structured storage system.

Drawer on rails Tandem with storage systemORGALINE.
The cost of a set of railings for drawers on rails is about 450 rubles. As a result, add the price of railings to the price of the selected guides.
As in the case of using roller guides when using guides Tandem you can make retractable galleries.
Retractable gallery on rails Tandem.
In this case, with a case width of up to 600 mm, when making a retractable gallery as in the photo, the cost of a set of guides with BLUMOTION and spare parts for the gallery will be about 2,100 rubles.
Calculation and installation of guides Tandem.
For the calculation, we take our base cabinet with a height of 720 excluding legs, a width of 600 mm with two facades 596 * 356 mm, a drawer height of 150 mm. We use this data for designing with the help of the programBloom . For installation in our example, we use guides TANDEM BLUMOTION500 mm deep.

Cabinet with drawers on rails Tandem.

Base cabinet with rails Tandem side view.
As a result of the design, we obtain data on the cutting of parts, as well as a list of accessories that need to be purchased.

In addition, we obtain drawings for drilling side walls and facades for guidesTandemyou already know how to drill the case.
If you have any doubts about the correct drilling of the facade and the front wall, then the program can be used to install the guides Tandem on the side wall, and attach the facade to the front wall of the drawer using double-sided tape.
Drilling the side wall under the guides Tandem.


Drilling of facades for self-tapping screws for fastening to the front wall of the drawer for Tandem guides.
In addition, print out the information for drilling the front and back walls of the drawer for the Tandem slides.
It should be noted that if you plan to use Tandem guides in the product, then you must use 16 mm thick chipboard, at least for the insides of the product, that is, the details of the box. According to the drawings of the front and back walls, we see that it is necessary to mill grooves 55 mm wide and 13 mm high in the front and back walls of the box.


In principle, the drawing on the left is enough to make a Tandem full or partial extension drawer with closer (Blumotion) or Tip-on (front push opening system), also all calculations can be applied to Movento. We have provided drawings from the manufacturer's official instructions - BLUM.
Tandem and Movento are brothers, Movento is a new generation of runners in which the Blumotion or Tip-on closer (front push opening system) is already integrated. Movento is full extension only.
For those who have already installed Tandem, installing Movento will not present any difficulties, the only difference is that Movento is 1 mm higher than Tandem. Tandem with Tip-on is also 1mm higher (asterisk in picture).
This 1 mm will have no effect on the design of the drawer edge height, width or length. even because 1 mm is an error in marking, cutting, and installation. The only thing it needs to be taken into account when marking and installing the guides on the wall of the case (cabinet), but even then, only if you make an installation drawing with dimensions and install it according to it. However, in practice, set in place.
How to make a drawer, everything is simple, here's what you need to calculate:
2. Dimensions of the bottom of the box.
1. Processing of the sidewalls. Drawer bottom width Tandem.
The box must have a protruding rib, the role of which is to close the guide, because. Tandem - these are hidden guides. The rib also serves to fix the box on them. The thickness of the rib should be no more than 16 mm. Suitable chipboard 16 mm. But since it is not very popular in Belarus, then 18 mm chipboard can also be used, for this you will have to process it, (fig. on the right)
Bottom width calculation.
Chipboard 16 mm: BOTTOM WIDTH = INSIDE CASE WIDTH - 42 mm.Chipboard 18 mm: BOTTOM WIDTH = INSIDE BODY WIDTH - 42 mm - 2*X.
X - sampling depth in chipboard 18 mm.
Let's take an example.
Let's say we have a box with an internal body width of 464 mm.
We use 18mm chipboard. We make a sample of 4 mm.
Then the BOTTOM WIDTH = 464 - 42 - 2 * 4 = 414 mm.


After assembly, everything should look like the picture on the left.
Pay attention to bottom length.
BOTTOM LENGTH = GUIDE LENGTH - 10 mm.
Let's take an example.
Let's say we chose a 500 mm guide.
Then the BOTTOM LENGTH = 500 - 10 = 490 mm.
Pay attention to the depth of the case!
For example, if we chose a 500 mm guide, then the case depth = 500 + 3 = 503 mm.


Now you need to correctly calculate the height of the box.
Let's look at an example for Tandem:
Let's say we have a standard kitchen cabinet (cabinet), 720 mm high, made of 18 mm chipboard.
Then the internal height of the case will be = 720 - 36 = 684 mm.
We want to make 4 drawers in this building.
Then the height of the box = (684 - 32.5 * 4) / 4 = 138.5 mm, rounded up to 138 mm.
You can complicate the task. We want the boxes to be of different heights.
For example, so that all but the bottom one are 100mm high.
The total height of the walls of the boxes = 138 * 4 = 552 mm.
Three drawers 100 mm high is 300 mm.
Then the lower one will be 552 - 300 = 252 mm high.
I hope the idea is clear!
4. Installation of locks on the drawer.

After the box is assembled, install the locks. The locks are used to fix the drawer on the Tandem rails.
It's simple: tightly attach the lock between the rib and the facade and fix it with self-tapping screws.
By the way, the lock also provides height adjustment of the facade! (Locked wheel).
5. Holes in the back wall of the drawer.

Drill holes in the back of the drawer as shown. These holes are used for additional fixation. drawer a special pin, which is located at the end of the guides and also allows you to adjust the slope of the facade.
How to install a drawer on Tandem or Movento guides.
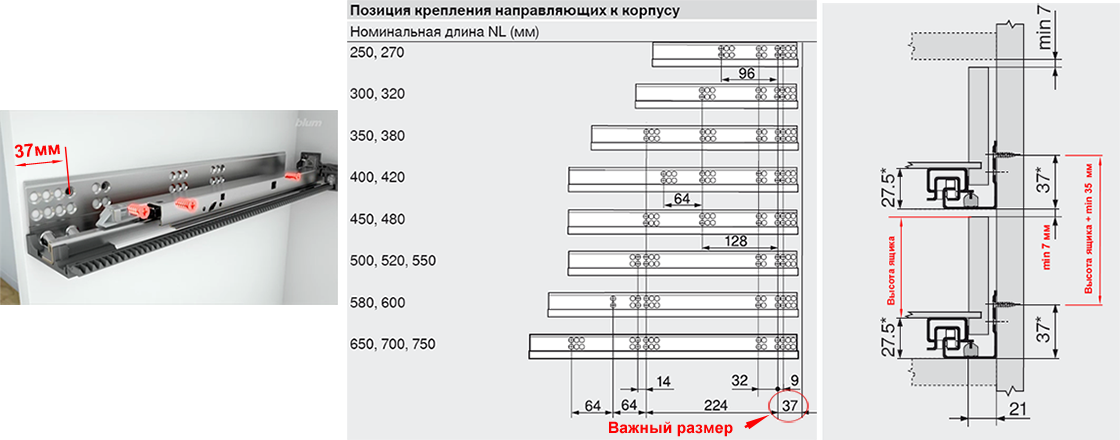
Pay attention to the size 37 mm from the edge of the housing to the 4th hole in the guide, it must be held precisely! The left and right guides must be at the same level. By level, we mean the same size reference relative to the case (cabinet). Pay attention to the correct positions of the guides on one wall. The distance between the guides (third picture) must be chosen so that there is a gap between the top of the box and the next guide at least 7 mm!, and preferably more, we would recommend at least 20 mm.
Take this into account when calculating the height of the drawer sides!
IN ALL HOLES, IT IS NOT NECESSARY TO THREAD THE SELF-TAPPING SCREWS!
Many holes are made so that in the event of a drilling error, the hole could be re-drilled elsewhere! There are no recommendations on how many screws to install on the box. Use common sense! The heavier the box, the more screws!
How to install a drawer on Tandem rails.
1. Pull out the telescopic parts of the rails.
2. Place the drawer on the rails.
3. Push the drawer all the way in.
The locks will automatically lock the drawer.

1. Attach the front to the drawer. Mark the line on which the facade eccentrics will be installed, so that the eccentrics fall approximately in the middle of the box wall, this marking is quite arbitrary.
2. On the line, mark the holes for the eccentrics, about 50 mm from the front edge.
3. Drill the holes for the cams as shown.
4. Insert the punches into the holes under the facade eccentric.
5. Attach the front to the assembled and installed drawer and with a light blow mark the fastening positions on the drawer.
6. Drill according to the markup.
7. Fix the front with the screw without fully tightening the screw.
8. Adjust the position of the front. The eccentric allows you to adjust the height / width - +/- 2 mm.
9. Tighten the screw to the end.
Continuing work on my kitchenette, I wrote another master class. Dedicated to installation retractable system tahndembox plus from the Austrian company Blum.
It's probably worth starting with the calculations. I will give a diagram and formulas from the official site, which I used in preparing my project.
Let's go straight to the theoretical part. I will make a reservation that a complete installation file will be attached at the end of the article. If you still have questions after my lesson, the answers to them can be found there.

We pass from theory to practice. The box is assembled according to the general rules (consignment note bottom, inset hull strips). Racks for rails are marked as follows, at least that's how I do it.
First, the boundaries of the facades are marked: from the bottom edge to the top of the facade, then the gap between the facades is 3 mm, then the second facade, then another 3 mm, the third facade and the remaining 5 mm.
In this case, the lower boundary of the facade corresponds to the reference point for installing guides. From it we set aside 33 mm upwards and lower the perpendicular, on which we set aside 37 mm from the front edge. This is the third hole in the guide. We drive a couple more screws into the same line into subsequent holes. 
Let's move on to the assembly of the boxes themselves. In my configuration, these are boxes with a height of M and D. We calculate the dimensions of the bottom and back wall using the formulas. We fasten fasteners to the back wall at the back with self-tapping screws. 
These elements are snapped into the grooves located at the rear of the side walls. 
Then the bottom is inserted into the grooves in the lower part of the side walls.  We turn the box over and fasten the bottom with screws.
  We put the finished box in place.
Now we assemble deep drawers D. In terms of configuration, they are distinguished by higher fasteners of the back wall and the presence of rails. 
We impose fasteners on the back wall and fasten it with self-tapping screws. 
I have already described this moment, but here the photos are more detailed. The rear part of the side wall with a niche for attaching the rear wall. 
The back wall is fixed in its proper place. 
Self-tapping screws are screwed into the bottom through special holes. 
After assembling and installing a couple more boxes in place, we proceed to the addition of facades (in my opinion, the most difficult part of the installation). That is, we have to install a couple of clamps. 
My case is quite complicated. Facades are not attached as usual, but offset to the right. (in the photo I tried to capture this fact) separately the left and right ends of the facade. ![]()
We turn it over to the inside and start marking, according to the above diagram. On the right, the overlap on the rack is 11 mm - plus. On the left, on the contrary, a gap of 3 mm - minus. 
We drill holes with a depth of 12 mm with a 10 mm drill bit. Drilling is necessary on a solid substrate, otherwise you risk pushing through the front of the facade. 
You should get such a couple of blind holes.

In these holes, you should enter the retainer futorki. 
The latch is inserted in a bent state. 
And then straightens up. At the same time, the futorki stand by surprise and it is impossible to tear out of it. 
High facades must be marked with exactly the same hole for the railing. It is advisable to put them in a couple, with a step of 64 mm, but I decided to save money. 
The railing is also introduced in a bent state. 
Then it unbends and is fixed in it. 
We snap the facade into the side walls of the box. And the railing is placed in the grooves of the rear wall latch. As usual, pressed in until it clicks. 
By rotating the railing, you can adjust the slope of the facade back and forth. We put the second facade in place. 
The lower facade in the installation has some differences. Namely, the overlay on the lower horizon. We add 16 mm to the dimensions. 
In the next photo, I showed the same holes. This is a little trick though. I started drilling with a drill on wood (with a spike), it does not move, but the spike can pierce the facade from the outside. Therefore, I drilled with a drill for metal with a limiter. 
We put the third facade in place. 
It remains to adjust the position of the facades. The first photo shows how the eccentric moves the facade up and down. In the second photo, left and right, in the third, it’s just the dismantling of the facade. 
The final touch is the installation of decorative caps. 
And finally, as promised, filler schemes in PDF format. .