One way or another, everyone who works with wood sometimes has many different cuts of wood of different species.
Of course, you can just throw them in the trash, but I suggest you make a very beautiful cutting board out of them yourself. In addition to its practical value, it will delight you with its appearance and bring pleasure from a hand-made thing.
 The main points in the manufacture of a cutting board with your own hands are the presence of wooden scraps of wood of different species and shades and their preparation and gluing.
To make this DIY, I used the following tools:
- Table circular saw (for cutting pieces of wood into strips);
- Jointing and planing machines;
- Frazier;
- Quick clamps;
- Orbital sander;
- Glue brush.
From the materials I needed the following:
- Trimmings of wood of different breeds and shades;
- Carpentry glue (necessarily waterproof and non-toxic - after all, on this board we will cut food);
- Mineral oil and polishing cloth.
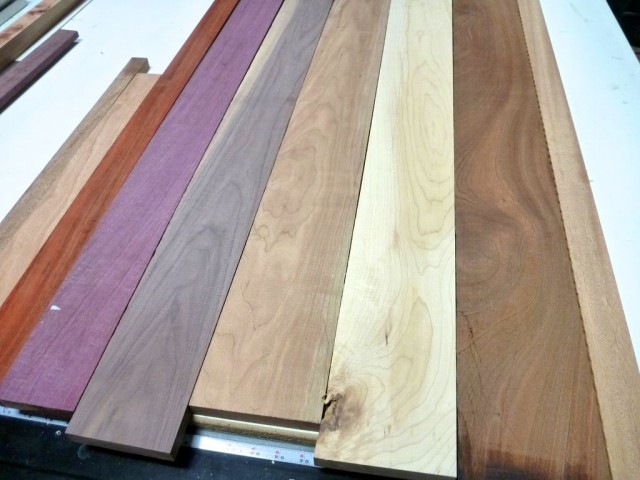
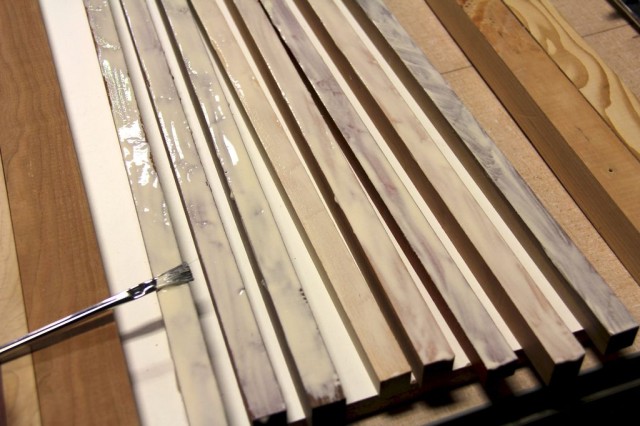
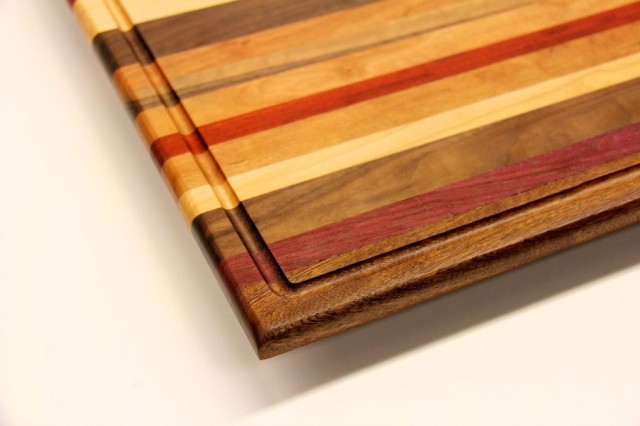
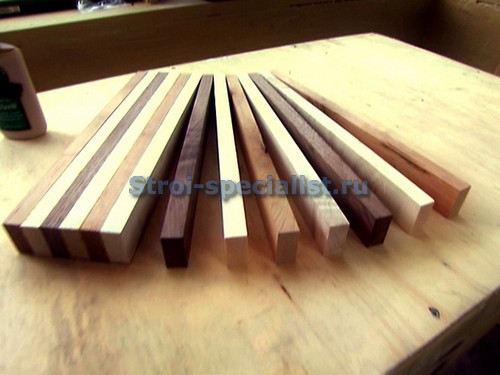
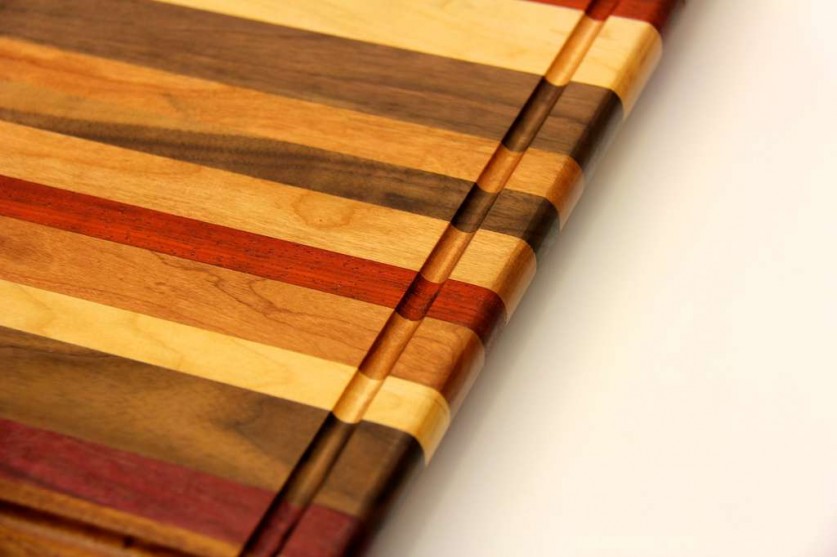
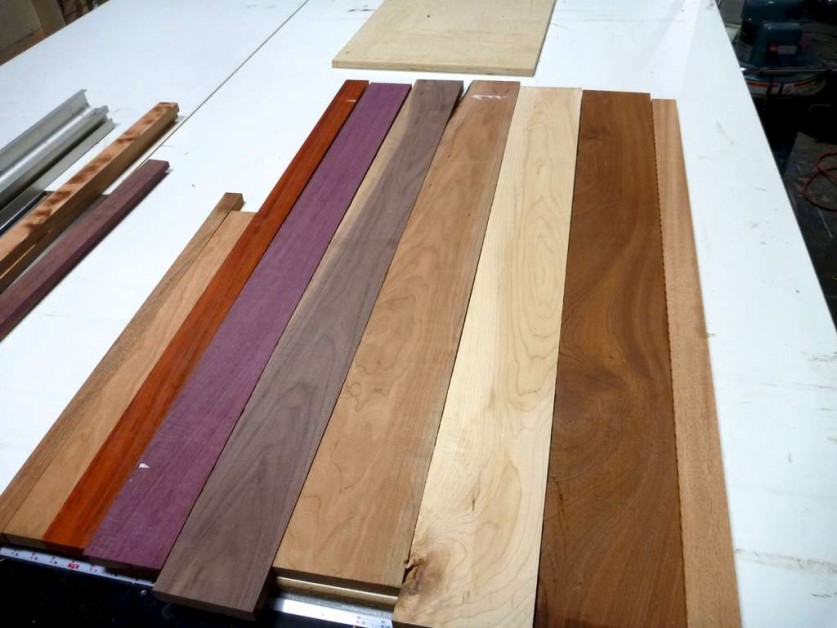
In order to make a cutting board with my own hands, I used trimmings of cherry, maple, walnut and other species, the texture and shade of which seemed interesting to me.
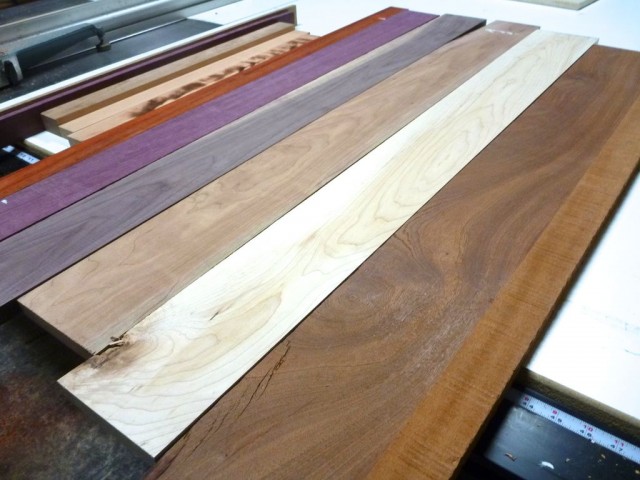
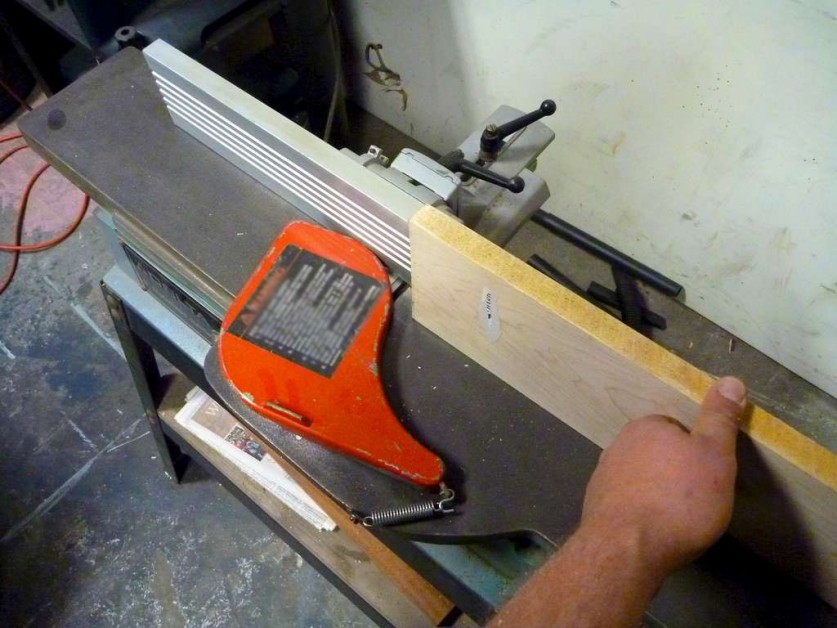
 Then I started processing pieces of wood on a jointer. This is necessary so that they can easily dock with each other. As a result of processing, it is necessary to ensure that the boards have approximately the same height, while the width can be any.


![]() After I processed the front sides of the planks using a planer. Thanks to this, all the pieces of wood turned out to be of the same thickness and with a smooth surface. You do not need to make them too thin, preferably at least one and a half centimeters, optimally 18-20 mm.
After I processed the front sides of the planks using a planer. Thanks to this, all the pieces of wood turned out to be of the same thickness and with a smooth surface. You do not need to make them too thin, preferably at least one and a half centimeters, optimally 18-20 mm.

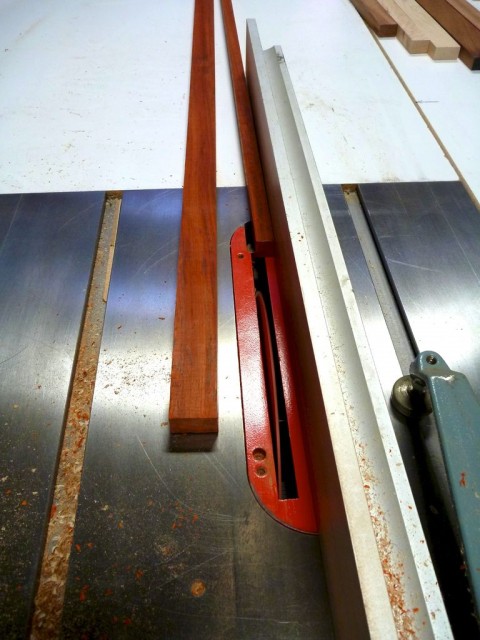
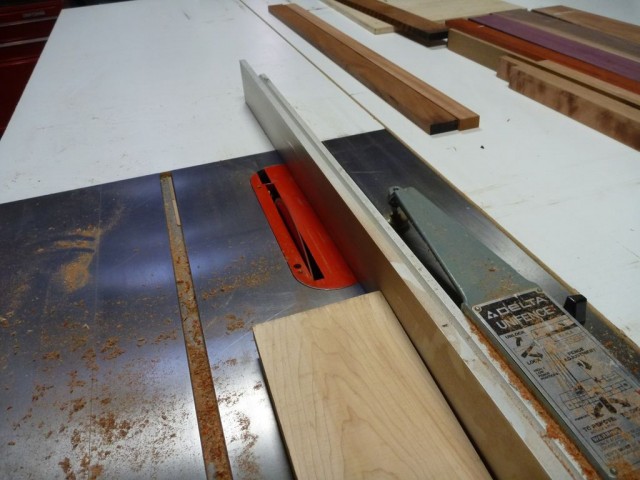
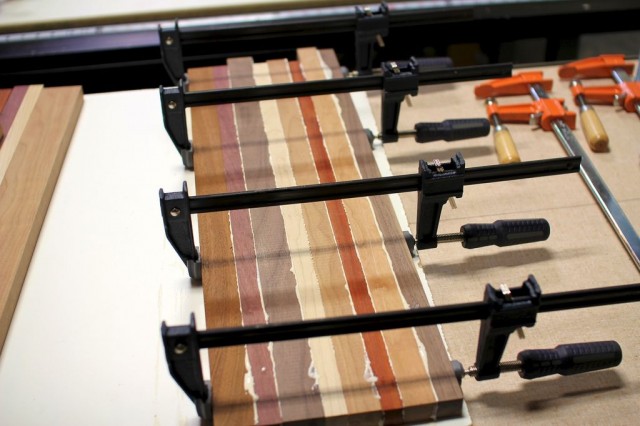
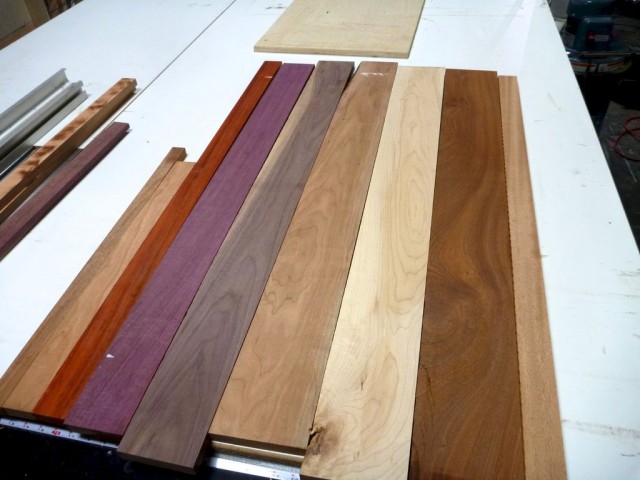 I cut the prepared boards lengthwise using a table saw. Stripes do not have to be the same width, you can vary it to your taste.
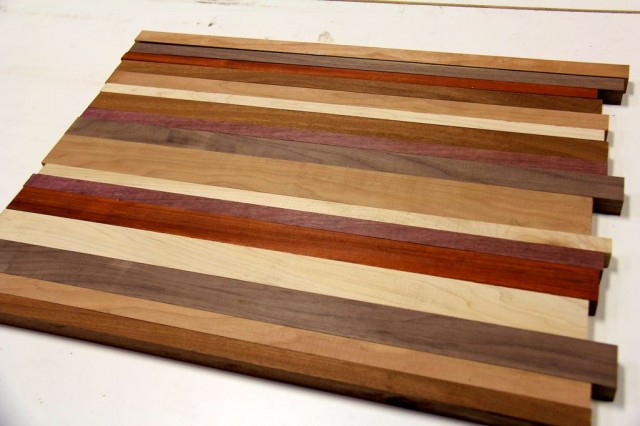
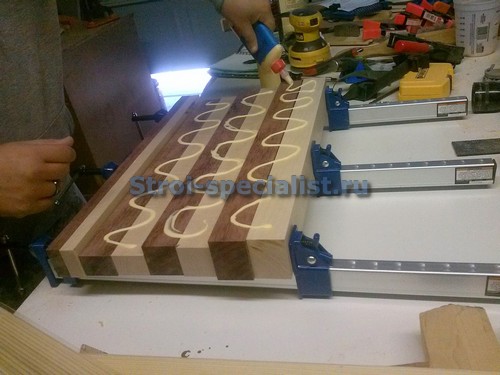
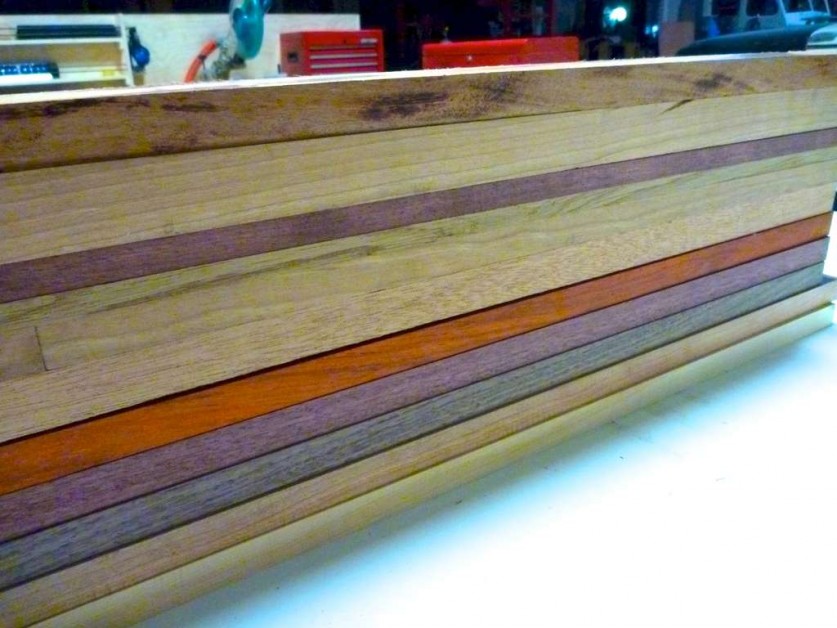
 Having finished all the cutting work, I laid out the strips in the right order. This is where you can let your imagination run wild, you can fully achieve an unusual appearance by experimenting with colors, size and location. The number of planks will depend on the size of the cutting board.
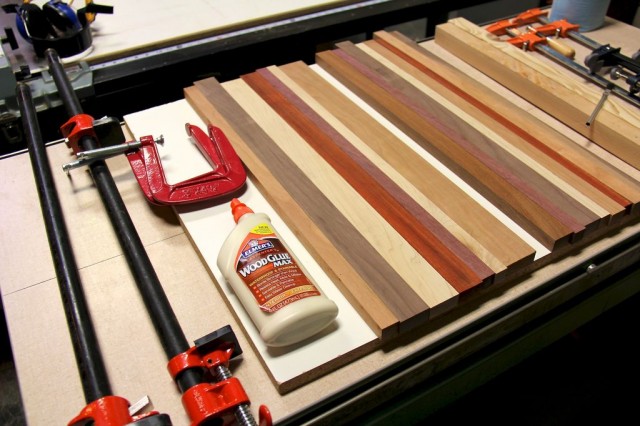
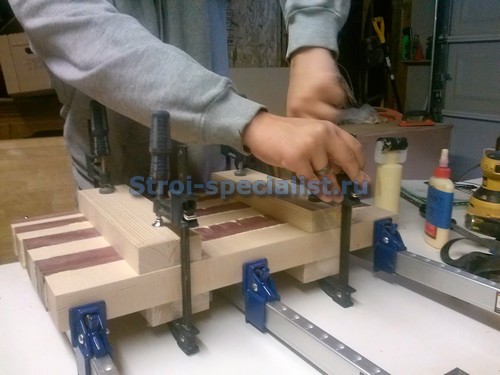
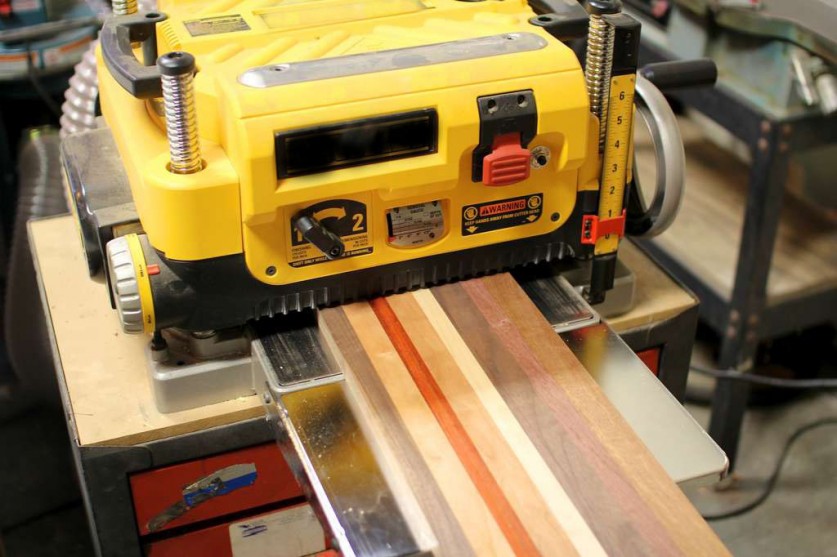
 Then they will need to be glued together, and it would be better if you do not glue them all together, but divide them into several groups. The width must be chosen so that the resulting board is included in the planer.
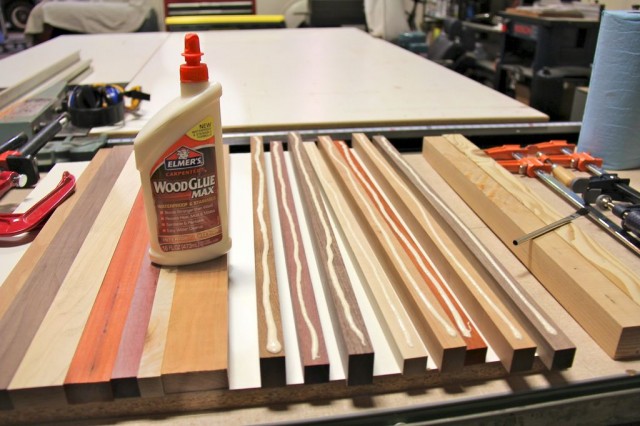
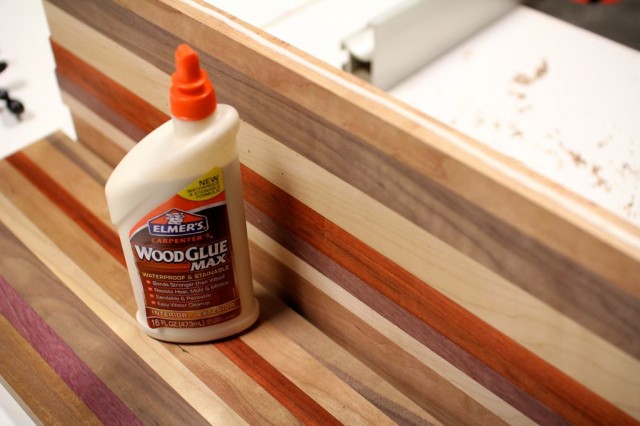
The glue must be non-toxic and waterproof. It must be applied to the side faces of each strip with a thin layer, and then tighten the resulting parts with quick-clamp clamps.

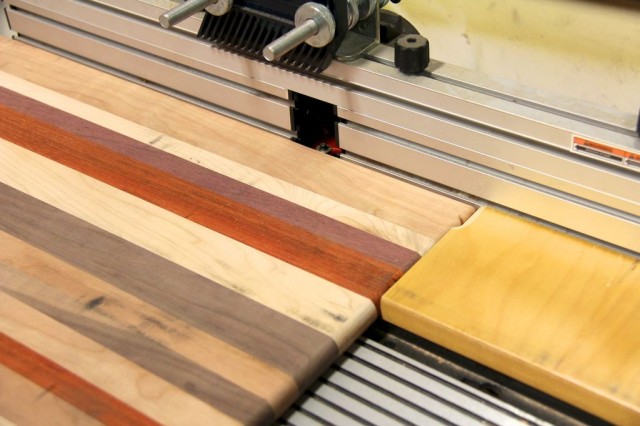
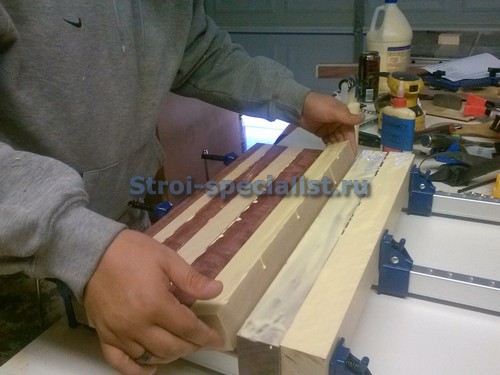
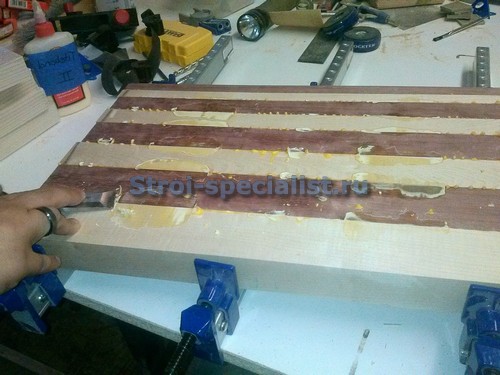
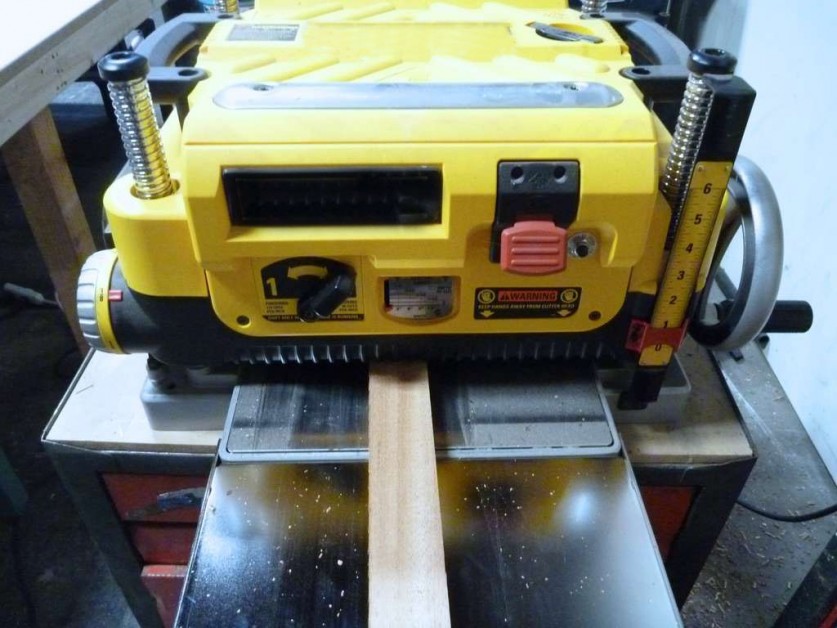
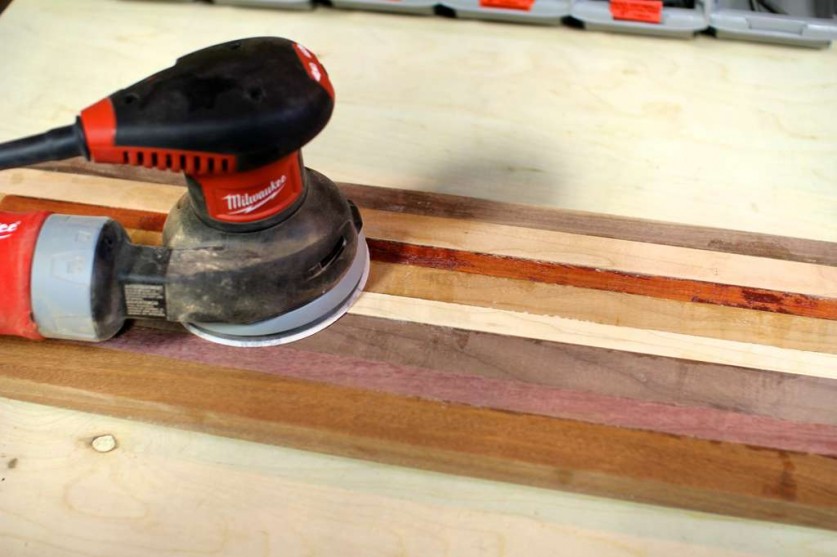
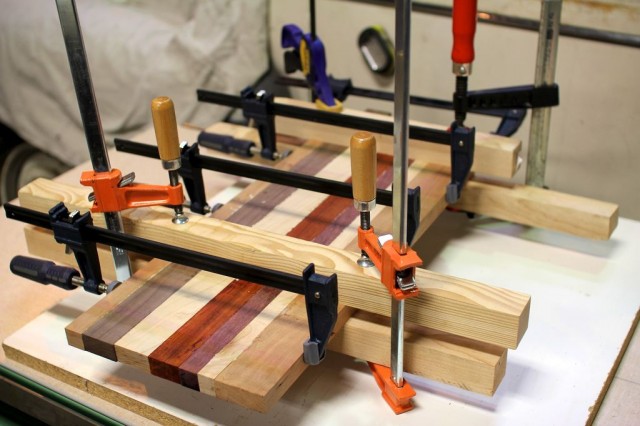 I got two boards. I treated the surface of each of them with an orbital to remove the remaining glue from the surface. Then I processed each of them on a planer to obtain a flat surface.
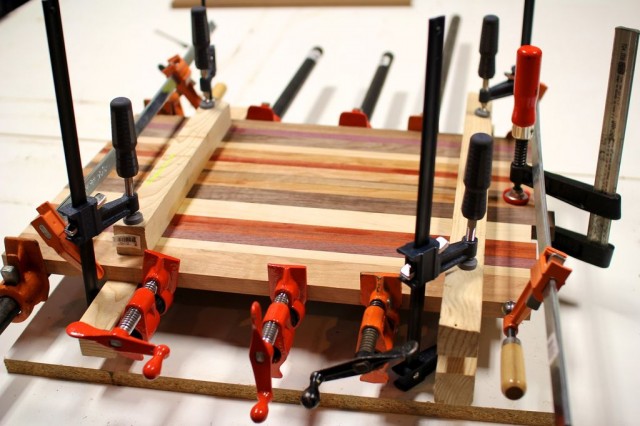
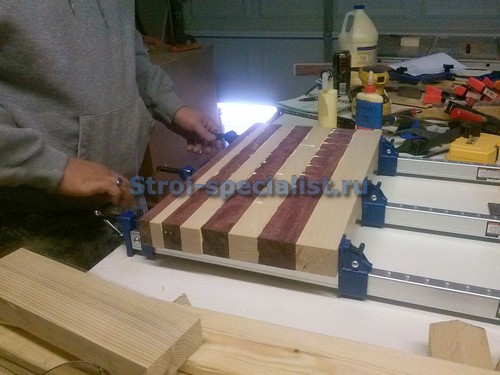
 Glue the resulting pieces together, just like you glued the strips together. Due to the large size, the resulting board can no longer be processed on a planer, it will need to be sanded by hand. It is advisable to glue the halves together as accurately as possible.
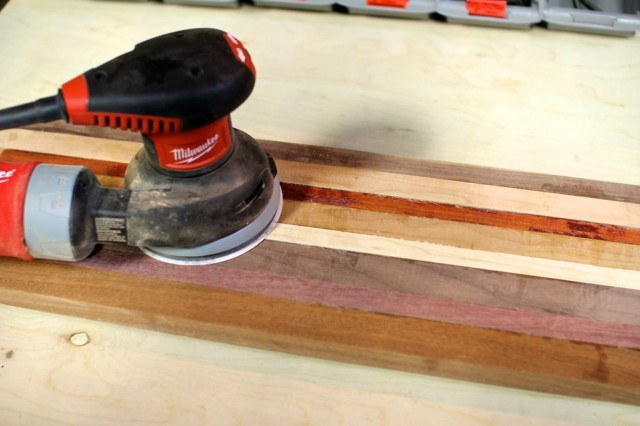
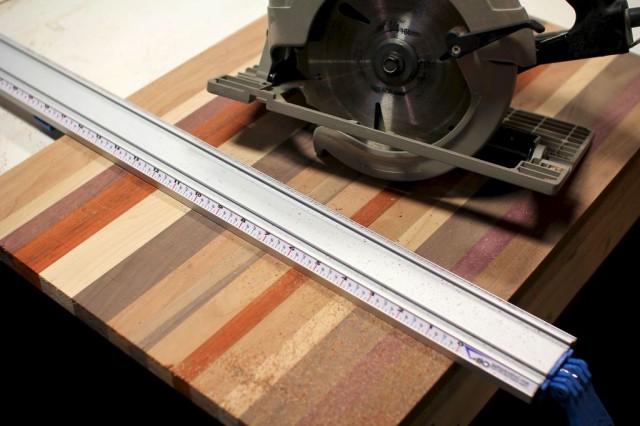
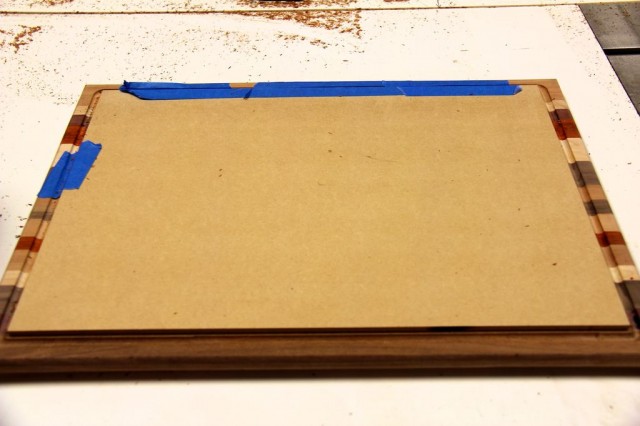
 I sanded the halves glued together with an orbital, after which I proceeded to cutting the board. Trimming the cutting board with my own hands, I tried to make it proportional (I chose its length based on the width of the board). You also need to think about making the board fit in the sink or sink, otherwise it will be very inconvenient to wash it.
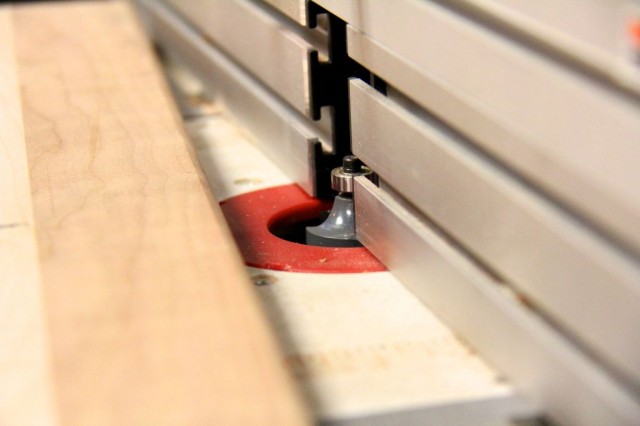
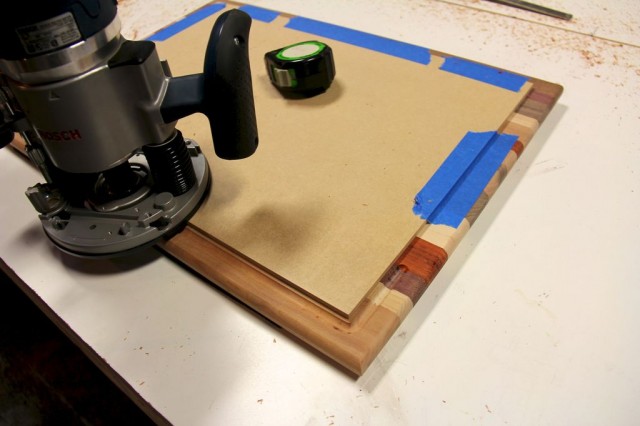
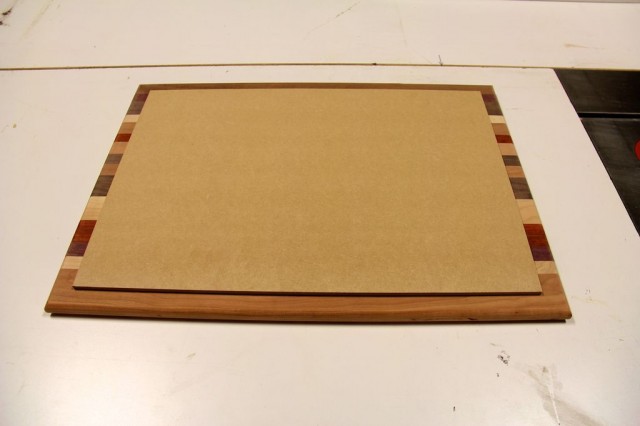
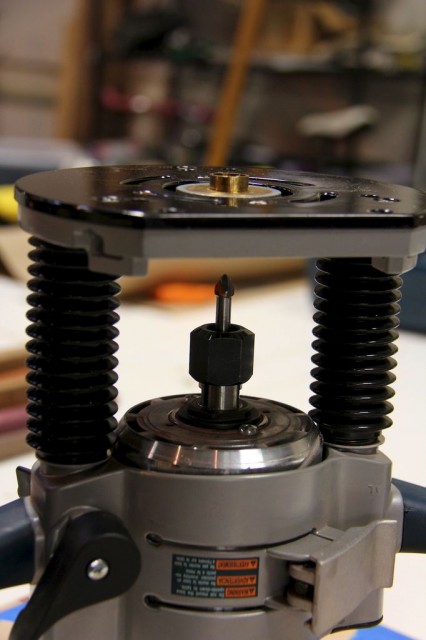
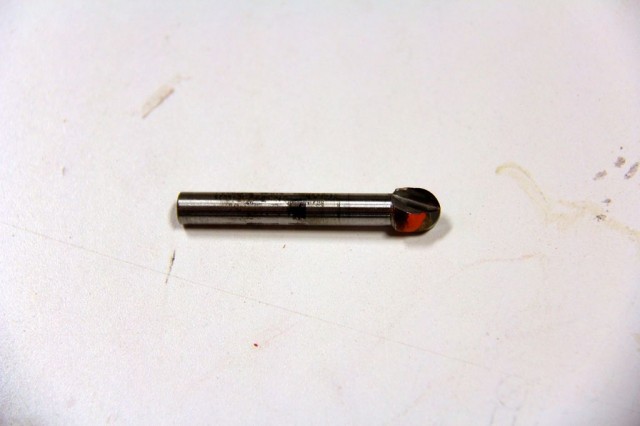
 After I rounded the edges with a semicircular cutter. This task will be greatly facilitated by a milling table with guides, but manual frezer It will work too, it just takes longer.
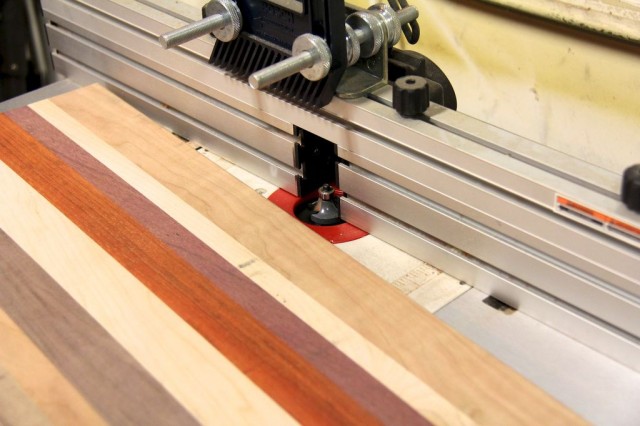
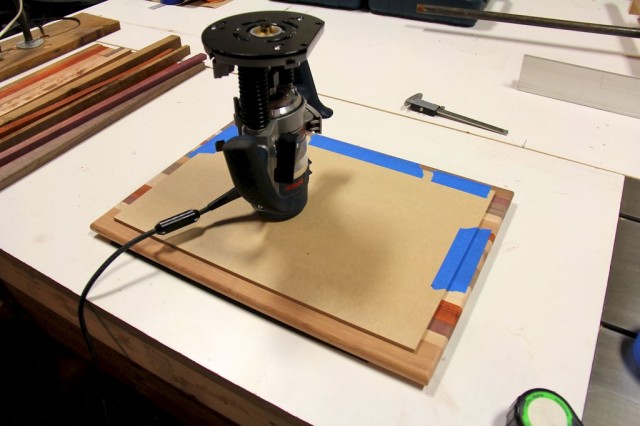
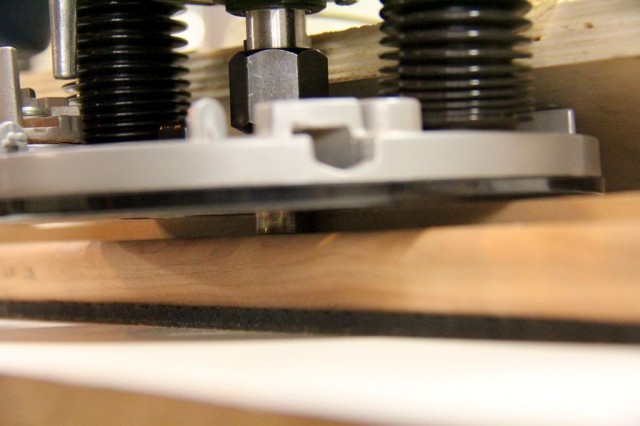
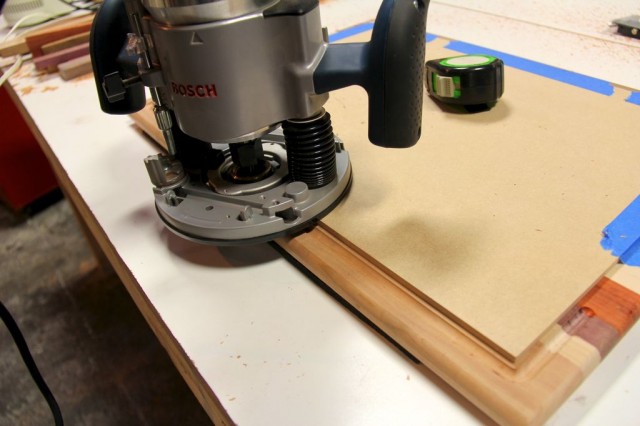
 I cut a groove along the perimeter, it is needed so that the juice does not flow onto the table when cutting various products. To make the groove even, I used a plywood template, which I secured with masking tape on three sides. After cutting a groove along one side, remove the tape from one side, and secure the one that you have already processed. And so on all four sides.
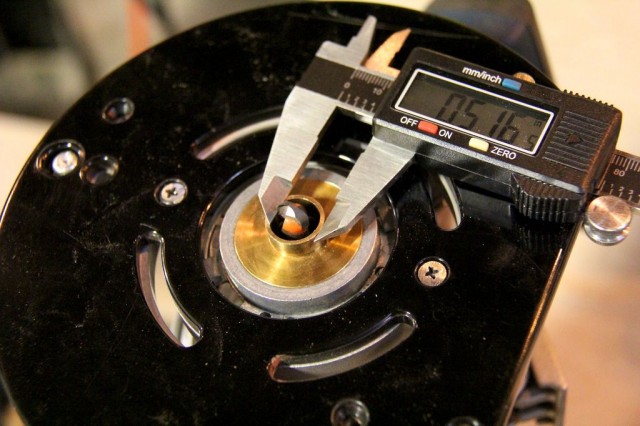
The groove does not need to be made very deep, because it will be difficult to clean, one or two passes of the router are enough.
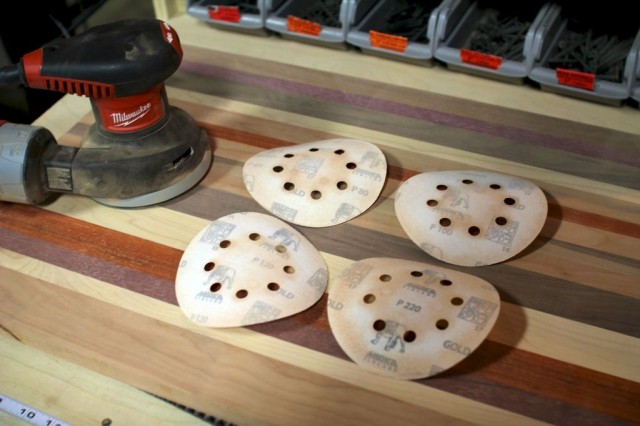
 I did the final grinding of the cutting board with my own hands sandpaper 80, 100, 120 and 220 grit (grit units), after each treatment changing the paper to a smaller one (from 80 to 220).
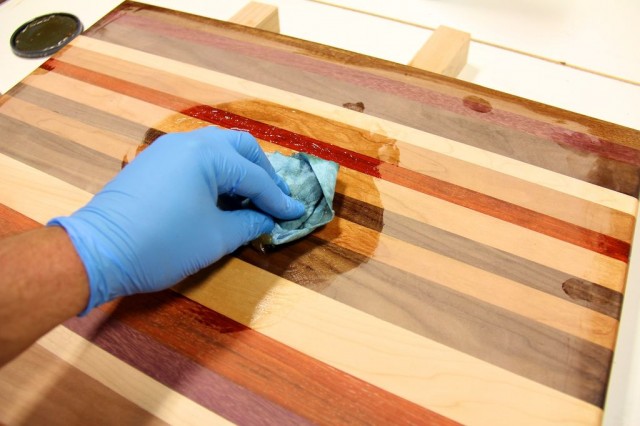
 So that the cutting board with your own hands does not deform due to a large amount of moisture, it must be coated with mineral oil. You need to make sure that the oil is well absorbed into the wood, if necessary, apply a 2nd layer.
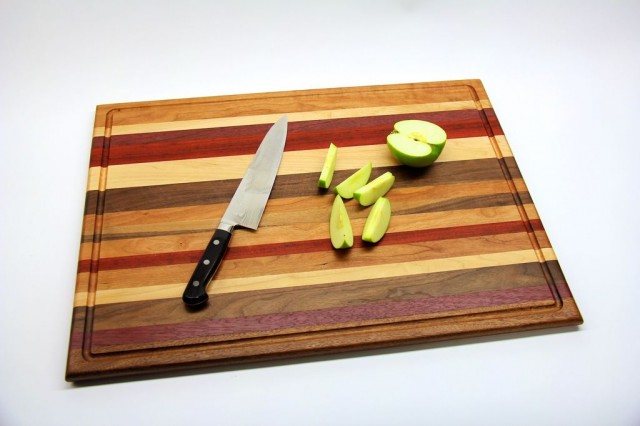
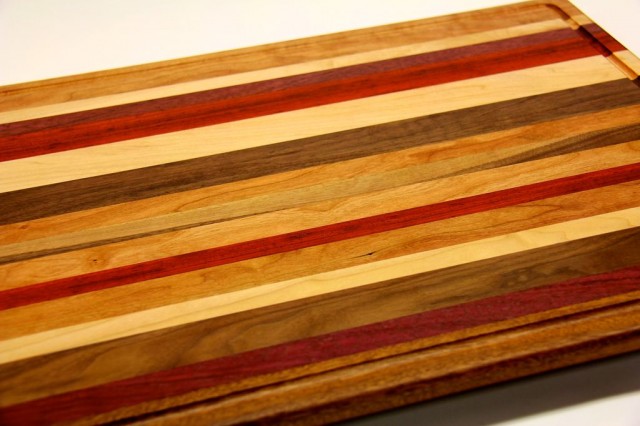
 Here are some more photos of the finished board:

Education Committee of the Moscow Region Vsevolozhsk Municipality
Municipal educational institution
"Novo-Devyatkinskaya secondary school No. 1"
Vsevolozhsky district of the Leningrad region
CREATIVE PROJECT
on the topic"MANUFACTURE OF A CUTTING BOARD"
in the subject "Technology and technical labor"
Completed:
MELNICHENKO ANDREY
6-1 grade student
Supervisor:
VINOGRADOV Vladimir Vladimirovich
teacher of technology and technical labor
2016
PROJECT WORK
Content:
Technical reference
Drawing up sketches of the main parts of the product
Manufacturing sequence development
Selection of materials, tools, devices for work
Making a product sketch
Method for manufacturing a cutting board and drawing up a technological map
Production of a product according to a technological map according to a sketch in compliance with labor discipline and work culture
Brief description of cutting board manufacturing
Economic justification
Environmental assessment of the project
Self-assessment of the result
Description of work (all stages)
Work safety
Preparatory stage:
Design stage:
Technological stage:
Practical stage:
Project justification:
Used literature and Internet materials
My work on making a cutting board consists of several stages.
First of all, I outlined for myself a sequence of actions when drawing up a project for the manufacture of a cutting board:
Idea discussion
Awareness of the problem, social significance (for home, school, etc.)
Search for information on your problem
Independent work on the selection of drawings, sketches to create an object.
Evaluation of your knowledge, skills to implement the idea
Estimation of time, materials, their cost, appearance of the product, environmental friendliness, manufacturing technique.
Justification for the choice of this project (topic and purpose of the project)
Historical background on the chosen topic
Technical reference
Preparatory stage:
In my creative project, I decided to make a cutting board. So I named my project “Cutting Board Making” (project theme).
The purpose of my project it became the study of the basic properties of wood and the methods of its processing, as well as the improvement of knowledge and skill in mastering tools and materials when creating a product with their own hands, to accurately and clearly learn how to perform technological operations; improve your capabilities; acquire acquired knowledge; evaluate the work done.
BUT project objective was the development of a technological process for the manufacture of a cutting board using tools and fixtures available in the school workshop.
What is a cutting board? Cutting board - a piece of kitchen utensils designed for cutting, less often chopping food.
To cook food, you need to prepare all the ingredients, cut, crumble, but this must be done carefully on a cutting board. A beautiful board will decorate the kitchen and can be used as a tray when serving dishes on the table. A cutting board is a necessary thing for any housewife. It is the most popular and widespread. It is most convenient to cut and cut food on a wooden surface. And the sound (knock) when the knife comes into contact with the tree is not as loud and unpleasant as when using its other types. Plus, the knives don't get blunt.
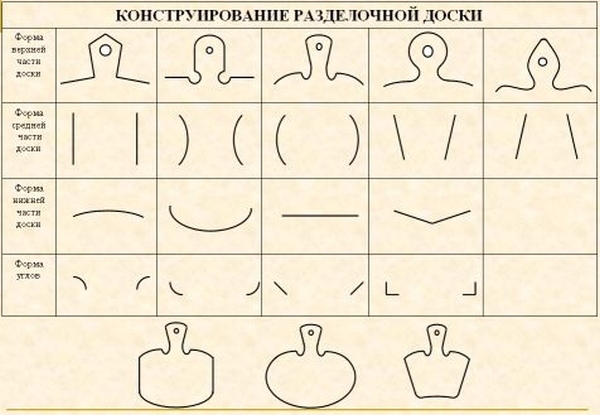
The board can be cut in the form of fish, animals, fruits, various geometric shapes. I chose the traditional board shape.
The exact date of origin of the cutting board is not known. But it is known that even in ancient Egypt, housewives laid special devices on the table so that they would not stain the table when cooking. In ancient times, stone blocks were used as cutting boards, the care of which left much to be desired.
Cutting boards have been an integral part of kitchen utensils since ancient times. Then they were used mainly for butchering meat at the feasts of the Roman nobility. True, at that time it was not easy to lift a cutting board - stone was a favorite material for making boards.
A variant of a board made of wood (pine, oak, beech, birch) appeared a little later and remained practically unchanged until the 20th century.
The plastic cutting board familiar to us appeared only in the middle of the twentieth century. In the 40s, the chemist Müller in Germany and the scientist Andrianov in the USSR simultaneously obtained silicone plastics that had high heat resistance and resistance to water, acids and organic solvents, just what manufacturers of household and kitchen items were looking for.
And in the forties of the last century, the production of plastic cutting boards was launched.
Of course, a cutting board is almost impossible to perfectly wash (clean) after use, even with detergents. But the problem is solvable - their number.
In EU countries, cutting boards for different products are divided by color:
blue board for cutting seafood
white board is for dairy products
on yellow boards butcher raw poultry
on red - raw meat
cutting vegetables on a green board
In our country, there is no such gradation in color, but each operation in the kitchen has its own board.
Separate boards for:
for fish
for meat
for raw vegetables
for boiled vegetables
for bread
for fruits
Before starting work on the project, I studied various sources on the Internet, and also read carefully the topic in the tutorial. I studied the history of cutting boards, what kind of wood is better to use for making boards. A cutting board is an indispensable attribute of any kitchen. Boards can be both professional (for example, for catering establishments) and household. They differ in shape, size, and the material from which they are made. But the most popular were and remain wooden cutting boards. To make a cutting board out of wood with your own hands, it is enough to know some simple rules. First, not all wood is suitable for making a cutting board. One material absorbs moisture faster, the other is practically "moisture resistant" - it repels water. The wood may delaminate. Yes, different types of wood differ from each other in terms of hardness.
In order to make a board for the kitchen, such species as oak, pine, birch are suitable. They make boards from beech and acacia. There are also more expensive breeds (for example, Hevea).
The simplest cutting board can even be made from plywood. True, this is impractical material. A plywood cutting board is too simple and not aesthetically pleasing.
2. Design stage:
2.1. Drawing up sketches of the main parts of the product
2.2. Manufacturing sequence development
2.3. Selection of materials, tools, devices for work
2.4. Making a product sketch
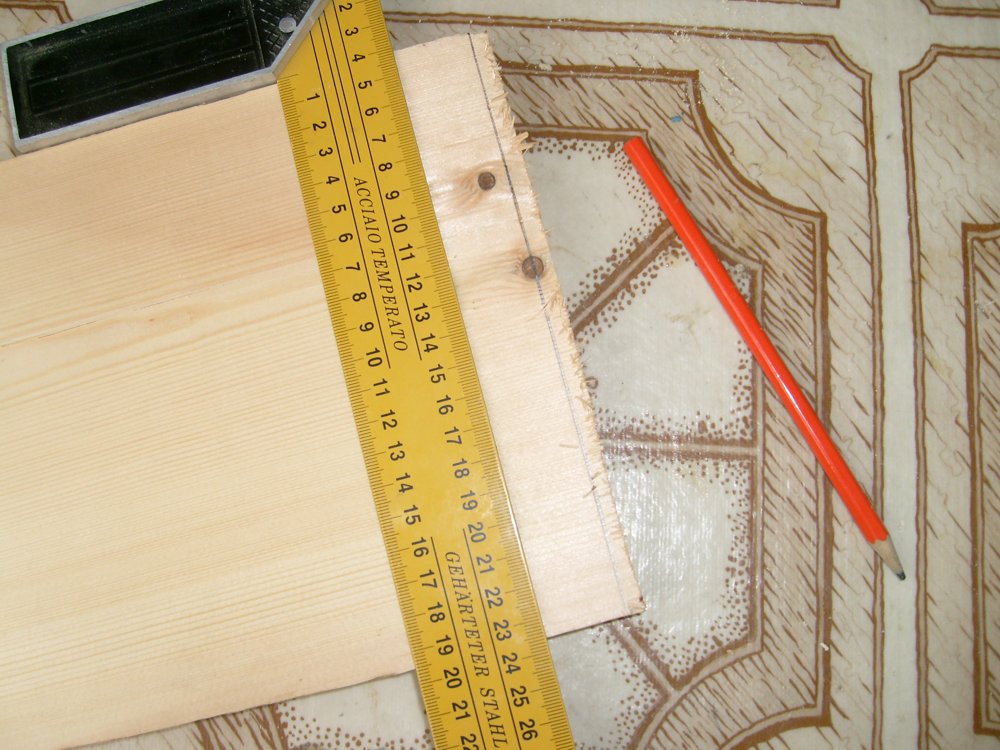
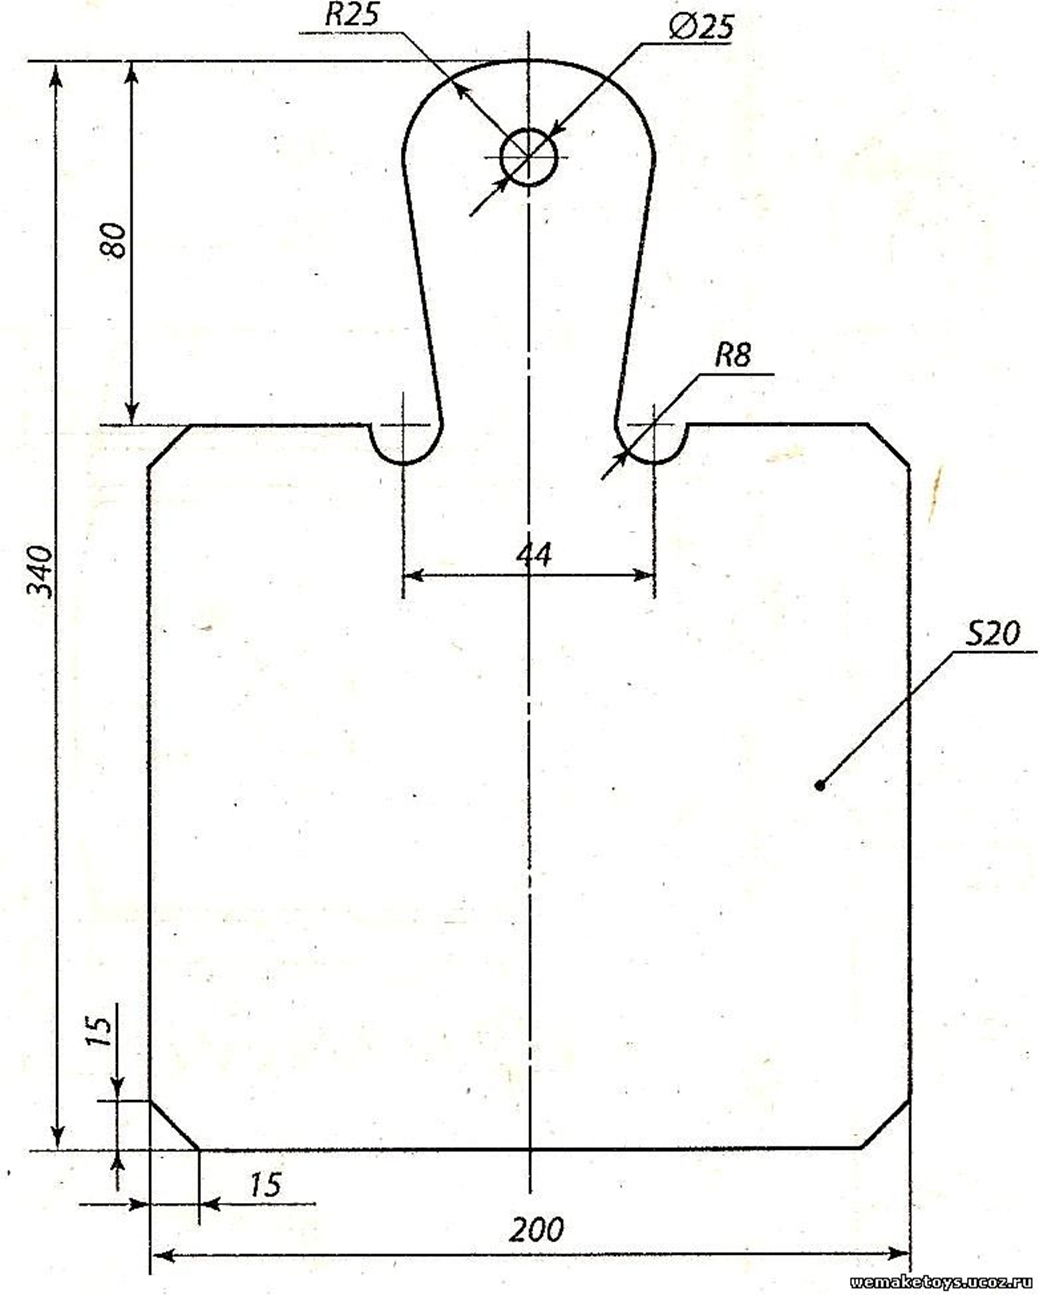
Before starting work on the manufacture of a cutting board, you need to make a blank and make the necessary markings.markup called drawing the contour lines of the future product on the workpiece.
When marking, drawing and measuring tools are used, such as a pencil, ruler, square, compasses, jigsaw, drill, templates.
Templates are a finished part or its shape made of wood, metal, or paper, cardboard.
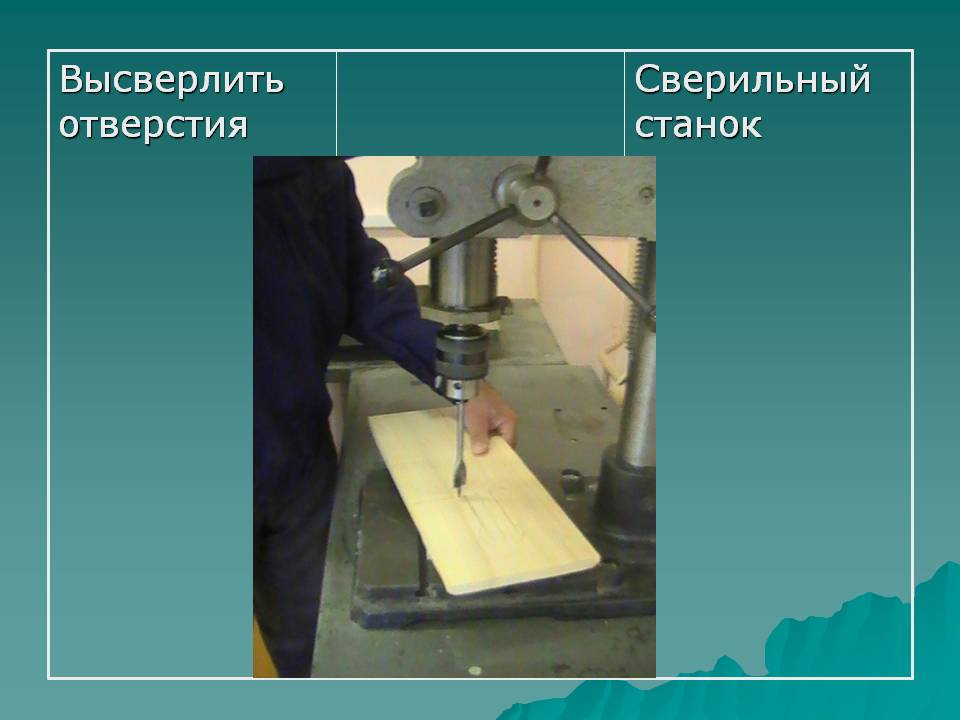
Then, if the product is planned to be made with a hole, it is necessary to drill it. Hole drilling is a recess in the details of the product. They can be through and deaf.
The rules for making a cutting board are simple. The method of making a board, regardless of the material chosen, is the same:
Before making any part, performsketch (template) or drawing. Sketch is a freehand image indicating the dimensions and maintaining the ratios between its parts.
Types of cutting boards:
Sketch (cutting board template)
3. Technological stage:
3.1. Method for manufacturing a cutting board and drawing up a technological map
ROUTING:
Sequence of operations:
1. Select a blank for cutting (Ruler).
2. Mark according to the template (Template, pencil).
3. Cut out a curved contour (jigsaw, sawing table).
4. Mark and drill a hole Ø 8 mm (Template, awl, drill, drill Ø8mm).
5. Select a blank for suspension (Ruler).
6. Mark according to the template (Template, pencil).
7. Cut out a curved contour (jigsaw, sawing table).
8. Mark and drill a hole Ø 6 (Template, awl, drill, drill Ø 6 mm).
9. Clean and sand the parts (File, sandpaper)
4. Practical stage:
4.1. Production of a product according to a technological map according to a sketch in compliance with labor discipline, work culture
4.2. Brief description of cutting board manufacturing
First you need to decide on the size of the future cutting board(board thickness and size)
Then - pick up the appropriate wooden blank(what kind of wood)
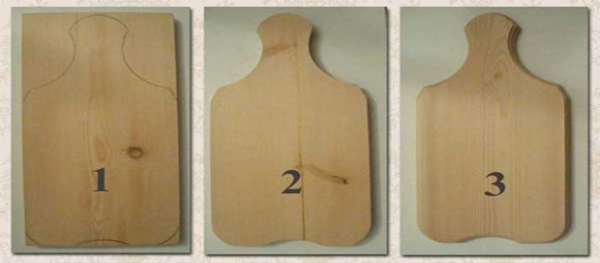
Cut out scissors a drawing on paper and put it on the board (but first the board is marked depending on the shape and the desired size)
Trace the outline of the drawing on the board.
We clamp the board in a vise and drill several holes on the sides of the marked cutting board handle so that the tree does not crack during trimming(drilling machine)
We cut out the board and drill a hole in the handle (the handle should be located strictly on the longitudinal axis of the board, so you need to carefully measure and determine this axis.The board itself and the handle are cut with a hacksaw or jigsaw.
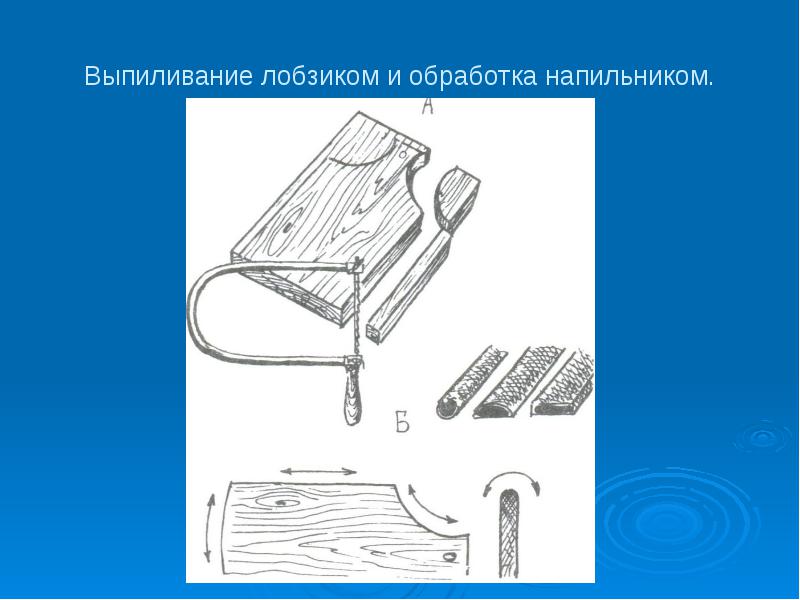
Do not forget about the corners and bends in the handle area. They need to be carefully sharpened, roundedfile, emery, rasp - who has what. And it's not just about getting hurt. Small pieces of wood left after working with a saw can then break off and fall into the food, and then into the esophagus. If a handle is made, do not forget to drill a hole in it. Then the board can be stored in a suspended state in a place convenient for you.
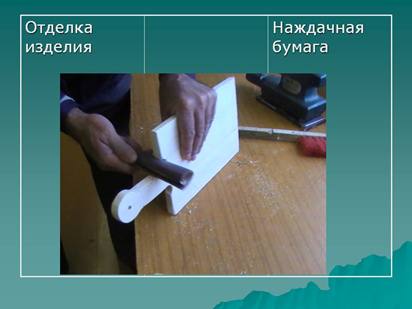
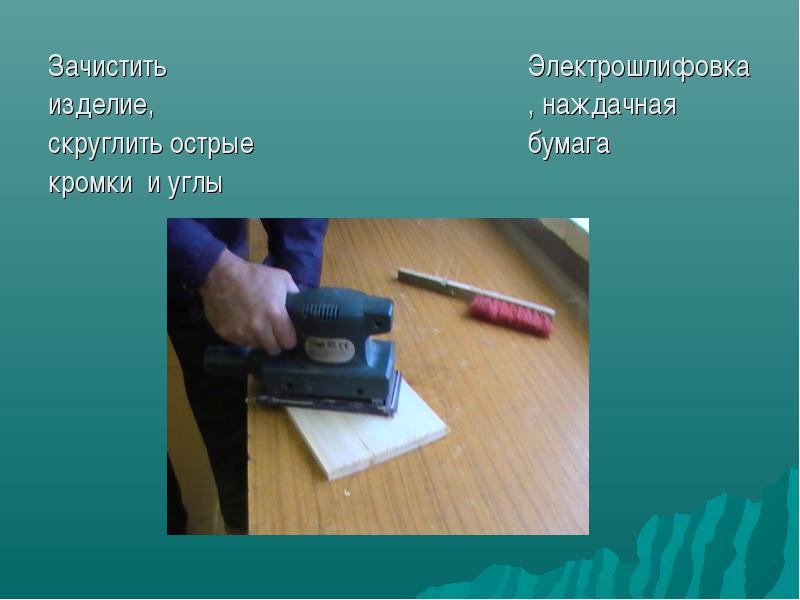
We make recesses along the edges and clean the boardsandpaper (ends and surface). Further, using the samesandpaper you need to process the entire surface of the board, paying special attention to the ends. It is better to round the right corners of the surface.
It should be borne in mind that the tree is covered with microcracks, and the remains of food waste accumulate in them. Therefore, the cutting board after each use must be washed and dried very carefully. When making a board, take into account not only its surface area, but also its weight.
5. Justification of the project:
5.1. Economic justification
5.2. Environmental assessment of the project
5.3. Self-assessment of the result
economy is that all the materials for this project can be found in the school workshop, and among the production waste
The cost of this work can be calculated as follows:
Plywood sheet (55cm x 75 cm) - 640 rubles, from one sheet you get 5-6 blanks of a cutting board measuring 34x20 cm, one blank costs about 13r 20k
Carbon paper (1 sheet) - 2 rubles
If you use waterproof varnish (0.5 liters), its cost is 100 rubles
The total costs, excluding labor, amounted to 115 rubles 20 kopecks.
Conclusion: a profitable investment of money, as the costs are small.
Environmental friendliness is that in the manufacture of this project was used environmentally friendly material - wood.
Self-esteem: Finished work, as a result of which I improved my skills. I began to understand better how to work with a jigsaw. I also learned that there are many other types of cutting boards. Learned to determine the type of wood. The versatility of my project lies in the fact that the board can be used for its intended purpose, that is, as a cutting board itself, and as a kitchen interior. It must be taken into account in the manufacture that the board is comfortable and durable.
Description of the work on the project.
Product analysis and evaluation: advantages and disadvantages
Work safety requirements
Sanitary and hygienic requirements
Project design and project protection
In my work, all the stages of making a cutting board are followed:
The rationale for the choice of this project was made (selection of a topic, purpose and objectives of the project), historical and technical information on the selected topic was given, a sketch of the product was drawn up, a sequence for manufacturing a cutting board was developed, materials, tools, tools for work and a sketch of the product were selected.
A technological map has been drawn up for the manufacture of a product according to a sketch in compliance with labor discipline and work culture.
A brief description of the production of a cutting board is given.
An economic justification for the manufacture of the board has been completed.
An environmental assessment of the project and a self-assessment of the result are given.
advantages and disadvantages.
Conclusions are drawn on the topic.
The main safety requirements during work and sanitary and hygienic requirements are highlighted.
Product analysis and evaluation:
Advantages of a cutting board:
firstly, a necessary thing in the kitchen;
secondly, it is universal;
thirdly, it is easy to manufacture, economical.
Flaws:
if the cutting board is made of plywood, it cannot be used for cutting vegetables, meat or fish, as microbes will get into microcracks;
very difficult to clean such a board
Conclusion: From an aesthetic point of view, a cutting board should look beautiful.
A board for cutting bread and flour products is a convenient, affordable and necessary thing for every kitchen.
Advantages
High strength indicators. This is justified by the presence of hardened glue in the structure of the product, which is stronger than wood fibers;
The board must withstand constant contact with the knife
Moisture resistance. What is more important in the kitchen than resistance to mechanical stress? Resistant to excessive moisture. Juice from chopped vegetables and fruits, water flowing from them after washing, and just steam standing over the pans quickly make ordinary wood unusable. But the sizing mentioned above quite effectively prevents this;
Beautiful appearance. Plywood, like a classic wooden product, has an original natural pattern and adds aesthetics to a kitchen item.
Ease of processing. Forms of cutting boards made of plywood can be very diverse.
Acceptable price. Given all the high performance indicators, fiberboard is cheaper than solid wood
Durability. The service life is not limited to ten years, subject to proper care.
Flaws:
it will not be possible to use for cutting vegetables, meat or fish, as microbes will get into microcracks;
toxic glue may have been used in the manufacture of purchased plywood.
Safety requirements in the manufacture of cutting boards:
1. Put on overalls and put it in order.
2. Be careful when working with cutting tools, do not direct the cutting edges towards yourself.
3. Work only with a serviceable tool, if any malfunctions are found, do not fix the problems yourself, but inform the teacher. Observe safety rules when working with an electric jigsaw and drill.
4. Securely fix the workpiece when sawing with a jigsaw
5. When sawing with a jigsaw, use a saw table.
6. It is necessary to work with a jigsaw without jerking and bending the canvas.
7. Do not bring the product being cut, sawn or planed too close to the eyes in order to avoid dust or chips getting into the eyes.
8. Remove dust, shavings, sawdust with a sweeping brush.
9. You can not keep your left hand close to the canvas.
10. Work in a well-lit area.
Sanitary and hygienic requirements
1. Wash your hands before starting work.
2. It is necessary to provide adequate lighting when carrying out the project.
4. It is necessary to provide access to fresh air in the room
5. Strictly carry out work on the technological map for the manufacture of a cutting board
7. Used literature:
Internet:
stroi-specialist.ru›Home master›razdelochnaya-doska.html
better-house.ru›sdelaj-sam…doska-svoimi-rukami/
kulinarochki.ru›istoriya-razdelochnoj-doski/
en.wikipedia.org›Cutting board
idei-na-kuhne.ru›doski-razdelochnye-iz-dereva….
Simonenko V.D. and others. Technology. Textbook for grade 6. –M.: Ventana-Graf, 2012.
DIY magazines.
Melnichenko Andrey, student of 6-1 grade
One of the most common kitchen accessories is the cutting board. What options you will not find on the shelves of modern stores. However, with all the variety of such products, it is difficult to choose a board for your specific conditions. We will tell you today how to make it with your own hands.
Wooden cutting board - simple option
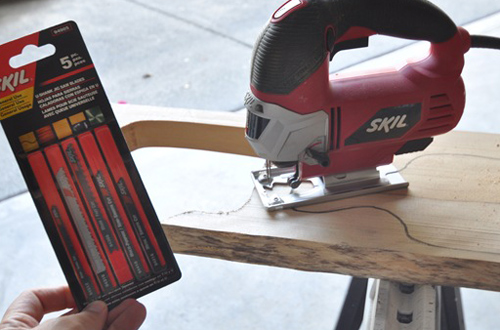
For self-production of a cutting board, you will need a piece of planed edged board with a thickness of 20-30 millimeters. Try to pick up a workpiece without visible defects - knots, wormholes, cracks, which can reduce the strength and decorative characteristics of the future product. Sawing curved edges is conveniently performed using an electric jigsaw, with a wood saw installed.
The first stage of work - marking the workpiece
It is convenient to perform it using a pre-made template. Prepare a sheet of thick paper or thin cardboard. Bend it lengthwise and draw with a pencil an image of half a cutting board of an intricate shape. Then, without unbending the paper blank, cut out the template, cutting through both halves of the sheet at the same time. To mark the cutting board, place the resulting template on a wooden blank, press it and circle it with a pencil.
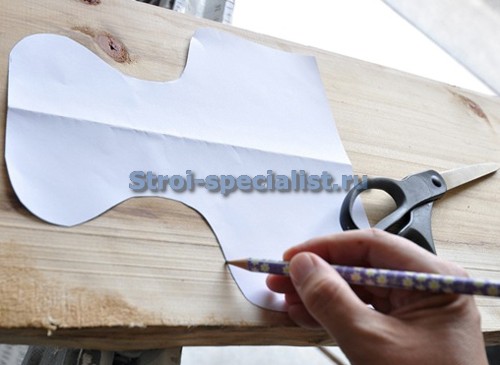
cutting board cutting
Cut out blanks using a jigsaw. If there are roundings of a small radius, install a metal file with a smaller blade width.
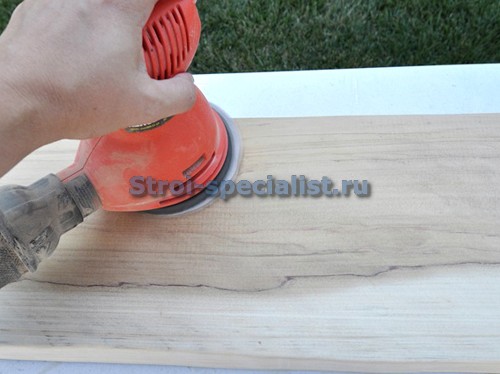
Grinding
It can be performed both manually and mechanically, using a grinder of one or another principle of operation. To achieve the best quality work, use sandpaper of several sizes of abrasive grit, from larger to smaller.
The last stage - finishing the boards
Its purpose is to protect cutting boards during their operation. Contact with wet products, cleaning untreated products under running water can lead to rot and the rapid destruction of wood. To avoid this, apply several coats of mineral oil to all surfaces with intermediate drying. The coating process is conveniently performed with a piece of lint-free durable cloth.
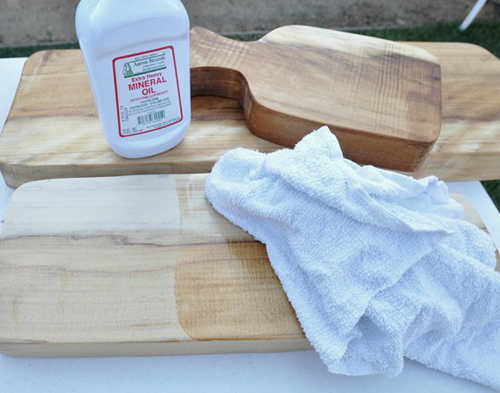
Wipe off excess finishing oil with a dry cloth. After holding the last layer for a day, the products are completely ready for use.
Homemade cutting board - a more complex option
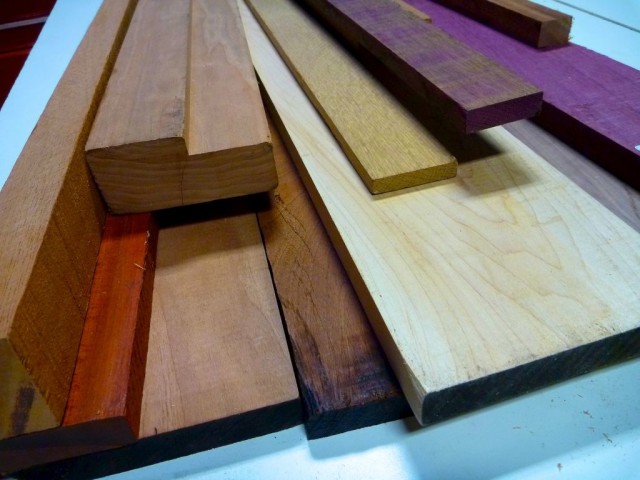
To make a more worthwhile version of the cutting board, you will need bars of various precious woods that have a contrasting color of wood. Of the available ones, we can recommend ash, maple, birch, which have a light color and beech, mahogany, bog oak, which have a brown or red color.
Nowadays, you can purchase such blanks for independent work in a number of online stores. Of course, foreign tree species, due to quite specific reasons, have a rather high cost, but it's worth it.
Hardwood is difficult to process with hand carpentry tools, so it is necessary to have access to a number of machines, such as a planer or thicknesser, as well as a circular saw. In addition, we need shield clamps or clamps.
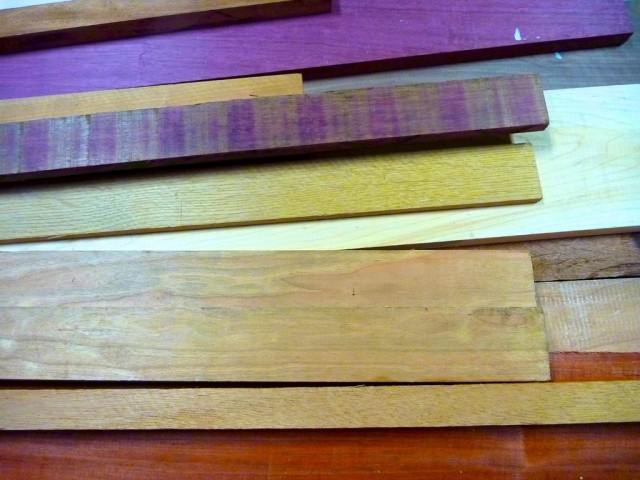
Shield making
For the manufacture of a type-setting cutting board, an even number of bars of light shades and an odd number of dark ones should be prepared. Pass the workpieces through the thickness gauge until parts of equal width are obtained. Their thickness can be different - this will give the whole product an original look. Preliminarily lay the parts in a cassette to select their optimal relative position. Then turn the bars over on one of the edges and apply glue. For our product, choose a high-quality moisture-resistant joinery binder.
Lay the parts with glued edges to each other and clamp in screw or lever clamps.
To avoid warping of the future shield, place auxiliary bars of sufficient thickness from two planes of the product and press them with clamps.
After the adhesive layer has completely dried, usually after a day, release the workpiece from the clamping devices and remove excess glue with a chisel.
After mechanical grinding, it is quite possible to use the product in this form, but we suggest that you make it more original.
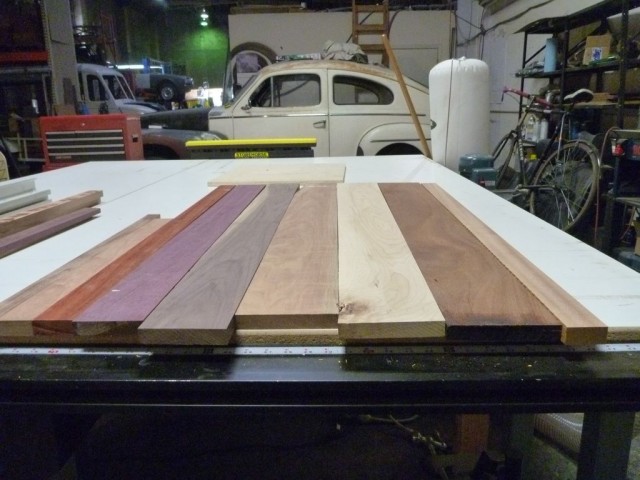
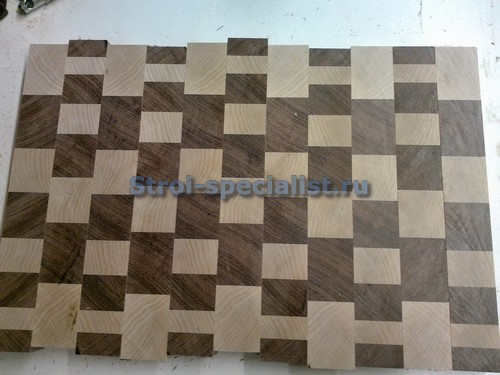
Making a chess pattern
We transfer the polished shield to a circular saw and saw it across the bars into separate parts with a thickness of 25-30 millimeters.
![]()
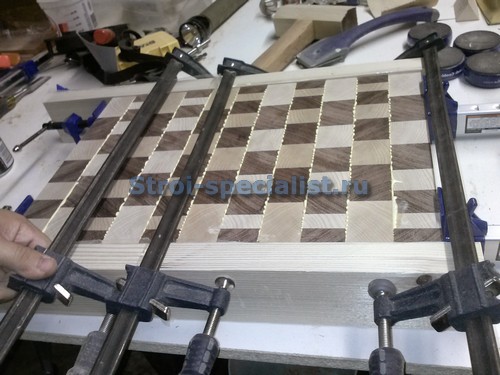
We assemble the set and stack the resulting parts so that the light parts alternate with the dark ones.
In the future, we proceed in accordance with the technology described above - we lubricate the edges of the parts with glue, clamp the product in clamps and glue them into a shield.
After the glue has completely dried, we carefully grind the finished product with sandpaper of various grain sizes from coarse to fine. To protect the product from moisture and enhance the color of the wood, we must treat the cutting board with mineral oils.
By selecting bars of various thicknesses and shapes, experimenting with different shades of wood of different species, you can get an unlimited number of different options for the same product - a cutting board.
Dear readers, if you still have questions, ask them using the form below. We will be glad to communicate with you;)
Hello everyone, and in today's article we will discuss, with our own hands. I will try to briefly talk about quick methods for making this necessary kitchen cutting attribute. If the old one is cracked and has become inappropriate, then this article is for you.
In order to make a cutting board, we need the following tools. 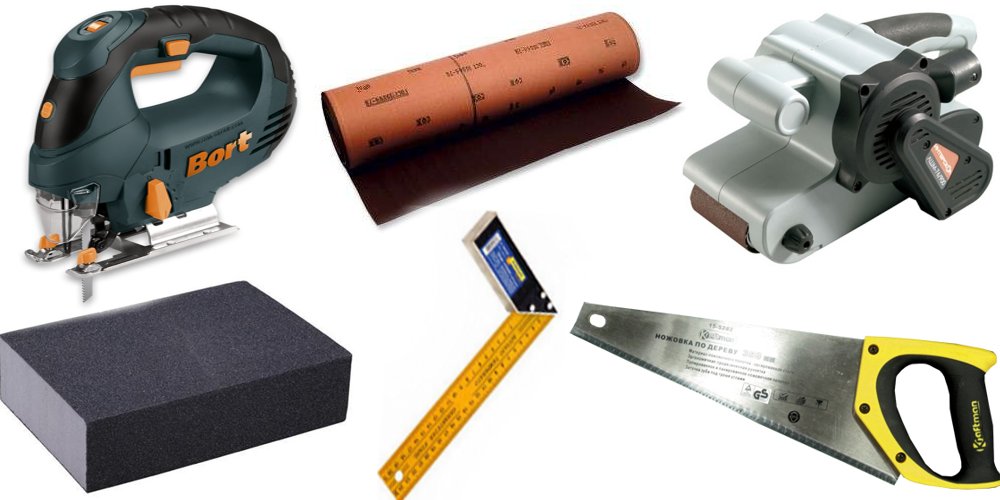 - A ruler, preferably with a square.
- A simple pencil, soft or hard.
- A compass or ruler with pre-drilled holes.
- A saw or, best of all, a jigsaw.
- A grinder or a set of skins of different grain sizes, from 60 to 220.
- Sanding sponge for finishing.
Preparation of material for the cutting board.
 First you need to prepare the necessary material, we have chosen for this wood. This is a classic type of material, as it is easy to work with, does not damage or dull knives and is quite strong at the base. There are options for using glass, metal and plastic, but this is possible in the following lessons.
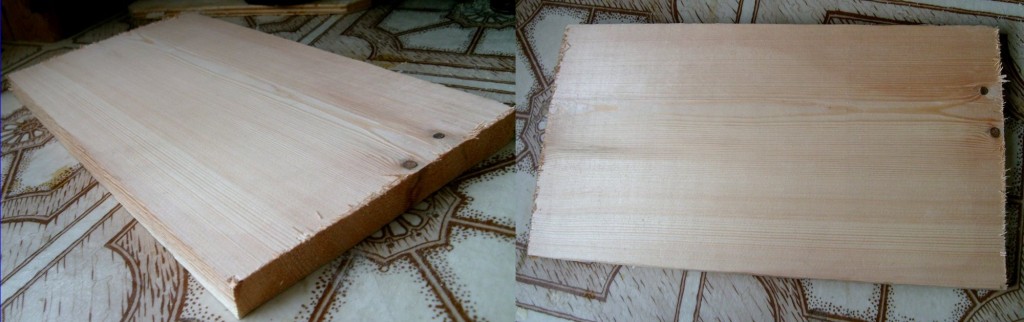
And so we need a simple wooden board, this can be found, probably, in any household. If you live in an apartment and you don’t have material at hand, then try to go to the nearest construction site. There always remains a couple of pieces after repair and construction work.
Dimensions and design of the cutting board.
The dimensions should be used as follows, the thickness of the product should be 20-40mm, width 200-300mm, and length 400-600mm. After preparing the product, we will draw the future figure. The design will be rectangular, with rounded corners. This is the simplest option, but it is the easiest and most ideal. We take a ruler with an angle, and check our board for distortions and slopes. On one of the long sides along the length, we select a flat plane, relative to which we will make all other measurements.
Having made an even rectangle, we make a roundness along the edges with a radius of 30-50mm. How to make a smooth drawing curved line, for this we use a compass or a ruler with ready-made holes, we will recall the drawing lessons at school. The angle should not be sharp, but also too swirling. If you wish, you can draw a more complex blank, for example, an oval or other shape.
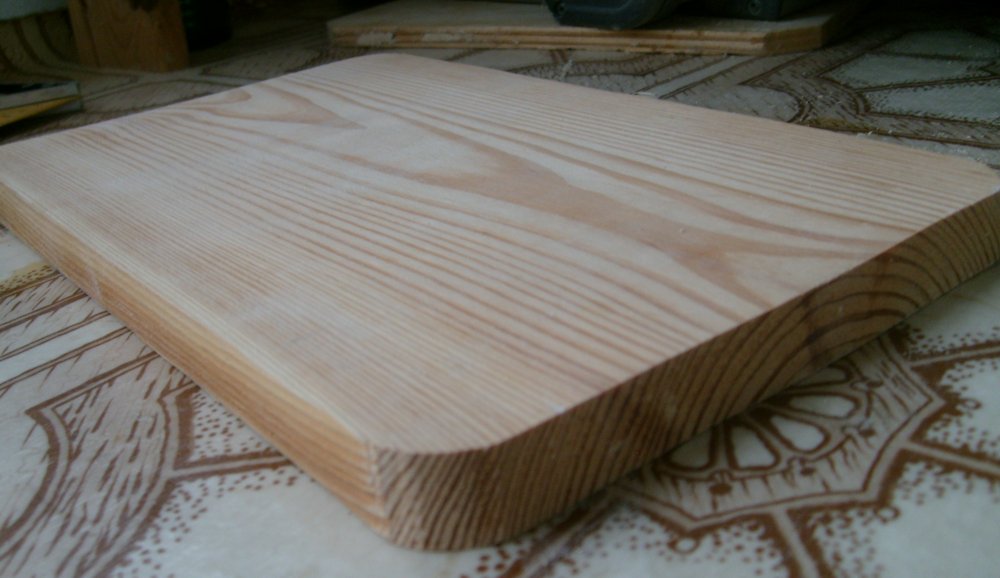 |
Cutting and sanding wood.
 And so, we have a drawing ready and now we need to cut off all the extra ones. To do this, we will use a saw with small teeth or a jigsaw with a curved saw blade. Do not forget about safety measures, use gloves and goggles when working with the tool. Carefully cut out the corners and extra elements according to the applied pencil drawing.
Our cutting board has already become a bit like a beautiful product. But how to make it smoother, without splinters and sawdust. To do this, we need to sand every corner and all sides of our tree. To do this, I use a grinder, but in the absence of such a power tool, you can use simple sandpaper.
 To begin with, we take a skin for a tree with a larger grain size, this is 60-80 k. This is done in order to first remove large and convex places on the wood, especially if it has a complex texture. After we take the skin 120 and 220k. Skin each side carefully, take your time and be focused on getting the job done.
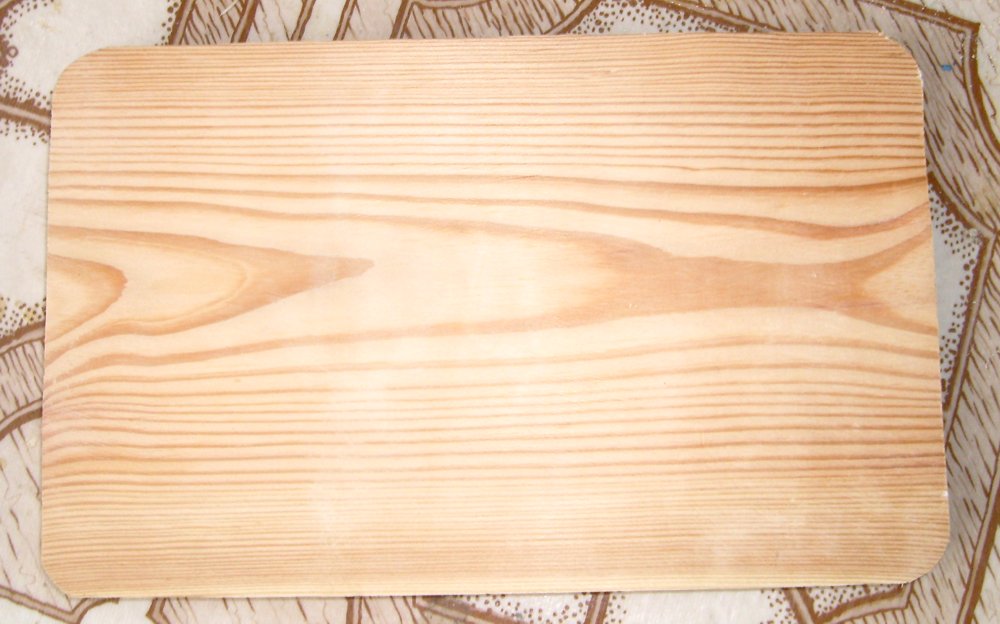
Before us is a sanded cutting board made of wood, which is not ashamed to show to my wife. But how to make it more slippery and without small roughness. To do this, we take an abrasive sanding sponge for wood, which can be found in any hardware store. And just like with the skin, process the entire surface of the cutting board.
Conclusion.
Well, our cutting board is ready, it remains only to clean it of fine wood dust. This can be done with a brush or a damp cloth. I also recommend wiping the board with mineral oil. This will give a small layer of protection to the wood, and will prevent severe cuts from the knife. Now you know, how to make a cutting board out of wood, and can be taken for more complex details. In the following articles I will definitely write about this, until we meet again.
Everyone who works with wood has a lot of scraps left. You can just throw them away, or you can use them. In this article, we will tell you how to make a cutting board of incredible beauty from scraps of different types of wood. The key points in this project are the selection of the right (non-toxic, waterproof) glue and the presence of wood trimmings of different shades.
![]()
Tools :
- table saw
- planer
- planer
- milling cutter with a set of cutters
- milling table
- clamps
- glue brushes
- orbital hand sander.
Materials:
- wood trimmings of various species
- waterproof non-toxic wood glue
- mineral oil and rags


To make a cutting board with our own hands, we used cuttings of maple, walnut, mahogany, cherry and other species, the color and texture of which seemed interesting to us. When we talk about wood trimmings, we mean wood, not glued beams, plywood and other composite materials.
Manufacturing technology of a wooden cutting board
1. Process wood cuttings on a planer. Such processing is necessary so that the planks are clearly joined to each other. Try to ensure that the height of all the boards is approximately the same, the width can be anything.
2. Process the front sides of the boards on the planer. This way you will achieve uniform thickness and smooth surfaces. It is advisable not to make the boards too thin, the thickness should be at least 15, and preferably 18 mm.

3. Cut the planks lengthwise with a table saw. The minimum width of the boards should be approximately 12 mm. The stripes do not have to be the same width, vary it as you wish.


4. Arrange the boards in the correct order. Try to achieve an interesting look by experimenting with combinations of colors and sizes. The number of planks depends on the size of the cutting board.

5. Glue the boards. It is advisable not to glue them all at once, but to divide them into several groups. The width of each group should be as wide as your planer can handle. The adhesive must be non-toxic and moisture resistant. Apply a thin layer of glue to the side edges of each plank, and then tighten all the parts with clamps.


6. As a result, you should get several groups of planks. Sand the surfaces of each group with an orbital sander, taking care to remove all adhesive. Then planer each group, removing as thin a layer as possible from each side. Now you can put the pieces of the cutting board together and give an intermediate assessment of your efforts.
7. Glue the pieces of the board together using the same technology that glued the planks. Remember that due to the large size, the cutting board cannot be processed on a planer, it will have to be sanded by hand. Therefore, try to glue the parts as accurately as possible and wipe off the glue that has come out with a damp cloth. To pull the parts together, you will need fairly large clamps.

8. Sand the board and cut to size. Grinding with a manual grinder, remove the glue influx. When cutting the board, try to make it proportional, that is, choose the length of the board based on the width. It is also desirable to take into account the size of the sink, because if the board does not fit in the sink, it will be problematic to wash it.
9. Round the edges of the board using a router with an appropriate cutter. A special table equipped with guides will greatly simplify the task.
10. Cut a groove along the perimeter of the board, which is needed so that the juice released by the products during cutting does not drain onto the table. You need to cut the groove using a router with an appropriate rounded cutter. To make the groove smooth, use a plywood template. Fix the template with masking tape on three sides, and move the router along the fourth. Then remove the tape from one of the sides and fix the one along which the groove was made. Depending on the depth of the groove, one or more passes can be dispensed with.