Despite the fact that the construction season is coming to an end, some are just starting to think about building their own home. First of all, these are those who decided to opt for frame houses, because these buildings can be assembled even in winter. And if you consider that the number of orders falls with a cold snap, many firms offer price cuts and promotions in winter. Therefore, if you did not have time to build in the summer, assembling a frame house is your option.
Where to start building
Any construction begins with the choice of a place, and marking on the site. The plan can be drawn up with your own hands, especially when it comes to building for temporary residence - a summer house, and so on. If you are planning to build a cottage from a frame in which you plan to live permanently, it makes sense to turn to specialist engineers. A detailed project of the house includes not only a sketch of the future building, but also materials, the layout of engineering systems, the number of outlets, a description of the electrical wiring and sewerage.

After drawing up the plan, it is necessary to make markings on the site for formation. The foundation can be columnar, tape, pile and others, depending on the type of soil and the weight of the finished structure.
When arranging a small country house, it makes sense to stop at if it is planned to build a cottage for permanent residence of the family - it is better to choose a monolithic tape. If construction takes place in winter, a pile foundation will do.

What are the build steps?
- design and technical documentation
- foundation device
- installation of the frame, its insulation and insulation
- installation of floors and interfloor ceilings
- roof installation
- facade work
- wiring of communications, insertion of windows and doors
Canadian, Finnish and traditional buildings
In order to discuss the assembly of frame houses, it is necessary to decide what type of frame house will be built. The fact is that all wooden houses, which are based on a frame, can be divided into two types - or traditional Russian ones.
Since such buildings have been erected in Finland for several centuries, the technology has improved. Frame houses are no longer built in stages on the site, and all the necessary parts are assembled at the factories. The house as a result consists of ready-made panels that need to be properly connected. Modern production offers essentially ready-made frame house, decomposed into parts. Such a building is a constructor, the assembly of which takes place on the site. In some cases, the panels already have exterior and interior finishes.

Russian frame technologies have not changed much over the past hundreds of years, only the materials have changed. The house is built as follows: it is initially installed on the foundation, fixed with strappings and the wall pie is gradually formed - vapor barrier, insulation, waterproofing, OSB boards. If 150 years ago there was a layer of insulation, then it is still there today, only instead of wood shavings or straw they began to use modern mineral wool. You can read about the work on the facade.
In addition, glued laminated timber is used in Finnish houses, while in Russian houses it is the most common. Some firms take wood of natural moisture, which is why the timber deforms over time. The quality of technical drying timber is something in between, between glued laminated timber and ordinary timber.
The assembly also depends on the type of house, which can last from several weeks to several months. A team of workers with experience in one season can assemble a complete house with a size of 200 m2.
Assembling a traditional Russian frame
How is a traditional frame house assembled? It consists of several, which must be carried out in a certain sequence. At the same time, a quality house can only be built in compliance with the frame technology.

So let's set up the foundation. If the house is supposed to be residential, but you don’t want to conduct a soil analysis, it’s better to stop at strip foundation. It is strong enough and can easily withstand the frame, while shrinkage is unlikely. For a small country house 6x6, a columnar foundation is suitable, but it is better to at least make an independent analysis of the soil. To do this, dig a hole one and a half meters deep and see what layers of soil are there. If the foundation is clay, a columnar foundation will not be an ideal solution. If the soils are sandy and coarsely sandy, any foundation, columnar and not buried, is suitable, since sandy soils are stable.
Once the foundation is in place, wait a few weeks for it to dry thoroughly if the foundation is made with cement. If the foundation is piled, which is what developers prefer to install, it allows to reduce construction time.
After the foundation is installed, the bottom one is attached to the anchor bolts. Corner posts and internal ones are exposed, fixing on metal corners. Horizontal lintels are placed between the racks, giving the frame rigidity. Corner posts must be additionally fixed with struts.
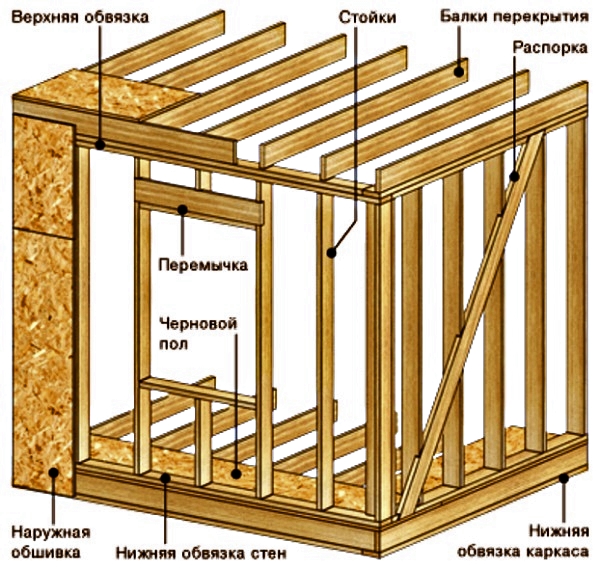
The structure of the frame walls is crowned by the upper trim. Do not forget to check the geometry at each stage of the assembly of the house, we deduce the corners to 90 degrees, the horizontal beams must lie in the same plane.
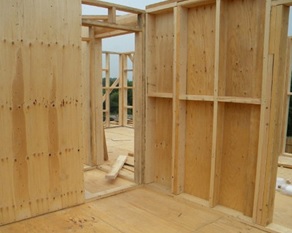
When the frame is ready, we start it. The width of the timber should be equal to the width of the insulation, that is, 15-18 cm. We protect the insulation from the side of the street with a waterproofing film, which will prevent moisture from entering the insulation. We protect the insulation with OSB boards. From the inside of the house, we adjoin the insulation with a vapor barrier membrane, which brings excess moisture from the timber into the room. We fix the membrane and also close the OSB.
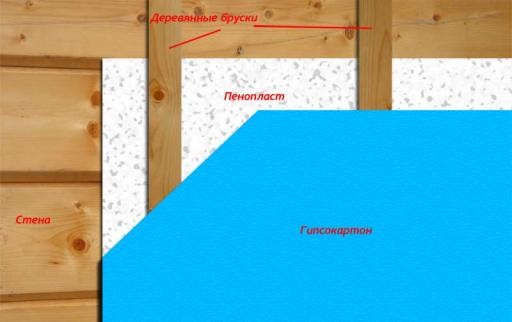
External and internal OSB boards can be sheathed with foam and drywall, respectively. Drywall will make the walls inside even, and the foam outside will additionally insulate the house, protect it from wind and external noise.
Work on the roof begins with the construction of the truss system. In fact, a roof frame is being built, which is sheathed in the same way as the walls. The type of lathing depends on the choice of roofing material. The slope of the slope also affects the choice. The roof can be gable, shed or more complex design.
The floors of the house can be made from SIP panels or traditionally - the floor beams are placed on the strapping beam and strengthened.
Find out also how a frame house is made, and.
We offer you frame houses for self-assembly. Having decided on self-assembly, you should remember that only a competent approach to any installation operation guarantees high strength and longevity of the house.
In our version, we will consider the installation of structures on a finished foundation slab. This type of foundation is the most common, because. has a number of significant advantages (the absence of basement floor beams with basalt insulation, the possibility of installing a water heated floor, hidden engineering wiring, etc.).
Before starting installation, it is necessary to check the height and geometric dimensions of the foundation, which must comply with building codes (local deviations of the upper surface of the foundation are allowed when checking with a 2m rail within 2mm, and the allowable deviations from the vertical or from the design slope of the planes for the entire height of the foundations are 20mm).
Necessary tools and fixtures for installation
- Perforator with drill Ø12mm x 250mm;
- Screwdriver;
- Electric drill;
- Electric planer;
- Bulgarian
- Impact wrench for tightening "grouse" with a head of 13mm;
- A set of socket heads with a collar;
- Hacksaw;
- Electric saw;
- Clamps 4pcs;
- Fountain drill Ø30mm.
Requirements for storage, installation and operation of wooden structures
- Avoid contact with moisture and other chemicals. Store on pads raised above the ground and cover with sheets of waterproof material with water drainage. During storage, polyethylene sheets must be placed under the gaskets.
- Do not allow mechanical damage, do not throw.
- Structural changes are not allowed.
- Installation is carried out according to the installation plan.
- It is not allowed to replace structural elements with similar elements from other manufacturers.
- It is not allowed to replace the roofing material specified in the contract with any other material.
1. Mauerlat is the support board on which all the frame walls of the 1st floor are mounted, so this is a very important part of the work that you need to pay special attention to. The minimum offset, and you will not have walls joined.
Mark out, according to the project, the entire layout of the Mauerlat. Check the diagonals according to the plan (necessarily with a metal tape). Place tape waterproofing (roofing felt) on the concrete under the Mauerlat. Fasten the Mauerlat to concrete using anchors Ø10x120mm with a washer. Preliminarily, in the Mauerlat at the place of fastening with an anchor, choose a feather drill of about 10 mm so that the anchor is flush. Fastening pitch 500-1000mm.
After the final installation of the Mauerlat, attach a flax jute sealant from above. Cut the canvas with a width of 145mm, and fix it with a furniture stapler (8-10mm staple).
Assembly plan of panels on the 1st floor

2. The assembly of wall panels starts from the corner of the building. After installing one panel and fixing it to the Mauerlat with M8x80 "capercaillie" in a checkerboard pattern with a step of about 300m, install a temporary strut. The structures do not require preliminary laying of insulation in the corner panels before installation.
After checking the marking of the panel with the project documentation, install the next element of the building wall. Fasten the panels to each other with “wood grouses” M8x90 with reinforced washers, having previously pulled them together with clamps. In places of reinforcement of structures, “grouses” M8x160 and M8x200 will be required. For the stability of the outer walls and the assembly accuracy, it is recommended to mount the inner walls at the same time.
3. Lay a flax jute sealant on top of the wall panels and fix it with a stapler, and then install a strapping board corresponding to the thickness of the walls. Mounting should be done with “wood grouses” M8x80mm with a step of 300mm in a checkerboard pattern.
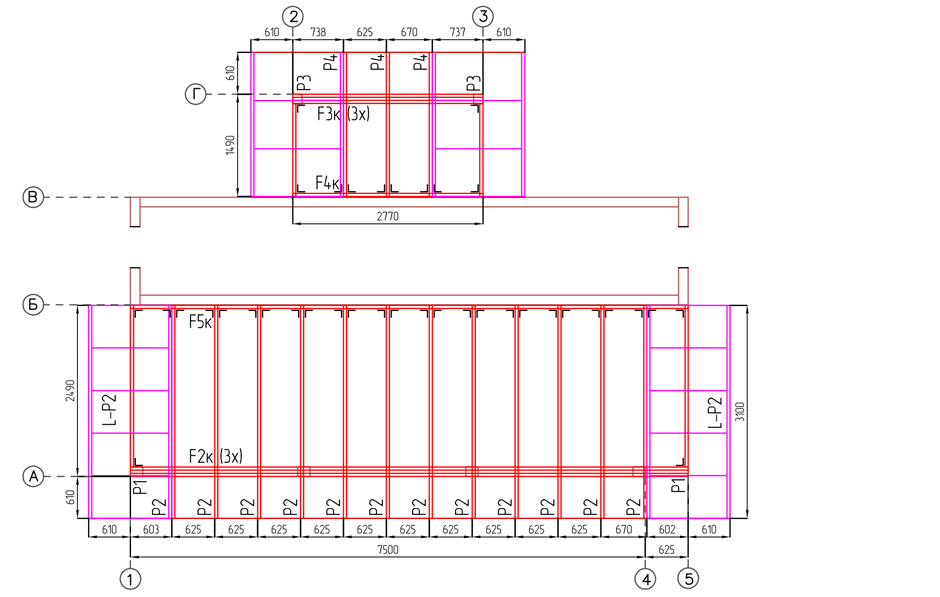
Assembly plan of floor beams of the 1st floor

4. It is very important to observe all dimensions and install the beams according to the markings on the products. Fasten the floor beams to the binding board of the panels of the 1st floor with KUU-70 corners on both sides with 4x50mm screws.
After mounting the floor beams, tie them with a beam with a section of 45x90 mm along the contour (along the grooves at the edges of the beams) and additionally inside the beams. Fasten with screws 5x90mm. Install spacers 2-R1 under the interior panels of the 2nd floor 2-IN. Fasten with KUU-50 corners. Please note that the floor beams are exactly on the racks of the wall panels. If so, then you are doing everything right.
Lay a rough floor from OSB-3 boards 22 mm thick along the floor beams.
Installation plan of panels 2nd floor

5. On top of the subfloor, install the lower trim of the wall panels of the 2nd floor, after laying a sealant made of linen jute on it.
6. Assembling the panels of the 2nd floor is similar to assembling the panels of the 1st floor (see point 2).
7. The binding should be made on top of the wall panels along the contour (see item 3).

8. First of all, mount the support beam F1. Fasten to walls using KUU-105 corners with 4x50mm screws. The beam and trusses of the roof and stairs have a weight that makes it possible to do without lifting equipment. After installing the F1 beam, we mount the supporting trusses SN1 and NU6, and then all the other trusses.
Rafter trusses coming to the supporting trusses (F1, SN1, and NU6) at an acute angle, fasten with a pair of corners OV L and OV P. Rafter trusses coming to the supporting trusses at a right angle, fasten with brackets OBR R50x107 or a pair of corners OV L and OV P. Attach truss trusses to the wall panel framing with KUU-105 corners.
After that, connect the left and right parts of the trusses located to the right and left of the carrier beam F1 in pairs of blocks "A" and "B". Fasten with M12 bolts, M12 washers and nuts. Trusses, to which the gable stairs adjoin, should be fixed with one “A” block and two “B” blocks.
Attach front stairs L-NU to walls 2-EX and end trusses with 5x90mm screws.
Fasten the roof trusses with 45x90mm internal ties with 5x90mm screws.
To sheathe the outside of non-sheathed floor beams, wall panels and roof trusses OSB3 9mm.
The frame house is assembled according to a pre-designed project. By the time of assembly, all stages of work should be thought out, tools prepared, purchased Construction Materials, the most important of which are boards. You can assemble such a house with the help of two or three people, so if you assemble it yourself, it would be nice to enlist the support of relatives, acquaintances, friends or hire workers.
Consider the main stages of assembly, assuming that you have a project, the foundation has already been made, and you are ready to proceed with the installation of other structures.
Work order
- Install the bottom trim board.
- Mount the ceiling over the foundation.
First, floor beams are installed. Floor logs are laid on them, blocks are fixed between the logs, then a board of the outer perimeter is installed. They make a draft floor from plywood or osb boards.
- Mount the frame of the walls of the 1st floor.
The walls are assembled in a horizontal position on the surface of the subfloor of the 1st floor.
With the help of a chalk string, projections of all walls are applied to the floor plane. Choose one of the outer walls and proceed to assembly.
The two straightest boards are selected for the top and bottom of the wall and cut to the desired length. Both boards are temporarily fastened with nails, projections of racks, window and door openings are marked at the ends. Then the clip of nails is removed and the boards are spread to a distance equal to the height of the racks.
For wall racks, boards with a section of 150 x 50 mm, 100 x 50 mm are used. The pitch of the racks must be specified in the project. The step size is taken depending on the design scheme and the material of the facades. For example, a step of 407mm - if the walls are sheathed with drywall. Step 610 mm - if the house has 2 floors. In addition, such a distance between the posts (610 mm) is convenient for mounting insulation boards (mineral wool).
The assembly of the frame of the outer walls begins with the setting of the corner posts.
- Collect window and door openings.

The assembly of the window opening begins with the upper lintel. It is made from a wide board and attached to the racks. Then the entire block is nailed to the upper trim of the frame. Support posts supporting the window lintel are fixed with nails. If there are racks above the jumper, they are also fixed.
Then a window sill board is nailed to the racks. Short lower racks are attached through the window sill. The entire finished block is nailed to the top wall trim.
Doorways are made in the same way as windows, with the difference that the doors do not have window sills and short lower pillars.
- Install braces.
Ukosina - a frame element located obliquely in the plane of the wall. It stabilizes the structure, does not allow it to fold.
Usually jibs are made from boards with a section of 50 x 100 mm, 50 x 150 mm. You can use metal strips or corners. But metal jibs are placed in two pieces, crosswise. After all, metal, unlike wood, works only in tension. And two jibs will take loads from different sides.
Sheets of plywood or osb, which are sheathed with facades, can serve as jibs. Plywood is nailed to the racks and boards of the lower and upper strapping.
- Fix wall blocks.
Blocks in the walls increase the strength of the structure, whether it is an ordinary house or a building. In internal walls, in addition, in the event of a fire, the blocks will slow down the spread of fire from the bottom up. Blocks are placed between intermediate racks in order to more reliably fix drywall sheets (in internal walls) or plywood and osb in external walls.
- Sheathing the wall.
The walls are sheathed with plywood, osb, polystyrene boards. Sheathing is done both in the horizontal position of the frame, and after installing it vertically. For external skin, plywood is preferable, because. it is stronger than osb, although osb is an acceptable plating option.
Walls with cladding are heavier than without cladding. To lift, you will need the help of several workers or a winch. And if you sheathe a frame that is already upright, you need to build scaffolding and stairs.
Sheets are fixed vertically and horizontally. Between them leave 3 mm gaps. You can also use pieces of plywood long enough to span three studs. The sheathing is nailed, fastened to the boards of the upper and lower trim after 150 mm, to the racks - after 300 mm. The openings of windows and doors are cut out both in the horizontal and vertical position of the frame, after the wall has been raised.
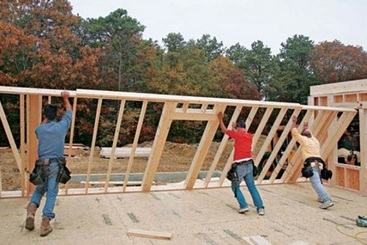
The wall can be lifted by several workers.
You can help with a manipulator or winches. When lifting the internal walls, one person is placed on a plot of 2.5-3 m. The length of the section for one person when lifting the outer walls is 1.8-2.5 m. The worker stands in front of a part of the wall without an opening. A sheathed wall is best raised in calm weather, because a plywood wall is an excellent sail that tends to capsize in the wind.
Before lifting from the end of the frame, temporary jibs are easily attached. As soon as the wall is raised, the jibs are nailed to the platform or to the bottom trim board. With the help of a suspension or level, the position of the wall is leveled, and then it is finally fixed with the help of temporary jibs from boards with a section of 25 x 150 mm. The jibs are placed in increments of 1.5 m and are attached to the rack and to the subfloor.
- Make a second top harness.
The second top trim of boards is installed on all load-bearing and external walls when all walls are assembled and installed vertically. It binds the frame into a single whole and distributes the weight from the upper structures. The harness is made of even boards of the same thickness and nailed to the top board.
- Gather interfloor overlap.
Beams are mounted, then logs. Lay the draft floor of the 2nd floor, if the floor is provided for by the project.
- Assemble the frame of the roof gable.
- Install the ridge element.
- Install the roof rafters and puff under the ridge.
- They make a crate and cover the roof with the material provided for in the project.
The house is ready for final finishing. External walls need to be insulated. Install windows and doors, clad facades. The final stage is the interior decoration of the premises. It includes the installation of clean floors, the installation of plumbing, electrical equipment, and which can also be done by hand. Also covering walls and ceilings with plasterboard, painting or wallpapering.