Material calculation
| WALLS: | |
| gas silicate Ytong (600x250x400mm): | |
| 74.17 m³ x 4440 rubles/m³ | 329315 rub. |
| block glue: | |
| 60 pack. x 290 rubles/pack (25 kg) | 17400 rub. |
| Ytong U-formwork blocks (500x375x250mm): | |
| 35 pcs. x 400 rubles / piece | 14000 rub. |
| masonry reinforcement D10 AIII: | |
| 0.14 t x 37500 rub/ton | 5250 rub. |
| reinforcing bars Ø12 AIII: | |
| 0.27 t x 37500 rub/ton | 10125 rub. |
| concrete mix B15-20: | |
| 2.3 m³ x 4200 rub/m³ | 9660 rub. |
| : | |
| 0.2 m³ x 3700 rub/m³ | 740 rub. |
| extruded polystyrene Penoplex 35: | |
| 0.4 m³ x 5100 rub/m³ | 1020 rub. |
| flexible reinforcing ties BPA 4-2P 250mm: | |
| 740 pcs. x 3.3 rub./pc. | 2442 rub. |
| facing single brick: | |
| 7670 pcs. x 13 rubles / pc. | 99710 rub. |
| masonry mixture: | |
| 3.4 m³ x 2700 rub/m³ | 9180 rub. |
| TOTAL: on the walls | 498842 rub. |
| FOUNDATION: | |
| gravel bedding: | |
| 11.6 m³ x 1900 rub/m³ | 22040 rub. |
| concrete mix B15-20: | |
| 8.8 m³ x 4200 rub/m³ | 36960 rub. |
| concrete mix B15-20: | |
| 74.6 m³ x 4200 rub/m³ | 313320 rub. |
| hydrostekloizol TPP 3.5: | |
| 19 rolls x 690 rubles/roll (10m²) | 13110 rub. |
| reinforcing bars D10, 12, 16 AIII: | |
| 4.5 t x 37500 rub/ton | 168750 rub. |
| edged boards for formwork: | |
| 1.4 m³ x 6500 rub/m³ | 9100 rub. |
| roll waterproofing RKK-350: | |
| 6 rolls x 315 rubles/roll (10m²) | 1890 rub. |
| TOTAL: on the foundation | 565170 rub. |
| COVERS: | |
| wooden bars 150x100; 100x50: | |
| 3 m³ x 7000 rub./m³ | 21000 rub. |
| drywall Knauf (2500x1200x10): | |
| 26 pcs. x 260 rub./pc. | 6760 rub. |
| steel profile with fasteners: | |
| 222.4 r.m x 49 rub./r.m | 10898 rub. |
| basalt insulation (Rockwool): | |
| 19.2 m³ x 3700 rub/m³ | 71040 rub. |
| waterproofing (Tyvek Soft): | |
| 185 m² x 68 rubles/m² | 12580 rub. |
| PE vapor barrier: | |
| 185 m² x 11 rubles/m² | 2035 rub. |
| plywood sheets FK 1525x1525x18: | |
| 1.4 m³ x 19000 rub/m³ | 26600 rub. |
| subfloor edged boards: | |
| 1.5 m³ x 6500 rub/m³ | 9750 rub. |
| TOTAL: by floors | 160663 rub. |
| ROOF: | |
| pine racks (150x50mm): | |
| 4 m³ x 7000 rub/m³ | 28000 rub. |
| wood protection impregnation: | |
| 59 l x 75 rubles/liter | 4425 rub. |
| waterproofing (Tyvek Soft): | |
| 184 m² x 68 rubles/m² | 12512 rub. |
| onduline slate 2000x950x2.7: | |
| 106 sheets x 399 rubles/sheet | 42294 rub. |
| roofing nails 73x3mm: | |
| 23 pack. x 190 rubles / pack (250 pcs.) | 4370 rub. |
| figure skate (1000mm): | |
| 13 pcs. x 290 rub./pc. | 3770 rub. |
| edged boards 100x25mm: | |
| 1.5 m³ x 7000 rub/m³ | 10500 rub. |
10:0,0,0,290;0,290,290,290;290,290,290,0;290,0,0,0|5:185,185,0,290;185,290,60,60;0,185,105,105;185,290,144,144|1127:224,144;224,60|1327:160,62;160,114|2244:0,38;0,169;290,199|2144:79,0;79,290;216,290|2417:290,22|1927:217,-20
RUB 1,410,056.0
Only for the Moscow region!
Calculation of the cost of work
Do you want to know how much it costs to build your house and choose contractors?
Place an express application and get offers from professional builders!
Layout example 10x10 m for calculation |
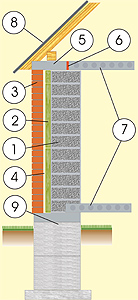
Structural scheme |
|
 |
1.
Aerated concrete block d=400mm; 2. Brick cladding d=120mm; 4. Ventilation channel d=20-50mm; 5. Reinforced concrete screed h=200mm; 6. Extrusion foam d=30-50mm; 7. Wood beam ceilings d=150-250mm; 8. Ondulin sheets; 9. Foundation from a monolithic concrete slab h=1.8m; |
|
Gas silicate wall with brick facade
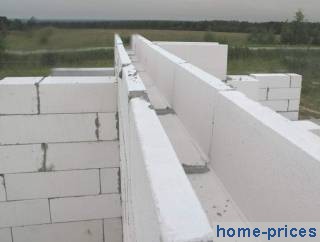
Gas silicate masonry
According to the characteristics of heat saving, acoustic protection, fire resistance, autoclaved gas silicate significantly outperforms ordinary brick.
Compared to other concrete building materials, autoclaved aerated concrete blocks have an increased and uniform micropore structure throughout the volume, which explains their unsurpassed heat-shielding parameters, as well as "breathing" ability.
Despite the fact that aerated concrete blocks are promoted as a very convenient and heat-efficient structural material, their use is advisable only if you guarantee the purchase of exceptionally high-quality material: Beston, Wehrhahn, Hess, Hebel, Ytong and serious adherence to the manufacturer's technical conditions, it is better with the involvement of specialists .
Currently, the building market sells blocks of autoclaved aerated concrete (Ytong®, Wehrhahn®, Hebel®, Hess®, Beston®) with small dimensional deviations (in the range of ±1 mm), which can be laid on a special masonry adhesive.
The wall folded in this way is characterized by minimal thermal conductivity, due to the fact that there are no “cold zones” formed by inter-brick seams from sand-cement mortar, and, in addition, the costs of installing gas silicate blocks are reduced by an average of a third.
Adhesive for aerated concrete is sold at a price twice the cost of a simple cement binder, at almost five times less consumption.
According to existing standards, an outer wall of aerated concrete blocks with a cross section of 0.40 m is quite enough for the central region of the country.
The exterior finish of cellular concrete walls should not block the diffusion of moisture from the house to the outside. Therefore, it is unacceptable to paint aerated concrete walls with “non-breathing” means, cover with foam plastic, plaster with cement-sand plaster.
When installing gas silicate walls, it is necessary to link a lot of recommendations and building subtleties, otherwise, instead of saving on insulation, you can get damp, too cold, or unsafe walls.
- According to the technology, it is necessary to lay the places under the window sill and the places where the jumpers are supported with reinforcing bars, as well as every 4-5 rows of blocks.
- The installation of the first row of aerated concrete blocks should be taken very carefully, checking the level and verticality of the wall during installation.
- In order to install reinforcing bars, along the top of the wall, grooves are made with a wall chaser in a thickness and depth of 30 * 30 mm, which, when laying the reinforcement, are rubbed with an adhesive for aerated concrete.
- Gas silicate blocks can be planed, drilled, chased, sawn with a hacksaw, milled directly at the construction site.
- An uneven or excessively protruding aerated concrete block must be adjusted with a planer to the required level at the place of its installation.
- On the last row of aerated concrete blocks, in plank formwork preparation, a reinforcement-reinforced mortar belt is made, 20 cm thick. On the outer surface, the mortar belt is thermally insulated with a 50-mm layer of extruded foamed polystyrene.

Face brick cladding
Brick is, obviously, the most famous building material for building a house, which, in addition to its classic appearance, is distinguished by high (up to one hundred freeze-thaw periods) frost resistance and low (no more than 6%) water absorption, which sets a long lifespan of stone households. Among facing brick products there are, in addition to standard ones, glazed, figured and clinker bricks.
The combination of a layer of facing-brickwork and autoclaved aerated concrete in the composition of the facade results in a rather harmonious building structure, which combines the classical style and modern achievements in the field of heat-efficient materials.
Nowadays, facing bricks are produced in various reliefs (corrugated, chipped, smooth, rough) and profiles (wedge-shaped, rounded, beveled, rectangular), as well as colors (from white-yellow to terracotta), which helps to realize any original artistic ideas.
- Since there is a possibility of the formation of deformation cracks, it is not necessary to connect the front and aerated concrete masonry with inflexible metal rods embedded in the seams of the masonry.
- The coupling of the front and aerated concrete block walls is done by laying five rows of bricks, using a plaster mesh, while maintaining an air gap through the gaps of the reinforcement.
- The facade wall is laid in 1/2-brick on a cement-sand binder, with laying, after 4 rows of spoons, a bonder row;
- From the facing brick, the main gas silicate wall is separated by a gap, up to 50 mm (along the entire height of the floor) for steam removal, leaving inlet / outlet channels in the upper and lower rows of the front masonry.
Foundation of reinforced concrete slab and monolithic tape
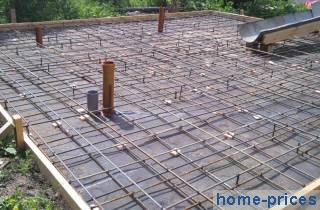
A solid-slab foundation is made along the boundaries of the house in the form of a single reinforced concrete slab and is practiced in a recessed or non-buried version.
In the embedment option, the concrete slab acts as the base on which the side parts of the foundation are built, which define the underground floor. With a high level of groundwater, it is better to erect the vertical parts of the foundation by the method of continuous concreting, using waterproofing measures: coating, impregnation, gluing.
The elevated slab foundation is used in low-rise buildings, with unstable soils: peat bogs, recultivated, bulk or heavily heaving, as well as in waterlogged areas. This foundation is appropriate for the construction of garden buildings that do not require a high basement part of the foundation and a basement.
According to experience, when the top of the foundation slab serves as a blank for the floor covering of the 1st floor, and the monolithic slab is installed above the depth of soil freezing, there is a need for thermal protection of the soil under the base slab and under the blind area.
The best solution would be to install a thermal screen made of extruded polystyrene foam, such as Teplex, Polyspen, Primaplex, Ursa XPS, Styrodur, Penoplex, Styrofoam, Technoplex, because other heat-shielding materials (expanded clay granules, granular foam, glass wool) are soon saturated with moisture, which leads to to a rapid decrease in their heat-shielding characteristics in damp soil.
A brief method for laying a slab foundation with vertical parts in the form of an inextricable concrete ring:
- First of all, the land is removed to the mark specified by the project.
- Crushed stone preparation is poured onto the prepared substrate, fractions of 40-60 mm, 20 cm thick, and compacted tightly.
- Cement-sand filling is carried out, up to 5 cm thick.
- A waterproof membrane is laid out with an outlet along the border of 2000 mm, in order to vertically waterproof the vertical part of the foundation base.
- In order to protect the waterproofing material from possible damage during the installation of the reinforcing structure, a second layer of cement mortar is applied over the moisture insulation, 4-5 cm high, along the perimeter of which formwork boards are mounted along the height of the foundation slab.
- The slab being formed is pulled together from the inside with two grids of welded steel bars with a section of Ø14 type AII (A300), AIII (A400) with cells of 20x20 cm.
- For a solid foundation, only high-quality concrete mix, grade M300, class B22.5, supplied by an automixer, is used.
- With an indent of up to 25 cm from the edges of the slab part of the foundation, the formwork is mounted to the height of the side parts in the form of an inextricable reinforced concrete ring,
- A reinforcing belt consisting of iron rods numbered A300 d10-d14 is placed in the completed mold for pouring, and concrete is produced.
- The setting time of concrete (when stripping should be done) is, in practice, 4 weeks in warm weather.
Timber plank flooring
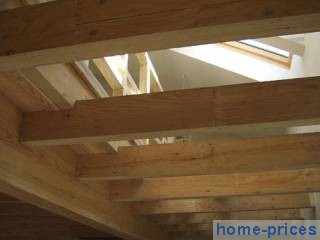
Wood-beam floors are mainly popular in private construction, due to the convenience and cheapness of their installation.
For beam ceilings, lumber of coniferous trees (spruce, larch, pine) is traditionally used, with a volumetric moisture content of not more than 12-14%. The best beam is a bar with an aspect ratio of seven to five, for example, 14x10 cm.
When designing a beam structure, it is necessary to be guided by special diagrams that determine the dependence of the beam geometry on the size of the span between the supporting structures and the weight of the load; otherwise, it is permissible to build on the approximate rule that the height of the beam should be about 0.042 of the floor length, and the thickness should be 5 ÷ 10 cm, with a load of 150 kgf / m² and a laying step of lag 50 - 100 cm.
For a possible replacement of the lag of the estimated size, bolted boards should be used, while maintaining the overall size.
Typical moments of installation of wood beams:
- The installation of the beam bars is carried out in the following sequence: first of all, the first and last, and then, with the adjustment according to the spirit level, all the rest. Beams should be wound on the wall no shorter than 15-20 cm.
- The beams are set aside from the wall by at least 5 cm, and the gap between the beams and the smoke channel must be at least 40 cm.
- in log cabins, the edges of the beam beams are sawn down in the manner of a bell, and then they are driven into the finished drank of the upper crown to the entire depth of the wall.
- To protect against possible decay that occurs from moisture in the brick environment, the ends of the beams are sawn off at an angle of about 60 degrees, treated with an anti-rotten solution (for example: Kartocid, Aquatex, KSD, Dulux, Senezh, Holzplast, Biofa, Tex, Biosept, Pinotex, Cofadex , Tikkurila, Teknos) and wrapped with roofing material, keeping the end edge open.
- Traditionally, in block-and-brick walls, the end parts of the beams are located in the niches of the walls, where condensation appears, for this reason, between the ends of the log and the brick, they leave air for ventilation, and with a sufficient depth of the niche, an additional layer of thermal insulation is placed.
The covering of the last floor is thermally insulated with the implementation of a vapor barrier membrane from below the thermal protection, the interfloor ceiling is not subject to insulation, and the basement ceiling is thermally insulated with the installation of a vapor barrier film over the insulation.
However, if the issue of structural strength of wood-beam interfloor ceilings is solved in practice due to the obvious addition of the dimensions of the beams and their number, then the situation is not so simple with noise insulation and fire protection.
A possible technique for improving the acoustic and fire parameters of timber floor slabs is as follows:
- To the base of the beam beams, at an angle of 90 degrees, on damping brackets, after 300-400 mm, metal guides are mounted - a crate, on which gypsum boards are suspended from below.
- On top of the lattice structure, a synthetic fabric is laid and fixed with brackets to the beams, on which mineral fiber boards are closely laid, such as: Ursa, Izomin, Rockwool, Knauf, Isorok, Isover, 50 mm thick, with a rise on the vertical sides of the floor beams.
- In the rooms of the upper level, plywood slabs (1.6 ... 2.5 cm) are mounted on the beams, then a rigid basalt fiber sound insulator (25 ... 30 mm), and again, chipboard slabs of floor preparation are laid out.
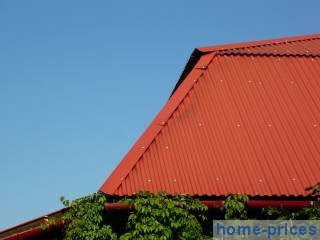
Euroslate roof
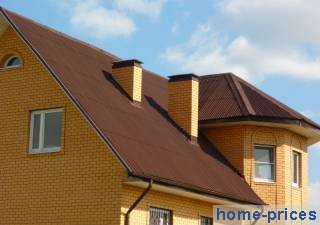 Euroslate (otherwise referred to as: ondulin, bitumen slate, bituminized slate, soft slate, ondulin slate) is a wave-like mineral fiber base, fixed with a distilled bitumen compound and dyed with a mineral UV-resistant pigment. bituminous corrugated sheet is made with various names: Guttanit, Ondura, Corrubit, Aqualine, Bituwell, Onduline, Nuline. Regular sheet sizes: 200x95 cm, weight 6 kg/sheet.
The roofing material is installed on a bearing base made of rafters and a sheathing layer.
In the construction of private buildings, a 2.3-span structure with inclined rafters and internal load-bearing walls is often used.
The interval between the rafters is usually in the range of 0.60 ... 0.90 m with a cross section of rafters 5x15 ... 10x15 cm; the lower sections of the rafter beams are lowered onto a fixing beam measuring 10x10 ... 15x15 cm.
The main qualities of a euroslate roof are its low cost and ease of assembly. Among the tangible shortcomings, one can cite a fairly rapid loss of color richness, as well as a noticeable combustibility of a cardboard-bitumen sheet, in comparison with a metal roof.
Basic principles for installing a bitumen sheet roof:
- The inter-row overlap of the soft slate sheets and the gap between the purlins are determined by the slope of the roof: if the latter is more than 15 °, then the overlap is 17 cm, and the distance between the boards of the batten is 0.30 ... 0.35 meters.
- In order to protect bituminous slate sheets from wrapping during gusts of wind, their fastening should be carried out from the lower zone of the end part of the roof, opposite to the prevailing wind direction.
- In order to prevent unnecessary layering at the intersections of 4 adjoining sheets, which contributes to the formation of cracks, the overlying layer is decomposed from the middle of the first sheet of the underlying level.
- Euroslate sheets are fastened along the bottom line in each upper half-wave, along two middle purlins - with a wave skipping, and the upper edge is covered with an overlay of a higher-lying corrugated sheet or a ridge detail. To fix each sheet, about twenty roofing nails are enough: size -73.5,Ø3.0 mm or self-tapping screws (length -65.0.Ø5.5 mm) with neoprene washers.
- Ordinary overlap of corrugated sheets must be done in 1 wave, however, with a roof slope of less than 10 degrees. - in two waves.
- The strengthening of the ridge parts is carried out in the direction of laying the bituminous slate sheets, with an overlap of 20 cm, with self-tapping screws screwed into each vertex of the wave of the underlying corrugated sheet.
- To protect and decorate the end zones of the roof, wind profiles are used, the installation of which is carried out from the corner above the eaves, with an overlap of 0.2 m.
Let's say you decide to build a house with your own hands. However, before construction begins, it is necessary to calculate the number building material. Currently, building bricks are quite expensive, an accurate calculation will significantly reduce your costs.
A preliminary calculation is necessary in order to be able to purchase the material of one batch. This will avoid trouble with different shades in different batches.
Note! The use of building material of different batches will not have the best effect on the appearance of your building. This is due to the fact that it is practically impossible to produce an artificial stone from clay of the same color in different batches, since both the composition of the clay and the firing temperature may differ slightly.
Below is a table that shows the correspondence of these parameters.
Table 1
Calculation procedure
Stages
The following steps must be followed:
- To correctly calculate the number of bricks per house, you need to know its dimensions, such as length, width and height.
- After calculating the perimeter of the building, the resulting number is multiplied by the height. As a result, we get the area of the constructed surface.
- Next, you need to calculate the area of \u200b\u200bwindow and door openings, subtract the resulting number from the total area.
It is also necessary to decide on the choice of one or another type of stone, which happens:
- Single. It has dimensions of 65 by 120 and 250 mm;
- . It has dimensions of 88 by 120 and 250 mm;
- Double. It has dimensions of 138 by 120 and 250 mm.
Using one-and-a-half or double silicate brick M 150, you can build walls much faster, just be aware that this can worsen the appearance of the building. The price of a double and one and a half is of course higher than the price of a single. Many people think that a single one looks much prettier, but the idea of \u200b\u200bbeauty is a rather controversial issue.
To make a more accurate calculation, you need to add to the height of each stone 10 mm. This is how much the thickness of the seam is. You should also add about 5% per fight.
table 2
| Type of masonry, stones | Stone size | Including seams, pcs. | Excluding seams, pcs. |
Note! Quantity data in table 2 are given without taking into account door and window openings, the dimensions of which are individual.
This instruction will allow everyone to understand how to calculate the number of bricks on their own. There is nothing difficult in this.
Simple example
An example of calculating the material for the construction of a house 12 by 12 m, having 2 floors:
- Determine the perimeter of the house. Add up its length and width. We get: 12+12+12+12=48 m;
- We count the area. To do this, multiply the perimeter by the height. Let's say that the height of each floor of our house will be 3 m, the total height is 3 + 3 = 6 m. As a result, the area will be 48 * 6 = 288 m 2 ;
- The next steps depend on what kind of masonry you will perform. Let's say we perform laying in 2 stones and facing in 0.5 stones. According to table 1, we see that the wall thickness in this case will be 640 mm. According to table 2, we see that in this case there are 204 pieces per 1 m 2 ;
Material calculation
| WALLS: | |
| foam concrete blocks (200x300x600mm): | |
| 62.37 m³ x 2900 rub/m³ | 180873 rub. |
| reinforced concrete lintels 2PB 17-2-p (1680x120x140): | |
| 12 pcs. x 462 rubles / pc. | 5544 rub. |
| reinforced concrete lintels 2PB 13-1-p (1290x120x140): | |
| 10 pieces. x 383 rub./pc. | 3830 rub. |
| reinforced concrete lintels 2PB 10-1-p (1030x120x140): | |
| 4 things. x 357 rub./pc. | 1428 rub. |
| steel mesh for masonry (50x50x3 mm): | |
| 35 m² x 102 rubles/m² | 3570 rub. |
| extruded polystyrene Penoplex 35: | |
| 0.2 m³ x 5100 rub./m³ | 1020 rub. |
| flexible reinforcing ties BPA 4-2P 250mm with insulation clamps: | |
| 740 pcs. x 3.3 rub./pc. | 2442 rub. |
| facing single brick: | |
| 7670 pcs. x 13 rubles / pc. | 99710 rub. |
| masonry mixture: | |
| 7.5 m³ x 2700 rub/m³ | 20250 rub. |
| basalt insulation (Rockwool): | |
| 7.38 m³ x 3700 rub/m³ | 27306 rub. |
| TOTAL: on the walls | 345973 rub. |
| FOUNDATION: | |
| sand bedding: | |
| 5.7 m³ x 850 rubles/m³ | 4845 rub. |
| concrete blocks FBS 24-5-6: | |
| 48 pcs. x 3830 rub./pc. | 183840 rub. |
| masonry mixture: | |
| 2.2 m³ x 2700 rub/m³ | 5940 rub. |
| concrete mix B15-20: | |
| 23.6 m³ x 4200 rub/m³ | 99120 rub. |
| reinforcing bars Ø10-Ø12 AIII: | |
| 1.2 t x 37500 rub/ton | 45000 rub. |
| edged boards for formwork: | |
| 0.7 m³ x 6500 rub/m³ | 4550 rub. |
| roll waterproofing RKK-350: | |
| 6 rolls x 315 rubles/roll (10m²) | 1890 rub. |
| TOTAL: by floors | 304390 rub. |
| ROOF: | |
| pine racks (150x50mm): | |
| 4 m³ x 7000 rub/m³ | 28000 rub. |
| wood protection impregnation: | |
| 59 l x 75 rubles/liter | 4425 rub. |
| waterproofing (Tyvek Soft): | |
| 184 m² x 68 rubles/m² | 12512 rub. |
| profiled sheets SINS 35–1000: | |
| 176 m² x 347 rubles/m² | 61072 rub. |
| self-tapping roofing 4.8x35: | |
| 6 pack. x 550 rubles / pack (250 pcs.) | 3300 rub. |
| figure skate (2000mm): | |
| 6 pcs. x 563 rub./pc. | 3378 rub. |
| edged boards 100x25mm: | |
| 1.1 m³ x 7000 rub/m³ | 7700 rub. |
10:0,0,0,290;0,290,290,290;290,290,290,0;290,0,0,0|5:185,185,0,290;185,290,60,60;0,185,105,105;185,290,144,144|1127:224,144;224,60|1327:160,62;160,114|2244:0,38;0,169;290,199|2144:79,0;79,290;217,290|2417:290,22|1927:217,-20
RUB 1,195,445.0
Only for the Moscow region!
Calculation of the cost of work
Do you want to know how much it costs to build your house and choose contractors?
Place an express application and get offers from professional builders!
Layout example 10x10 m for calculation |
Structural scheme |
|
 |
1.
Foam concrete block d=300mm; 2. Brick cladding d=120mm 3. Heater basalt d=50mm; 4. Ventilation channel d=20-50mm; 5. Reinforced concrete screed h=200mm; 6. Extrusion foam d=30-50mm; 7. Cover panel; 8. Sheets of corrugated board; 9. Foundation prefabricated block tape h=1.8m; |
|
Foam concrete block masonry with brick façade and internal thermal insulation

Foam concrete block masonry
Currently, foam concrete is a very popular, economical and healthy wall material, which, compared with other brick blocks, has increased vapor conductivity and microporosity.
According to existing standards, for the middle area, a single-layer external wall made of foam concrete with a cross section of 0.40 m with an external glass wool thermal protection, a layer of 50 mm, is sufficient.
Puttying masonry from foam concrete blocks should be done only after 6-9 months (and sometimes even after a year), due to the strong shrinkage of foamed concrete - up to 3 mm per meter of masonry and the inevitable cracking of the plaster, for this reason, for operational interior finishing of foam blocks houses, the use of plasterboard or gypsum-fiber false panels is acceptable.
In terms of soundproofing, fire protection, and energy efficiency indicators, the foam concrete block is many times ahead of ceramic bricks.
Facade cladding of foam block walls should not block the movement of water vapor from the house to the street. In this regard, it is undesirable to finish foam block walls with foam boards, plaster with sand-cement mortar, and paint with film-forming compounds.
Due to the problems of the manufacturing process, foam concrete blocks (in comparison with gas silicate blocks), are usually not produced with sufficient accuracy, as a result of which they are laid on an ordinary building mixture. In turn, the presence of significant mortar mix joints between foam concrete blocks, along with an increase in material costs, contributes to the formation of cold “bridges” and the deterioration of the thermal insulation parameters of the wall.
When installing foam block walls, it is important to take into account a large number of technological issues and requirements, otherwise, instead of reducing the cost of thermal insulation, it is really possible to get very cold, wet, or simply cracked walls.
- The installation of the lower row of foam concrete blocks must be approached as seriously as possible, controlling the verticality and horizontality of the masonry by the spirit level during work.
- An uneven or slightly protruding foam concrete block must be hemmed to the required size at the place of its installation.
- For the installation of reinforcing bars, on the surface of the blocks, grooves are made with a circular saw in depth and width of 30 * 30 mm, which, when installing the reinforcement, are filled with an adhesive solution for foamed concrete blocks.
- Blocks made of foamed concrete can be milled, drilled, chiseled, planed, sawn with a hand saw right on the construction site.
- According to the technology, the supporting zones of the lintels and the zones under the windows, as well as the next four or five rows of blocks, must be laid with reinforcing meshes.
- On the last row of foam concrete blocks, in panel formwork preparation, a reinforcement-reinforced mortar screed is produced, 20-25 cm thick. On the outside, the reinforced concrete belt is heat-shielded with a 5-cm layer of extruded polystyrene foam.

brick finish
The most ancient wall material for building a dwelling is, undoubtedly, a facing brick, which, apart from a wealthy appearance, is characterized by significant (up to 200 kg / sq. cm) strength and low (less than 6%) moisture absorption, which explains the long life cycle of stone households . In addition to the usual ones, clinker, figured and glazed bricks are produced among facing brick products.
Now facing bricks are produced in various textures (corrugated, chipped, rough, smooth) and profiles (beveled, rounded, rectangular, wedge-shaped), as well as colors (from light yellow to dark brown), which helps to realize any original artistic ideas.
- From the outside, on the foam concrete wall, with the help of polymer anchors, basalt fiber thermal protection plates (for example, Isover, Izorok, Ursa, Knauf, Izomin, Rockwool), with a section of 50 mm, are hung tightly, on top of which a vapor-permeable waterproofing membrane is laid (Izospan, Tyvek, Yutavek ).
- Every 2 rows of blocks, a coupling of the facing and foam concrete walls is arranged by laying bending galvanized strips or soft fiberglass mesh reinforcement, due to the fact that the facing and foam block wall parts have an unequal degree of shrinkage.
- Brickwork is done in rows of spoons on a cement-sand mortar, with alternating every 4-5 rows of spoons with a bond row.
- Since there is a risk of shrinkage cracks, it is not recommended to connect the foam block and brick masonry with rigid reinforcing bars laid in the seams of the walls.
- From the front wall, the main wall of foam blocks, with an external thermal insulation screen, is separated by a gap of at least two centimeters (along the entire height of the floor), to remove wet steam, with supply and exhaust openings at the upper and lower points of the front masonry.
Block-prefabricated strip foundation

The blocks differ in types: FBP - hollow foundation blocks, FBV - with a cutout, FBS - solid. As a rule, foundation blocks are made with a height dimension of up to 0.65 m, the horizontal dimension varies in the range of 900-2400 mm, the width is fixed at 30.40.50.60 cm.
In the manufacture of a strip foundation on non-porous substrates, it is quite possible to lay concrete blocks directly on a compacted soil base.
The use of a certain type of FBS block follows from the thickness of the external structures of the house. For low-rise construction, the width of the reinforced concrete block is 300 or 400 mm. The cross section of FBS blocks can be thinner than the outer walls of the building, as they have a much greater load capacity.
On non-rocky soils, it is permissible to lay out building blocks without in-line reinforcement, provided that a reinforced tape 0.10-0.20 m high with a reinforcing mesh is poured from below and above them.
Reinforced concrete blocks are reputed to be a classic building component, which allows you to quickly make the foundation of a private house.
To increase the base area of the foundation, in order to thereby reduce possible movements of the mainland soil, FBS blocks should be mounted on pre-mounted foundation supports.
The choice of FBS blocks as a material for the manufacture of the foundation is often motivated by the possibility of year-round construction or a time limit.
In situations where the characteristics of the underlying layer are not clear, it is better for peace of mind, instead of FL blocks, to arrange a monolithic reinforced concrete screed.
Today, the foundation of reinforced concrete elements, in terms of a set of basic properties, among which: resistance to shifts of the geo-underlying and efficiency, is inferior to another type - a monolithic reinforced foundation.
- The laying of foundation pillows starts from the outer corner of the building, and first the FL blocks are laid under the outer walls, and only then for the inner ones.
- On crushed stone preparation or laid foundation supports with dressing, FBS are placed - blocks that are joined with a sand-cement mixture.
- The assembly of finished blocks is carried out with respect to corners, along walls diverging at right angles, controlling alignment using an optical theodolite. Separate reinforced concrete blocks are laid with a forklift on a "bed" of masonry mixture.
- Laying should begin with the placement of landmark blocks in the corners of the building and at the intersections of the axes. The placement of wall blocks is started only after checking the position of the extreme blocks in terms of and in height.
- The geometry in the plan is checked by measuring the linear size of the sides of the house and the size between opposite corners, and the height level - by the spirit level or level.
- Windows for launching pipelines to the zero level are implemented by making a niche between the blocks, with further embedment with concrete.
Prefabricated reinforced concrete floor

For the installation of interfloor ceilings in buildings with brick walls, as a rule, reinforced concrete hollow panels are used.
During the construction of a low-rise building, in most cases, panel products of the PK, PNO brand are used, with dimensions: from 2100 mm to 6300 mm long, 0.16 ÷ 0.22 m thick and 0.99 ÷ 1.19 m wide.
Due to the technology of prestressing reinforced concrete, factory-made slabs are characterized by a large margin of safety, in comparison with ceilings made right there at the facility in a monolithic form, as well as the stability of technical parameters, at a cheaper cost and quick erection of the ceiling under construction.
Unlike cast reinforced concrete floors, reinforced concrete multi-hollow panels are distinguished by good soundproofing properties.
Some moments of laying reinforced concrete slabs:
- Before laying the floors, they look, according to the spirit level, the height marks of the bearing surfaces of the girders and masonry, which should lie in the same plane: the spread in marks can be within 1.0 ÷ 1.5 cm, if necessary, the bearing plane is adjusted with a sand-cement mixture .
- The slabs are lowered by a truck crane onto a cement-sand bed, a small shift is done manually, before the slings are removed, if a discrepancy in levels with adjacent slabs by more than 5 mm is found, the product is removed, the mortar bedding is replaced and laid again.
- Immediately after the alignment of the ceiling, the mounting ears are welded with wall anchors and with lifting fasteners of adjacent products, and the gaps between the panels are sealed with a cement mixture to the full thickness of the reinforced concrete panel.
- To compensate for structural movements, there should be a gap of up to 5 cm between the masonry and the support zone of the floor panel, and at the same time, to protect against freezing, it is worth inserting polystyrene foam insulation into this indent.
- For the purpose of thermal protection of the ceiling in winter, it is necessary to fill the cavities in the end sections of the multi-hollow ceilings with expanded clay-concrete mixture 120 ÷ 200 mm deep.
Profiled metal roof
Compared to metal roofing, the main benefits of corrugated roofing are ease of installation and minimum costs.
Profiled material - these are sheets of profiled metal-roll of a trapezoidal shape, with a film paint coating, which are manufactured under brands such as HC18, H57, H44, C-21, B-45, HC35, MP-35, H60, HC44, where the numbers indicate the height of the corrugation .
As a material for the roof, a profiled sheet with a corrugation height of at least 2 cm is used to obtain the required load capacity and economical use of batten boards. In this case, the permissible slope of the roof slope is considered to be at least 1: 7.
The roof covering is laid on a rigid structure consisting of rafters and battens.
For private buildings, a two- or three-span scheme is usually used with medium supporting walls and inclined rafters.
The interval between the rafter legs is usually made in the range of 0.60 ÷ 0.90 m with the standard size of the rafter beams 50x150 ÷ 100x150 mm; the lower ends of the rafter legs are lowered onto a fixing beam measuring 10x10 ÷ 15x15 cm.
Standard instructions for installing corrugated corrugated sheets:
- In situations of building warm attic spaces, roofing based on corrugated sheets, like every other metal roofing surface, requires the presence of an under-roofing moisture-proof film, such as: Stroizol SD130, TechnoNIKOL, Yutavek 115.135, Tyvek, Izospan, which prevents condensed water vapor from draining onto the heat insulator .
- The moisture-proof film is laid in horizontal strips, from bottom to top, with a sagging between the rafters of about 2 cm and an inter-strip overlap of 10-15 cm, with further gluing of the joints with adhesive tape.
- To exclude unnecessary horizontal joints, the longitudinal component of the corrugated sheet is made equal to the shoulder of the roof slope, plus 20 ÷ 30 cm, taking into account the lower overhang.
- The interval between the bars of the crate preparation is set by the section of the profile and the slope of the roof: when the latter is more than 15-17 °, and the profile grade is NS-8-NS-25, then the installation step of the sheathing is selected 0.4 meters, and for the profile grades NS-35- NS-44 - will be 70-100 cm.
- Installation of corrugated sheets of profiled flooring should be carried out from the eaves zone of the roof sidewall, opposite to the prevailing wind direction, in order to avoid lifting them under wind loads.
- Profiled sheets are fixed to the purlins with self-tapping screws, size 30x4.8 mm, with rubber gaskets, in the lower half-wave, and ridge corners, on the contrary, in the raised zone of the wave. Along the cornice line, fastening occurs at all deflections of the corrugated sheet, and the consumption of screws is up to 8 units. per 1 m2 of roofing surface.
- Lateral overlapping of profiled sheets is required to be done in one wave, and with a roof slope angle of less than 11 ÷ 12 degrees - in 2 waves.