For grinding, I use a surface grinder, but the processing speed there is very low, because the sole of the grinder is flat and in order to level the surface of a board, you sometimes have to remove a large layer of wood to clean up the bumps. In addition, such a grinder is inconvenient to process small parts, as well as oval-shaped workpieces. Therefore, I am going to make a full-fledged grinding machine and am looking for a suitable electric motor for this purpose. In the meantime, for grinding wooden blanks, I use the most primitive machine tool, which I made on the basis of and.
The grinder is fixed on a wooden board - a base 30 mm thick with an M8 bolt screwed into the hole for the handle and a metal clamp. A strip of rubber is placed under the clamp in order not to damage the plastic body of the angle grinder.
A small selection was made on the board for a circle with sandpaper, otherwise it would start to hurt her. A horizontal table is another board that is attached to the base board with self-tapping screws. The second support of the table is another segment of the board-thirty. The base and the table turned out to be very stable, and this is very important so that the grinder does not shake during operation.
On the machine, you can now very quickly and efficiently grind small blanks for wooden crafts, as well as “tear off” with sandpaper the excess part of the wood that you don’t want to cut off for a long and tedious time or with a knife.
The most important advantage is ease of manufacture and the possibility of quick disassembly if necessary, using the grinder for its intended purpose. When working, the workpiece is placed on the table and, since it is set at an angle of 90 degrees to the plane of the circle, it is possible to achieve right angles when processing workpieces.
The table did not become movable with the possibility of changing its angle of inclination, although it would be very desirable, but the grinding wheel is very small, so the table would have to be lowered below the base on which the machine stands. However, if you put it on the edge of the workbench, then you can adapt below the plane of the tabletop and an inclined table to grind parts at least at an angle of 45 degrees. If in the near future it will not be possible to make a real grinding machine with a large circle, then you will still have to follow the indicated path in order to be able to grind blanks for frames for photographs.
For security reasons, the angle grinder does not provide for fixing the power button. On the contrary, there, to turn on the tool, you need to simultaneously press two buttons. Therefore, I had to come up with some kind of mechanism on my homemade product that allows me to fix the "trigger" in the on state. I haven’t figured out anything better yet, how to apply a strip of rubber from a car camera, otherwise I would have to work with one hand, and keep the button pressed with the other. Now, when I turn it on, I pull the rubber on the "trigger" while simultaneously pressing the safety button. The rubber is tight and keeps the tool engaged. To turn off the grinder, I simply remove the rubber from the trigger.
The machine turned out to be mobile, which is very convenient: you can transfer it to the right place and turn it as needed for the convenience of processing workpieces. I try to work with them on the street, and not indoors, since when sanding wood, too much dust is obtained. It is impossible to collect it with a vacuum cleaner here. The base board is attached to a workbench or table with a clamp, so it can be attached to any table outdoors. The main thing is to have where to connect the grinding machine. I use for this
Angle grinder, simply - "Bulgarian", has three main areas of use.
- Cutting hard materials;
- Grinding with abrasives;
- Cleaning surfaces with brushes.
However, for convenience and expanding the capabilities of the tool, many devices have been invented. Let's do a quick review:
Tripod for angle grinder

This mini machine allows you to solve the main problem when working with a grinder: if you hold the tool with both hands, who will fix the workpiece? In this case, an angle grinder with a cutting disc is operated with one hand, and the second can hold and move the cut piece of metal.
Moreover, the tripod allows you to set the correct angle of cut, and the disk moves strictly vertically. The work is done efficiently and safely.
Devices for a grinder for cutting metal and other solid compact blanks, craftsmen have long learned to do it on their own.
The beds are assembled from a metal profile, automobile shock absorbers, or even plywood. A well-made machine is no less reliable and safe than a factory one.

IMPORTANT! When working with any machine - factory or homemade, you must remember the correct position of the protective cover.
If your design is strong enough and provides protection for the operator, you can use a tripod for sawing wood. The main thing to remember about safety. The main cause of injuries - an uncontrolled grinder, escaping from the hands when the disc is jammed in a tree, has been eliminated. But the disc itself can still injure.

Therefore, in the manufacture of such a device, it is better to make the switch not fixed. For example - in the form of a foot pedal. Then you can instantly turn off the power if the device gets out of control.
When there is no need to work with wood, but you just need to cut a large number of metal blanks, there are simpler options.
Such a mount can be made in an hour, and ease of use will increase by an order of magnitude. If you know how your hands “fall off” after cutting fifty pegs from a metal corner, this design is for you.
Clamp for grinder
The second most popular way to add convenience when working with an angle grinder is to fix the tool motionless on a workbench or in a vise.

By installing the appropriate disk, you can get an excellent grinder, or just. The Bulgarian itself does not cease to be such. At any time, unscrew the mount - and proceed to manual work.

If you fix a strong stop with a slot across the disk, you can process parts with high accuracy while holding the workpiece in your hands.

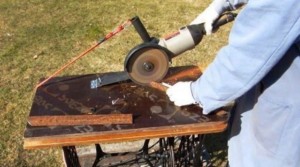
The most popular is the disc sawmill from the grinder. Having made a solid frame, and securely fastening the angle grinder under it, you get a seasonal sawing machine, which, if necessary, is easy to disassemble.

At the same time, you still have a grinder and an excellent workbench (though with a slot in the middle of the tabletop).

If the tabletop under the angle grinder is turned, it will turn out great. Using such a device, you can quickly cut a plinth, baguette, profile from any material at a fixed angle.
One has only to install the appropriate disk, fix the tabletop at an angle of 45 degrees - and cutting trim for the windows of a wooden house turns into a pleasure.
With such a machine, you can easily cut paving slabs diagonally, diversifying the ways of laying it.

Something similar is also produced in the industrial version, but the cost of such devices will scare away not only the home master, but also a small team of locksmiths.

wall chaser
Often when laying electrical wiring or cutting passages in the wall, the grinder is used as a. At the same time, comfort and safety during work leaves much to be desired. If you make a nozzle on an angle grinder with a solid base, you can make cuts in the walls, as long as the diameter of the disk is enough.

In fact, this is an emphasis sole, which allows you to smoothly move the angle grinder along the wall, with a uniform effort. When you make this fixture for the grinder yourself - take the time and install a closed case with a pipe for connecting a vacuum cleaner.

Frazier
Since any angle grinder is equipped with powerful engine with a gearbox - you can make a stationary one from it. Again, provided that at any time the tool is removed from the homemade fixture, for use for its intended purpose. The shaft of the grinder is brought out into the hole of the workbench, a cartridge for milling heads is put on it - and not too hard woods can be processed.

IMPORTANT! Since the angle grinder is not designed for this type of work, you will have to take care of safety on your own.
Working with stone requires special care. If the disk is tilted, you can ruin the workpiece (which is not very budgetary), or split the disk. It is necessary to ensure the rectilinear movement of the grinder, while simultaneously controlling the depth of immersion.
To automate the process, a special machine has been developed with guides along which the tool moves without deviating from the trajectory.

In addition, the cutting angle can be fixedly changed, expanding the processing possibilities. It is difficult to make such devices, but if you develop intelligent drawings using computer modeling, you can design a machine no worse than a factory one.
cooking
It would seem, where is the grinder, and where is the kitchen? Unless during the repair you can see this tool there. However, in capable hands for angle grinders, nothing is impossible.
With the help of a two-liter can of tomato paste, and a piece of galvanized steel, you can make a mill out of an angle grinder in half an hour.
In the bottom of the can we make a hole along the diameter of the protective casing, instead of which it is put on. We put a galvanized strip on the shaft and fasten the nut for the metal disk.

We fall asleep half a can of grain - and after a few minutes we get coarse flour. After sifting, we get the quality no worse than the store.
This is a rather non-standard use of the tool, but the grain crusher for poultry is a time-tested technology.
![]()
Since the volumes are almost industrial, manufacturing should be approached responsibly. The materials used are shown in the illustration.

Grain is poured into a plastic container. Through a hole in the plywood frame, it hits the blades and breaks. Fractions of the required size are poured through calibrated holes in the sieve, the rest is processed until it reaches the standard.

And for dessert - a very exotic device from a grinder - an apparatus for the production of cotton candy.
The working tool is a metal cover with holes in a circle.

The angle grinder is placed in the container.

Sugar syrup is poured into the lid - cotton wool is ready! 
Do-it-yourself various do-it-yourself tools for a grinder - video.
Do-it-yourself universal machine or attachment for a grinder - video
An angle grinder, also known as a grinder, is an indispensable tool in the arsenal of any owner, used for cutting, grinding and polishing metal and wood. You can significantly expand the functionality of this tool with the help of home-made devices, which we will discuss in this article.
The publication will consider a home-made frame for the grinder, which makes it possible to turn the angle grinder into a full-fledged cutting machine from the grinder, as well as other simple designs that can be made at home.
1 We modernize the grinder with our own hands - we make a cutting machine
The key advantage of an angle grinder is its mobility - it is a compact tool with an extremely wide range of applications. However, it also has disadvantages, among which are difficulties in processing loose parts, during cutting of which strong vibration appears (which can cause the destruction of the abrasive disk at high speeds) and the difficulty of maintaining the required dimensions of workpieces when cutting several structures of identical length.
The above disadvantages do not appear when the angle grinder is equipped with a cutting machine, which significantly increases the convenience of cutting both wood and metal. The manufacturer of such a machine for a grinder can be done independently, you will need:
- profile square pipe 40*40 and 20*20 mm;
- rectangular profile 40*20;
- metal corner 32 mm;
- bearings with a diameter of 32 mm;
- studs M12;
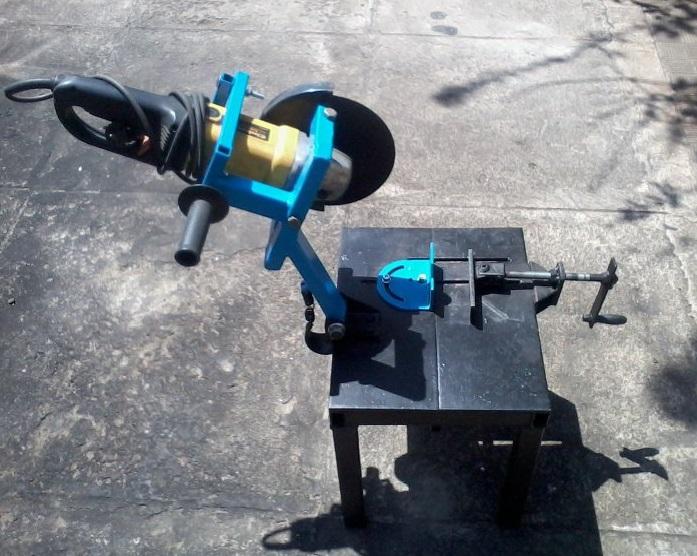
When assembled, a home-made machine for an angle grinder is a square frame made of a 40 * 40 mm profile, reinforced with cross bars. A rocker is fixed on the frame - a mechanism holding the angle grinder, which allows you to change the position of the tool in a vertical plane.
A homemade stand for a grinder is made according to the following algorithm:

The resulting homemade frame for the grinder is quite simple to operate. You need to install the angle grinder in the seat, position yourself to the right of the tool, put the workpiece on the supporting frame and right hand lower the adjusting lever. The cut itself is made in the space between the transverse jumpers of the frame.
1.1 Circular saw from grinder
Making a circular saw out of an angle grinder is even easier than a cutting machine, since there is no need to perform a large amount of welding work. You will need the following materials:
- old table;
- metal corner;
- construction clamps or corner;
- screws, nuts.

We note right away that a low-speed angle grinder is needed here (within 4-5 thousand rpm), since units with high speeds are not suitable for cutting wood - due to rotation, the workpiece will be torn off from the circular saw, which threatens the operator with danger machine. For sawing wood, it makes sense to use an angle grinder with a disc with a diameter of 150 or 180 mm.
1.2 Making a circular grinder (video)
2 Shtroborez from grinder
A wall chaser is a tool used to form grooves and furrows on the surface of concrete and wood structures. A wall chaser is necessary when reinforcing the laying of the foam block, hidden laying of wiring and cables. You can make such a tool with your own hands from an angle grinder, without spending about 5-10 thousand rubles on the purchase of a factory unit.
An angle grinder turns into a full-fledged wall chaser after being equipped with a special casing made of wood or metal, which acts as a limiter that holds the circular saw at the same depth along the entire length of the cut.

It makes sense to make a casing from sheet metal 2-3 mm thick. Decide on the width of the structure - the distance between the two side walls of the casing, it depends on the size of the disks used. After the main part of the structure on the casing, it is necessary to fix the clamp for the installation of the angle grinder. The fastening should be as strong as possible (welded with a continuous seam), since the vibration that occurs during operation can damage the connection.
A mounting socket is welded to the side wall for attaching the handle. As a nest, you can use a piece of pipe with a hole drilled for a stud or bolt. In the upper part of the casing, it is necessary to provide a nozzle for a vacuum cleaner; without it, dust can clog the structure from the inside.

Please note that the angle grinder can only make grooves when two diamond discs are installed. In this case, the first disk is mounted on the rod in the standard way, and the second - through a special spacer nut (the spacer must come with the angle grinder, it can also be bought separately). The thickness of the nut in this case determines the width of the formed strobe.
2.1 Varieties of disks for angle grinders
In conclusion, a few words about the varieties of discs for grinders. All discs are classified into four main groups - cutting, grinding, sharpening, peeling.
Cutting discs are available in diameters of 115, 125, 150, 180 and 230 mm, their thickness can be 1-3.3 mm, they are blue. The marking indicates the type of abrasive material: A - corundum, C - silicon carbide, AS - electrocorundum. Also, the markings indicate the numbers indicating the graininess - the larger it is, the higher the cutting speed will be and the lower the accuracy. Mounting hole in cutting discs it is reinforced with steel plates, which ensures its strength, since the ring experiences maximum loads during rotation.

For cutting stone materials, special diamond discs, which are continuous and segmented. The latter option is designed for heavy work - they can cut asphalt, granite, marble. Cutting tiles with an angle grinder can be performed using solid discs, they are focused on working with soft material and differ from segment analogues in the worst natural cooling.
Grinding discs are extremely variable, they are available with different abrasive surfaces - from emery, to sponge and felt (polishing discs). Grinding itself is carried out using special pastes that moisten the treated surface and thereby reduce the amount of dust released.
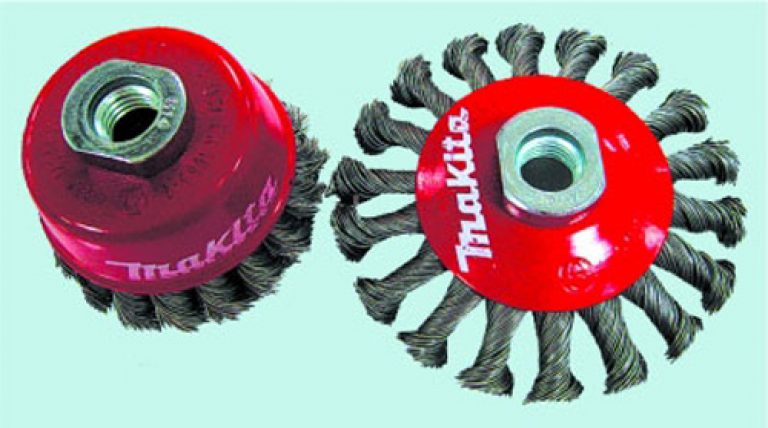
Roughing discs with metal pile are used to remove old paintwork, scale, cement mortar. There are also diamond roughing discs, which differ from cut-offs in the shape of the edges. Such discs are not used on metal surfaces, they can only be used on stone and concrete.
If you want to make tools for the grinder with your own hands, the drawings will be very useful to you. With their help, you can assemble all kinds of homemade designs, the main task of which is to expand the functionality, increase safety and simplify the operation of the angle grinder.
Working with an angle grinder, this power tool allows you to do three main operations:
- Cutting hard materials;
- Grind the surfaces of products with abrasive wheels;
- Clean surfaces with special brushes.
We offer you a way out of the situation - a device due to which the grinder will become stationary. A different kind of adaptation allows you to make a full-fledged machine with advanced features from a grinder.
Available accessories for the grinder

Fixture drawing
Consider devices that can really be made from a grinder with your own hands. You will need assembly instructions, helpful tips and video guides.
We offer the following fixtures available for assembly for your angle grinder:
- Tripods;
- Fasteners;
- Miter box;
- Milling cutters;
- Wall chasers;
- Design for cutting porcelain stoneware;
- Culinary fixture.
Now we will consider each presented home-made device separately. We will learn how you can make this or that design and improve your angle grinder (angle grinder) with it.
Tripod
- The tripod solves the main problem of the angle grinder - the need to hold it with your own hands, while there is no one to set the workpiece.
- If you make a tripod, you can hold the grinder with one hand, and hold it with the other, move the workpiece.
- With the help of tripods, the cutting angles of the grinder are set, while the disc moves strictly vertically. This device improves the quality of processing and reduces the risk of injury.
- To make a tripod, use a metal profile, shock absorbers from a car, or plain plywood.
- If you make the device correctly, the angle grinder will turn out to be an excellent stationary installation with a level of reliability and safety equal to factory tripods.
- An important element of a tripod is a protective cover. If it is available, wood can be placed on the desktop, work on wood, metal, plastic.
- Using a tripod, you can protect yourself from the main causes of injury when working with an angle grinder - a angle grinder that falls out of your hands or a jammed disk when working on wood.
- When making a tripod, it is recommended to convert the power button into a pedal type controller. This will allow by releasing the foot from the pedal of the device to quickly turn off the power.
- On average, a tripod can be made in an hour using simple blueprints. They are not much inferior to factory tripods, but financially they are almost free.
Retainer
- A latch or holder is the next most popular element that allows you to make a functional device out of a grinder;
- The task of the latch is to secure the power tool. So you get a stationary saw;
- The latch performs fastening on the required surface - table, workbench, vise;
- Such a mount has an important advantage - you can remove the holder at any time by returning the power tool back to manual mode;
- Across the disk, you can install an emphasis with a special slot. This addition allows you to process high-strength parts while holding the workpiece with your own hands;
- The most popular latch is a sawmill from a grinder. To make it, you will need a high-quality bed, under which an angle grinder is fixed. In just a few hours, a full-fledged sawmill is obtained from the grinder, which can be quickly dismantled as needed.
miter box
- By making the desktop under the angle grinder swivel, you will get a great fixture - a miter box.
- The miter box for an electric grinder allows you to work on wood, cut skirting boards, profiles, baguettes, wooden blanks at an adjustable angle.
- For these purposes, it is required to install the desired disk on the grinder, fix the desktop at an angle of 45 degrees.
- This is an incredibly convenient unit for those who need to cut a large number of window casings, glazing beads, skirting boards, etc.
- A miter box in combination with a grinder contributes to the possibility of cutting paving slabs in a diagonal direction. This will allow you to diversify the options for laying the material.
- The miter box for angle grinders is manufactured by factories, but the cost of such units is unreasonably high. Therefore, a home-made device is much preferable for working at home.
Wall chasers and milling cutters
- Wall chaser. The grinder can be used as a wall chaser, which is required to lay electrical wiring or cut passages in the wall. Holding an angle grinder, you greatly risk your health and the quality of the work performed. For such purposes, there is a special device - a nozzle on a solid base. It is a sole-stop, which contributes to the smooth movement of the tool along the wall, while creating a uniform force. Be sure to make a closed case. It will not be superfluous to equip the device with a pipe through which the vacuum cleaner is connected;
- Frazier. This device is possible to implement, since most angle grinders are equipped with a gearbox and a powerful electric motor. To make a similar design, you need to bring the grinder shaft into the hole of the assembled workbench, put on the milling head chuck and the device is ready to go. This tool is designed for woodworking. But it is not recommended to cut too hard rocks.
Porcelain stoneware processing
- Working with stone is a responsible thing, accompanied by certain difficulties and risks.
- If you tilt the angle grinder incorrectly, you can easily ruin the porcelain stoneware. Its cost is already not small to allow such a marriage.
- Another situation is a split in the saw blade of the machine itself.
- The purpose of this device is to allow you to control the angle of entry into porcelain stoneware and ensure rectilinear movement of the power tool.
- To automate the processing of porcelain stoneware, drawings of special devices with guides have been developed. Collecting them with your own hands is not so easy, but possible.
- The main feature is the guides along which the angle grinder moves with enviable accuracy, providing an even and neat cut.
culinary fixture
How can cooking and an angle grinder be related? In the most direct way.
Using a grinder and improvised materials, you can get a great homemade mill, coffee grinder. The build process looks like this:
- Take a two-liter jar made of tin;
- Arm yourself with a strip of galvanized steel;
- At the bottom of the jar, make a hole, the diameter of which is equal to the diameter of the protective casing;
- Remove the casing and disk, insert the shaft through the hole in their place;
- A piece of galvanization is put on the shaft of the grinder, suitable for the described radius inside the can;
- Galvanization is screwed with a nut to the grinder shaft;
- Pour grain or coffee inside the jar, close and turn on the angle grinder. Flour or coffee for brewing is ready.
Making your own fixtures is not difficult. You just need to decide which option you need.