Unadjusted valve clearances on the VAZ 2108 can cause a lot of trouble. A small gap leads to:
- inevitable valve burnout;
- loss of pressure in the combustion chamber;
- drop in performance.
With an increased gap, the rustle of the valves is clearly audible and the camshaft resource is sharply reduced. The instruction manual provides for adjustment every 20-30 thousand km. Experienced owners recommend adjusting the unit after 15-20 thousand km, especially if the engine runs mainly on gas.
Initial stage: open access to the camshaft
The proper conditions under which the valve assembly is adjusted are formed after dismantling the cylinder head cover. You can freely remove the upper cylinder head housing with gasket after the following procedures:
- loosen the cable by turning the two nuts to "13" near the bracket and remove it, after removing the return spring on the plastic sector of the damper drive;
- use a 10 wrench to unscrew the two nuts securing the throttle cable bracket and remove it;
- loosen the fastening clamps with a screwdriver and remove the inlet (located on the front side near the oil filler neck) and two outlet crankcase ventilation pipes (fixed behind the valve cover);
- unscrew the two nuts securing the housing to the cylinder head (using a “10” key);
- dismantle two rubber plugs located under the nuts already removed in the previous transition.
At the end of the stage of preparation for adjusting the valve clearances of the VAZ 2108 engine, an operation is carried out to remove the cover of the gas distribution mechanism, which is fastened with three "10" bolts. A set of necessary accessories is also formed:
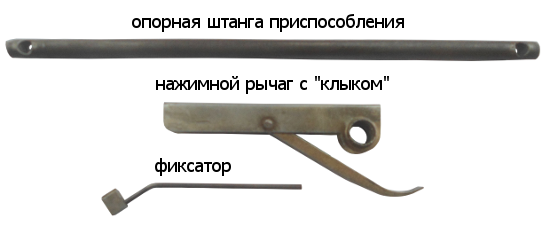
- device for sinking the pusher;
- a special latch that secures the pusher in the lower position;
- tweezers;
- valve lifter retainer;
- set of measuring probes;
- set of shims.
It is also worth preparing a new cylinder head gasket and sealant.
Adjusting valve clearances on the VAZ 2108 engine: procedure
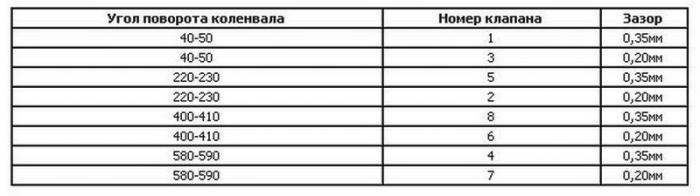
The factory-determined nominal value of the "thermal compensator" on a cold engine for intake valves is 0.2 mm, exhaust - 0.35 mm. Permissible deviations from the nominal value are also stipulated - 0.05 mm in both directions. A good example: when adjusting the intake valve, the 0.15 probe enters freely, 0.2 - with a slight interference, and 0.25 - does not enter at all.
Checking and adjusting the valve mechanism is carried out in pairs in 4 approaches. Each approach is performed with a different camshaft position. Before the first approach, align the marks on the camshaft pulley and the timing belt housing by turning the pulley clockwise with a spanner wrench.
The procedure for checking the actual gap using the example of the first approach is as follows:
- turn the camshaft 40-50 degrees clockwise (2-3 teeth);
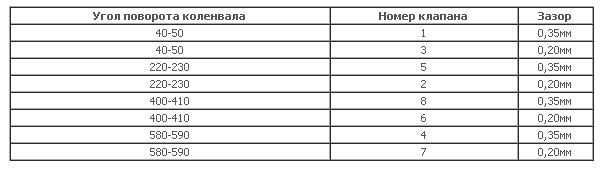
- take the actual clearance values at 1 (exhaust) and 3 (inlet) valves using probes (the count is kept from the timing belt).
The stages of checking the clearances in the remaining pairs of VAZ 2108 valves are carried out when the camshaft is rotated with an interval of 180 degrees:
- 220-230: 5 (inlet), 2 (outlet);
- 400-410: 8 (inlet), 6 (outlet);
- 580-590: 4 (inlet), 7 (outlet).
The valve adjustment process is carried out in the presence of unacceptable deviations from the norm. The sequence of actions is as follows:
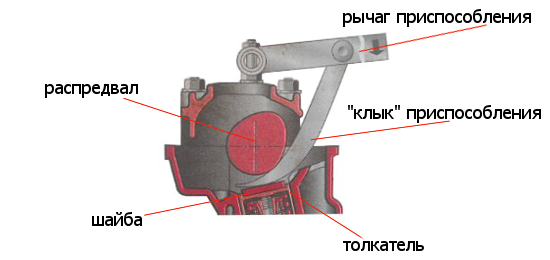
- install the adjustment device on the studs of the bearing housings located at the ends;
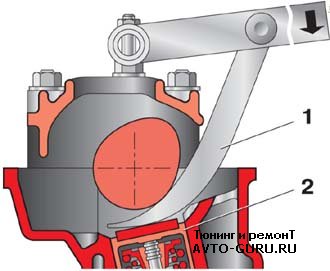
- insert a curved lever between one of the investigated valve lifters and the cam (the handle of the device should be facing the front bumper of the car);
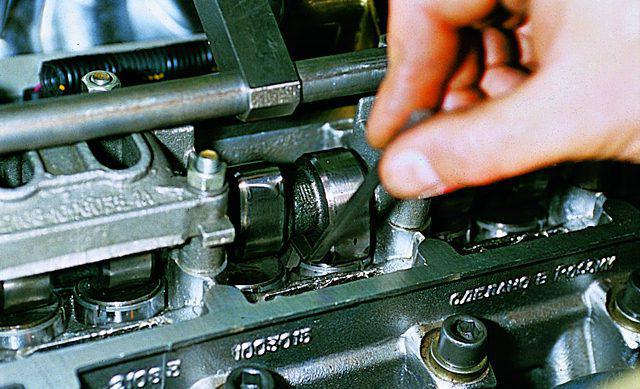
- by pressing the handle, drown the pusher and install a retainer between the end of the pusher and the camshaft to prevent the part from returning to its original position;
- remove the lever of the device and move it to the side;
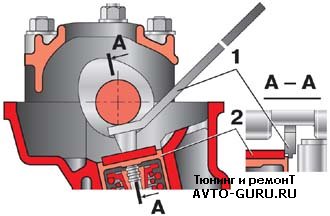
- remove the washer with tweezers;
- install a new washer of the calculated thickness with the marking down;
- remove the latch;
- measure the resulting gap.
The selection of a new washer is made from the following considerations:
- the thickness of the removed washer is determined (if the inscription is erased, the operation is carried out using a micrometer);
- the required thickness is calculated based on the previously measured measurement in the format: size of the new washer = thickness of the old part + (measured - nominal clearances).
If there is no valve adjuster
You can assign the functions of special equipment to two powerful flat screwdrivers with a flat working surface width of at least 10 mm. In this case, the adjustment of the clearances of certain valves to 2108 is carried out as follows:
- press the pusher down, leaning on the cam;
- install the edge of the screwdriver between the camshaft and the pusher;
- remove the first screwdriver;
- get the puck with tweezers;
- install a new part;
- remove the second screwdriver that acts as a retainer.
The process of adjusting the valve mechanism, carried out every 20-30 thousand km and is carried out with the cylinder head cover removed. At a certain angle of rotation of the camshaft, a feeler gauge checks the gap between two pairs of valve lifters and cams.
To adjust the gaps should be resorted to in case of significant deviations from the norm: 0.15 ... 0.25 mm for intake and 0.30 ... 0.40 mm for exhaust. Using a special tool or two screwdrivers, the pusher is bent and fixed, the old washer is removed, a washer of a new thickness is installed, the latch is removed and the resulting gap is checked.
This also applies to those who converted the VAZ to an injector and want to do chip tuning of the engine, but for some reason they never remember the valves. First valves and everything else, and only then chip tuning.
To adjust the valves on the VAZ 2108 and other similar ones, you will need (except for wrenches) a set of probes and a micrometer.
Intake valve clearances should be 0.2mm, exhaust 0.35mm.
But, you also need to determine what gap there is now. You can determine it by selecting a probe corresponding to the gap. Therefore, a minimum set of probes is needed from 0.1 to 0.5 mm with a size step of 0.05 mm.
A micrometer is a device for measuring thickness, with an accuracy of 0.01mm. It is needed to find out what is the thickness of the shim.
If there is no micrometer, you can use a vernier caliper with a division value of 0.01 ... 0.02 and even 0.05 mm. But, the less accurate the device, the less accurately you calculate the required washer thickness. You just have to buy more shims and adjust the shim by changing and measuring the gap with a feeler gauge.
Have you decided? Then let's start!
The valves are adjusted on a cold engine. You need to remove the valve cover.
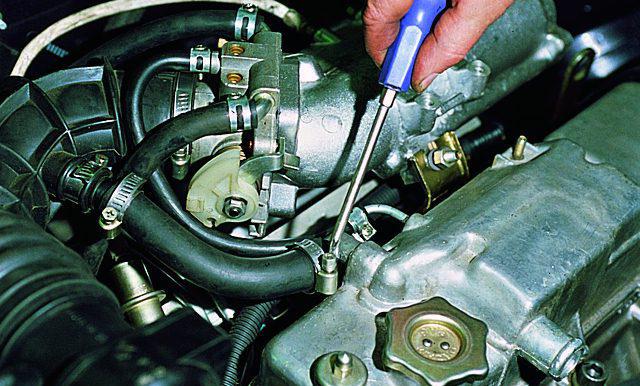
And for this you need to disconnect the engine ventilation hoses, unhook the throttle cable and remove the throttle actuator bracket.
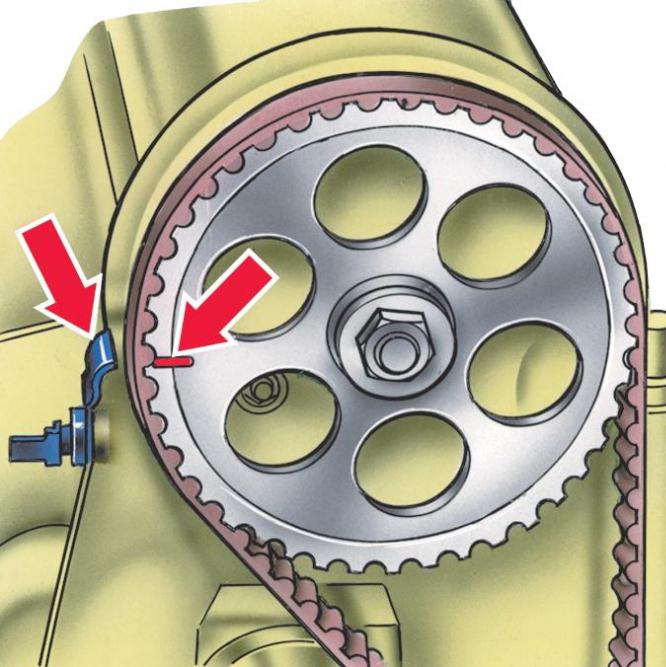
The cover itself is fixed with two M6 nuts, on studs. And also remove the timing belt cover. With a 17 key, turn the engine crankshaft a couple of turns. We achieve the coincidence of the marks on the crankshaft toothed pulley and on the cylinder block. We look to see if the mark on the camshaft pulley coincides with the mounting lug. If not, we turn the engine another turn.
After the marks match, turn the crankshaft another 45 degrees. Camshaft cams 1 and 3 must be turned towards the tappet with the side with the smallest radius.
It is in this position that there must be a guaranteed gap between the pusher and the cam. And the protrusion of the cam should look up. We take the probe and insert it into the gap. The clearances are shown in the table below. The gap is correct if the probe experiences very little resistance.
Be very careful at this moment. In order to compress a spring, even a strong one, by 0.05 mm, much effort is not needed. But there should not be a gap, more than a probe. If in doubt, try the probe 0.05 more and less than the nominal value. Permissible deviation of the gap is not more than 0.05. And I do not dare to make this deviation in a smaller direction.
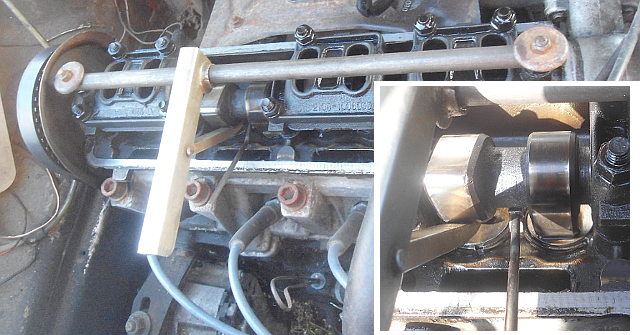
If you find a pusher in which you need to adjust the gap, install a fixture on the studs. (You can get by with two screwdrivers, but you need large screwdrivers. With a sting width of more than 10mm. If you still need to buy them, you can go broke on the fixture.)
We press the pusher down and substitute the stop on the edge of the pusher. Using tweezers or a screwdriver, we take out the adjusting washer. We measure it, calculate the required washer thickness and write it down on a piece of paper. (I assume that you, like me, adjust the valves on your car and do not have a large set of washers on hand.) For now, put the washer in place. We turn the crankshaft and repeat the measurements for the next pair of valves, again we write the results on paper.
With a list of washers sizes, we go to the store. At this time, the engine can be covered with a clean cloth.
Returning from the store, we turn the crankshaft again, measure the gaps and change the washers. If the gaps after replacement do not meet the requirements, you will have to visit the store again.
When all the gaps match, we assemble the engine. In this case, the valve cover gasket will need to be replaced with a new one. And it is worth inspecting the timing belt for wear and cracks.
Valve clearance data for front-wheel drive VAZ
Successful adjustment!
Here is a video for complete satisfaction))
The cause of a number of malfunctions in the operation of the engine of VAZ 2108, 2109, 21099 cars, along with a faulty or unadjusted carburetor, may be increased or reduced thermal clearances in the valve mechanism. These faults include:
;
.
To identify the true culprit of engine problems, let's listen to how this same engine works on Idling. A sure sign of increased thermal gaps will be a resonant rattling under the valve cover, which is clearly audible. With reduced gaps, rattling will not be heard, but constant overheating of the engine is possible, frequent, noticeable decrease in power and throttle response.
In any case, it is worth adjusting the valves. This normalizes the operation of both the gas distribution mechanism in particular and the engine as a whole. It is quite possible that the problems that existed before in his work will disappear, after such an adjustment, by themselves.
Required Tools
— A device for adjusting valves with a retainer.
Or two screwdrivers if there is no fixture. One should be long and powerful to push the pusher with the washer down, the second slotted with a wide blade (at least 10 mm) to fix the pusher in the pressed position.
— Set of flat probes
— Tweezers
- Ring wrench for 17
- Set of shims
Optional, as washers of the required size can be purchased separately after measuring the thermal gaps.
Preparatory work
Valve adjustment is carried out on a cold engine, so if your engine is currently warm, let it cool for at least 1 hour.
- Remove the throttle linkage bracket.
- Remove the timing cover.
- We make another mark on the camshaft pulley, opposite the installation one. To do this, we consider the number of teeth on it and divide it in half.
- We combine the alignment mark on the camshaft pulley with the protrusion on the rear timing cover.
- In the hatch on the clutch housing, we make sure that the long mark (at risk) on the flywheel is opposite the middle of the triangular cutout of the ignition timing scale.
Before adjusting the valves on the engines of VAZ 2108, 2109, 21099 cars, it is necessary to carry out in order to find out the general picture of the technical condition of the valve mechanism of this engine.
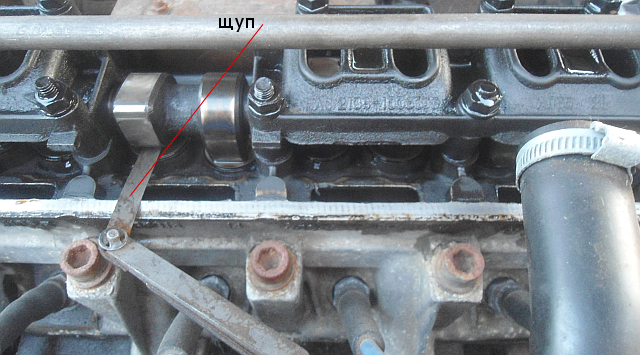 measuring the thermal gap with a feeler gauge
 Valve clearance adjustment
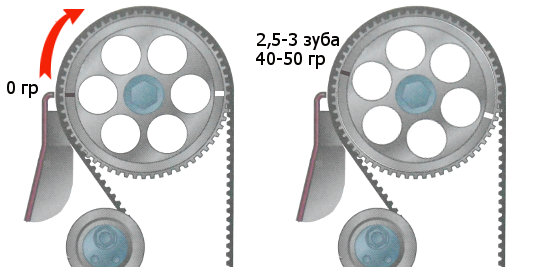
Consider, as an example, the adjustment of the third valve.
- Set the pulley to a position where the alignment marks match
(top dead center). We turn it 3-4 teeth (40-50 0) clockwise.
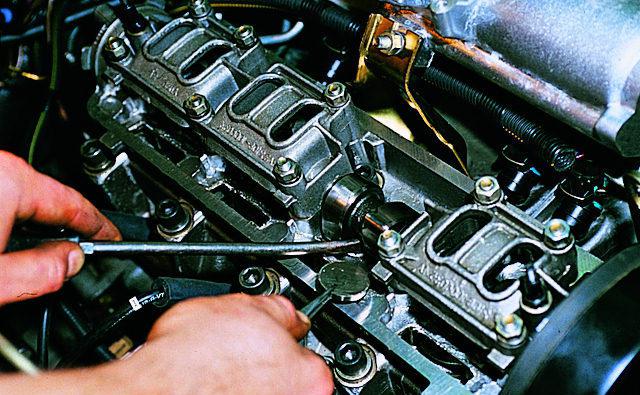
- Install the adjustment tool on the head of the block.
If not, take two screwdrivers. We will use the long and powerful one as a lever, the one that is smaller - slotted, to fix the pusher.
- We turn the pusher with a slot towards us
(toward the radiator).
- We introduce the "fang" of the device between the cam and the pusher.
- Press down the lever of the device and push the pusher down.
Instead of a fixture, you can use a long screwdriver. Leaning it on the cam, we also sink the pusher.
- We install a retainer between the edge of the pusher and the camshaft,
which holds the pusher in the depressed position. If there is no lock, insert the blade of a slotted screwdriver flat. It is necessary that the latch is exactly on the edge of the pusher and does not interfere with removing the adjusting washer.
- With tweezers, through the slot in the pusher, remove the adjusting washer.
Its surface may be marked with its thickness. If the marking is erased, you will have to measure its thickness with a micrometer, and in the absence of one, select a new one empirically.
- We calculate the thickness of the new washer using the formula:
- for intake valves Z=Y+X-0.2mm ;
- for exhaust valves Z=Y+X-0.35mm ;
Z is the calculated thickness of the new washer;
Y is the thickness of the removed washer;
X - gap determined by the probe.
We select a new washer with a marking close to the calculated one (± 0.05 mm).
- Install a new washer in the pusher, marking down.
- Press the pusher down and remove the retainer.
We adjust the remaining valves by turning the crankshaft at the angles indicated above.
We remove the adjustment tool, put back the valve cover and other removed parts.
Suddenly appearing noises in the engine compartment at idle and their disappearance after an increase in speed indicate an increase in the thermal gap between the timing pushers and engine valves. This happens every 30-40 thousand kilometers. But this problem is completely solved. In this article we will tell you how the adjustment is made (VAZ-2108 will be considered as an example) with our own hands.
Difficulties of adjustment
It should be noted that the G8 engine valve drive device is significantly different from the classic drive (VAZ 2105-2107). Therefore, for the first time, you may have some difficulties. On old Zhiguli models, to set the gaps, you need to turn the bolt and fix it with a lock nut. On the G8, the valve adjustment procedure is completely different. does not have such a system - here the gaps are set using washers of various thicknesses. This is the main distinguishing feature of all front-wheel drive VAZs of the "eighth" family.
How is it made (VAZ-2108 "injector") with your own hands?
Knowing these features of the work, you can begin to practice. First you need to remove the valve cover and pipes. Next, all the candles are unscrewed from the engine, the oil is drained. So we will see all the pucks. After that, we jack up the front of the car and scroll the front wheel. So we will match all the marks on the camshaft pulley and the alignment mark. The latter is located on the back cover of the timing belt. Next, through the viewing window on the gearbox, we check whether the marks on the flywheel are aligned with the triangular cutout on the block.
To make it easier to divide the shaft pulley into 4 parts, we cut out a small square (8x8 centimeters) from cardboard. If you attach it to the end of the gear, when pointing one corner to the standard factory mark, all the others will indicate the position during adjustment. These are 90, 180 and 270 degrees. How are the valves adjusted? VAZ 2108 remains in a jacked state, and at this time we turn the camshaft clockwise by two or three teeth.
The clearance process
After carrying out all these operations, you can proceed to the very setting of valve clearances. To do this, you need to make all the necessary measurements and find out which parts need to be adjusted. Using a special probe, we measure the gap in the first and third valves. This tool is installed between the shim and the camshaft cam. The data obtained must be verified with table values:
If the gap between the adjusting washer and the camshaft cam is not correct, then this valve needs to be adjusted. We remove the washers from the saddles and write down their thickness in a notebook. Next, we need a tool (device) that sinks it. We install it on the cover fastening pin and turn the pusher so that the slot looks at us. In parallel with this, you need to keep a record and number all the valves, as well as the washers that have been installed.
How are the VAZ-2108 valves adjusted further? Everything is simple here. The valve is recessed down, and we fix it with a retainer. It can be taken from the valve adjustment kit. Using a screwdriver or tweezers, push the washer out and measure its parameters with a micrometer. So we will make a more precise adjustment.
What to do with the rest of the engine valves?
By the same principle, you need to measure all the valves, remove them, measure and write down the numbered washers in a notebook. After performing all these manipulations, we calculate the size of the washer. This can be done using the following formula. First, we subtract the tabular value from the measured gap, then add the thickness of the removed washer to this number. As a result, we get the thickness of the new part
According to this formula, we calculate and write down all the necessary clearances, then we go to the store, buy and install new washers. After that, we make a test run of the engine, wait until it warms up to 85 degrees Celsius, then wait until it cools down, and re-measure the gaps. Some of them may go astray - in this case, we adjust them again. Remember that it is necessary to set the gaps only on a cooled engine.
Conclusion
At this point, the question “how to properly adjust the valves” can be considered closed. VAZ-2108 is a very easy car to maintain, so even such a laborious process will not cause any special problems. At the same time, you will spend a minimum amount of money on maintenance.
So, we found out how the VAZ-2108 valves are adjusted by hand. In time, this entire procedure will take about two to three hours of free time.
I already wrote an article on how to adjust the valves on classic VAZ models. It's the turn of a small article on how to adjust the valves in the VAZ 2108.
It is worth noting that a distinctive feature of the VAZ 2108 valve adjustment is their device, or rather their drive device. It is different from the classic, so it can cause difficulties. In Zhiguli, to adjust the valves, it is necessary to turn the bolt and fix it with a control nut. In the VAZ 2108 and above, there is no such system, and adjustment is carried out using washers of different thicknesses. Now let's move on to the direct adjustment of the VAZ 2108 valves.
First, it is worth removing everything that will interfere with us, or rather pipes, valve cover, and other little things.
It is necessary to unscrew all the candles, also remove the oil in any improvised way so that the washers become visible. It is convenient to do this with a medical syringe with a needle. Next, by turning the jacked wheel, you need to combine the marks on the camshaft pulley and the alignment mark, which is located on the rear timing belt cover. It would be useful to check through the viewing window on the checkpoint whether the marks on the flywheel are aligned with the triangular cutout on the block. To facilitate the division of the camshaft pulley into 4 parts, it is recommended to use a square made of cardboard, thick paper, 80 by 80 mm in size. If you attach this square to the end of the gear, then when one of the corners is indicated on the factory mark, the other three will indicate the position during adjustment - 90, 180, 270. Further, according to the technology, it is recommended to turn 2-3 teeth clockwise and you can start measuring (these 2-3 teeth correspond to 40-50 degrees).
The preparatory stage of valve adjustment is completed, then you need to measure which valves need to be adjusted. In this position, it is necessary to measure the gap in 1 and 3 valves with a feeler gauge. The gap itself is measured between the camshaft cam and the shim. You can find out at what degrees, which valve to check, from the table below:
If the gaps are different, then you need to fix this matter. Next, you will need special equipment (if you can call it that), which you need to find, borrow, buy, etc. Further, the technology is not complicated. If you do it once, you will know very well later. At this stage, you need to write down the numbers of the washers (their thickness). To do this, they need to be removed from the saddles. The specified moment is one of the most difficult to adjust the VAZ 2108 valves.
- It is necessary to install a device for recessing the valve lifters, fasten it to the cover fastening studs and turn the pusher so that the slot looks at you. This will make it a little easier to remove the washer.
- It is also recommended to keep a record in which to indicate the valve number, which washer is installed.
With the help of a device, the valve is sunk down and fixed with a latch from the VAZ 2108 valve adjustment kit. Using a screwdriver, tweezers - the washer is removed, its number is written down (it is on the reverse side), installed back. It will not be superfluous to measure it with a micrometer, since the parameters may differ, and this way you can make the adjustment more accurately.