Proper construction of extensions for various purposes can not only expand the residential part of the house, but also improve its appearance and protect it from wear and tear. The construction of a veranda adjacent to the house, regardless of the type of building, requires careful project development, with the definition of materials and construction technology.
Proper execution and approval of project documentation in state institutions will not only insure against problems with the law, but also help to draw up a plan and estimate for the building.

Design
A typical veranda is a roofed frame structure erected on a strip or column foundation, with glass or half glass walls. The statement that the veranda should be built from the same materials as the main building, with the emergence of new styles and fashion trends in architecture, has lost its relevance.


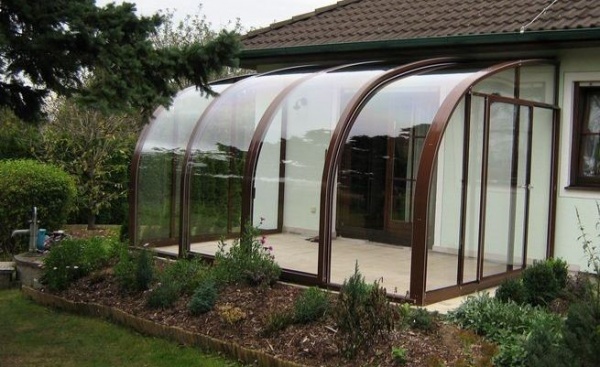
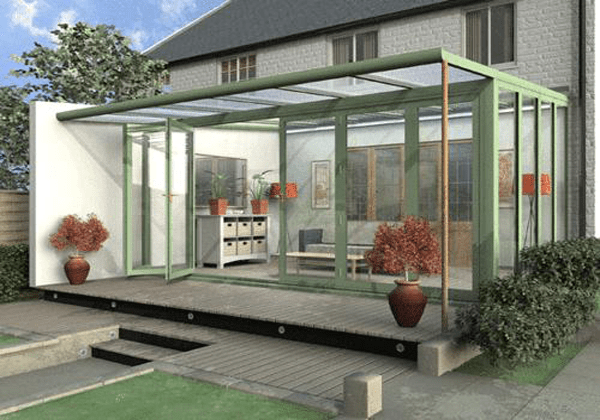
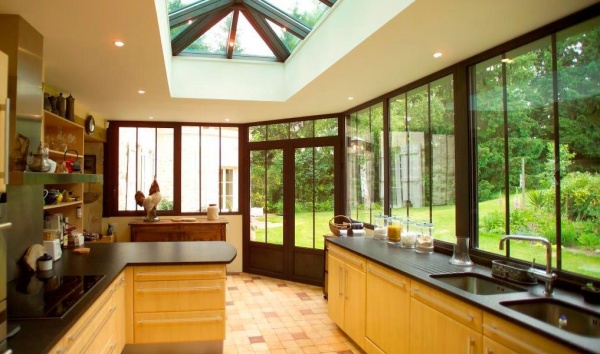
In the photos below - ready-made solutions for verandas attached to the house, with different principles of compatibility. In some cases, the new extension is made of the same materials and is completely combined with the house, in others the new one is combined with the preservation of common elements - the roof, beams, etc.

There are also projects in which the original design of the extension brings a new architectural touch, updating the exterior.

When choosing materials and construction technologies, one should also take into account the parameters of proper ventilation, moisture resistance and thermal insulation. With full glazing, it is necessary to provide opening segments for ventilation.

If an open veranda is being built, or, as it is also called, a summer terrace, you need to take care of the frost-resistant lining and tilt the floor towards the site.

Designs with removable frames are optimal for year-round use. The installation of large sliding doors will also allow the building to be used in a two-mode version.

In a typical project, the area of \u200b\u200bthe veranda is rectangular and ranges from 10 to 15 sq.m. With smaller areas it will be too crowded, with large areas, additional reinforcement for the roof will be required. Polygonal and semi-circular foundations are also possible.

According to its location, the veranda can be corner, end or front. An original solution can be considered the construction of a terrace around the entire perimeter of the house, which can have glazed, open and closed areas for various purposes: they can accommodate an entrance hall, a recreation area, and a large pantry.


Foundation
The foundation of terraces and verandas attached to the house should fit snugly against the main building, but at the same time have independent supports.

The strip foundation is suitable for large and heavy structures; in all other cases, a columnar foundation can be erected. When pouring concrete, you need to leave a gap of 3-4 cm with the main wall, which will subsequently be filled with waterproofing foam.

At the first stage of preparation for construction, the soil is cleared and compacted. Then, corner holes are dug for the pillars along the depth of the foundation of the house (about 1 m on average), a pillow is made of crushed stone, gravel and sand, on which concrete is poured.

After setting, supports are inserted from asbestos or metal pipes. Concrete poles or bricks may also be used. The same method is used to lay high piles for buildings adjacent to the level of the second floor.

Depending on the area and weight of the terrace, intermediate posts may be needed, installed every half a meter.

For a tape-type foundation, a trench of 30-50 cm breaks through, the formwork is laid 15-20 cm higher. Metal reinforcement bars or reinforcing mesh are embedded in the soil. Concrete is poured onto a layer of crushed stone and sand.


Wooden frame
The frame is mounted from beams or logs with a width of at least 12 cm, which are covered with a waterproofing layer. For the strength of horizontal knitting, experts recommend using fasteners in the foot, while the connection surface will be at an angle. Vertical racks are fixed with diagonal interceptions.


At the final stage, the wooden frame is covered with rafters for the roof. For cladding, you can use plywood panels, chipboard boards, etc.

The construction of a wooden veranda is the best budget solution for the prices of materials, but when choosing this type of building, you need a professional approach and knowledge of the nuances of building from a wooden beam.

Other materials for verandas

The construction of foam blocks is being built on a strip foundation. It is easy to make such a masonry yourself. Laying is carried out with the help of special glue, with dressing of seams for strength.

When finishing, an internal and external waterproofing layer is provided, finishing with drywall, wooden panels, moisture-resistant wallpaper and paints. The outer surface can be lined with ventilated facades.


Polycarbonate structure construction, modern and attractive option. This material is well combined in buildings with a wooden and brick frame.

For a building that consists entirely of bicarbonate shields, no foundation is needed. The earth can simply be compacted and covered with paving slabs.


The design is created using aluminum profiles, it is necessary to provide for the possibility of ventilation and water drainage. Polycarbonate panels and frames of various types can be customized for specific needs for lighting and thermal insulation.

Before you attach a veranda to the house, you need to decide on the functions that it will perform. In addition to the drainage and ventilation systems necessary in any case, the correct connection to the capital structure and the roof structure, the schedule for using this part of the house is important.

The design and construction of summer verandas differs from the requirements for premises with year-round operation. It is also important to note that any extension will require the same care and renovation as permanent buildings.


Photo of the veranda attached to the house


Many owners of individual dwellings often think about new extensions. After all, when you yourself are the owner of a summer house or a personal plot, you definitely want to do something exclusive and as comfortable as possible. Consider one of the most common options for extensions - a veranda. At the same time, we will analyze the methods of its construction with our own hands.
The need for a veranda. Functions
The need for a veranda for your own home is obvious, because it is a place where it is easy to gather with the whole family for a summer barbecue dinner, and at the same time hide from the evening rain and watch its threads through the large windows. But at the same time, I want to be able, being on the veranda, to warm myself from the autumn wind. It is often assumed that a certain greenhouse is placed inside such an annex. Hence the functions that this building should have:
- good roof, preferably transparent or matte,
- huge windows,
- warm walls,
- big space,
- close connection with the house.
A similar extension to the house is sometimes also called a terrace.
Design options with photo
For clarity, we present several options for an attached veranda. Here, for example, is the design of the simplest summer structure associated with a house.
A simple open veranda does not protect from the cold
Here we see the classic version: the roof of a residential building is initially extended, then the hanging edge is supported by poles, after which the floor is paved. The open veranda is ready. However, in autumn, as in the photograph, it will be very cold and uncomfortable inside such a space.
Another thing is when the veranda is finished with glass. Then the wind will not blow into it. Here is a similar design.
Veranda with glass walls in the form of windows well protects from the wind
Here the columns are already capital, made of brickwork, and the area between the columns is covered with huge windows, which at the same time provides both aesthetics and protection from the wind, and excellent visibility.
An even more reliable option in terms of heat is a capital veranda.
The building in this case is more like a room at home.
Here the terrace is, as it were, part of the house. The degree of glazing is also high, but there are solid walls and underfloor heating, powered by house heating or electric current. Although the feeling of the presence of the surrounding world is still created.
How to build with your own hands: step by step instructions
Project and drawing
We start with design. It is necessary at this stage to determine the size of the veranda. The width of the building is usually taken no more than 3 m, otherwise the terrace will be too cumbersome. But as for the length, then the owners must decide for themselves whether to stretch the veranda for the whole house or not. Most often, a summer room is attached to only half or a third of the building.
- Foundation. For the veranda, the most successful option is columnar. At the same time, several metal or asbestos pipes are simply laid in the project, which will be dug into the ground while standing to the depth of soil freezing. Their insides will have to be concreted with reinforcing bars. It is advisable to connect the protruding pipe heads with a grillage - a concreted tape around the perimeter.
- Walls. There is a consensus on this issue: it is better to use the same material from which the house is built, because each type of building element has its own degree of expansion. For example, a wooden veranda can deform a little over time and “press” on a brick house. If the hut is made of logs, then a terrace made of boards will come in handy.
- Roof. Usually it is single-sided. There is scope for design ideas. Most often, a transparent roof is made, for example, from colored polycarbonate. You can use thick glass, but it is enough and just to extend the roof of the house, whether it is slate or tile. The main thing is to withstand the necessary bias. Usually the slope of the roof of the veranda is less than that of the slopes of the roof of the house, since the width of the extension is small. A large slope of the roof of the veranda will underestimate its front part too much.
We will talk more about the choice of suitable components at each stage of construction in the process of describing the general step-by-step instructions. Having decided on the materials and dimensions, they make a drawing or sketch.
Typical scheme-drawing of the veranda of the house
The figure indicates the dimensions of the future building, as well as important dimensions, for example, the distance between the connecting elements, the slope of the roof, and so on.
Required materials and calculation with detailed examples
As an example, we will write instructions for the construction of a wooden frame of a shed veranda 3 meters long and 2 meters wide. We will take the height of such an extension to be 2 m directly near the house and 1.7 m from the front side.
For the construction of such a veranda, we will use the following components:
- wooden beams 100 mm x 100 mm with a total length of 42 m,
- logs in the form of wooden beams 50 mm x 100 mm each 3 m long (with a margin) - 4 pieces (for 3 meters of a building, according to building codes, 4 supports for the roof are enough),
- edged boards 20 mm thick for walls, board dimensions: 200 mm x 3 m, 200 mm x 2 m, their total area is 10 m 2,
- boards for roof sheathing 25 mm thick, with dimensions of 150 mm x 3 m, with a total area of 4.5 m 2,
- floor boards with an area of 2 m x 3 m, that is, an area of \u200b\u200b6 m 2, board size: 30 mm x 250 mm x 2 m,
- nails about 2 kg.
- a metal or asbestos pipe with a diameter of 100 mm for a foundation 1.5 m long - 6 pieces (1 piece for each meter of the length of the building is quite enough according to building codes),
- polyethylene with an area of approximately 1 m 2 (for 6 pipes),
- mastic for coating the ends of pipes - 1 bucket,
- fittings with a diameter of 8 mm - 12 bars (2 per pipe) 1.5 m each (according to the length of the pipes),
- cement 15 kg,
- sand 45 kg.
We will show how the calculation of materials was made.
To pour concrete into the insides of pipes inserted into the ground with a diameter of 100 mm, you will need some cement and sand. The total volume is equal to the product of the number of pipes and their volume. The latter is calculated as the product of the cross-sectional area of the pipe and its length: V \u003d 0.1 x 0.1 x 1.5 \u003d 0.015 m 3. Here, for simplicity, the cross-sectional area of the pipe is taken as the cross-sectional area of a square of 100 mm x 100 mm.
For six pipes, the volume will be as follows: V total. \u003d 6 x 0.015 \u003d 0.09 m 3. Let us take the volume of solution we need to be 0.1 m3. According to building codes, to prepare such a volume, it is enough to take 15 kg of cement and 45 kg of sand.
Consider also lumber. Beams 100 mm x 100 mm are needed as connecting elements of the frame. We will have three horizontal trims, namely the lower perimeter at floor level, the window sill perimeter, the same at roof level. We will also have vertical racks, according to the number of pipes, 6 pieces of 2 m high are enough. In total, summing everything up, we get the total length of the beams 100 mm x 100 mm: L = (2 m + 3 m + 2 m + 3 m) x 3 + 2 m x 6 = 42 m.
On the walls of a standard height of 1 meter for verandas, you will need the number of boards that will cover an area equal to the product of the perimeter of the building and a height of 1 m: S \u003d (2 m + 3 m + 2 m + 3 m) x 1 \u003d 10 m 2.
Boards for lathing under roofing will be mounted with slots equal to their width. Therefore, half the approximate area of \u200b\u200broofing is sufficient. The latter is approximately 3 m x 3 m = 9 m 2 (including the roof slope). So, 4.5 m 2 is enough for us.
Construction tools
We need the following tools to work:
- hacksaw,
- hammer,
- axe,
- shovel for mixing mortar,
- bayonet shovel for digging.
How to build: step by step instructions
- First you need to mark the future veranda. Relying on our own drawing, we find the installation points for the foundation pipes. The maximum possible step between such supports is 2 m. It is advisable to retreat at least 4 cm from the foundation of the house and also determine the locations of the pits for the supports along the building.
- The depth of the cavities for the foundation pipes should be about 1.5 m, depending on the region. The holes themselves can be dug with a shovel. There is an option to drill them with a universal hand drill. It is sold in many grocery stores. After preparing the cavities, they are filled with solid polyethylene for waterproofing, and then metal or asbestos-cement pipes are inserted into them. After that, two or three bars of reinforcement are pushed inside each such element and concrete is poured. The top end of each pipe must protrude at least 20 cm above the ground.
- After the concrete has hardened, you can begin to mount the floor. But first you need to either make a grillage - connect all the pipes with a concrete tape, or at least pour gravel over the total area of \u200b\u200bthe future veranda. If the described manipulations are not done, debris will subsequently accumulate under the floor of the terrace, and the coating itself will turn out to be cold for the feet of the owners.
- Consider the option without a grillage, when the entire planned area of \u200b\u200bthe veranda is covered with gravel. It's both cheaper and easier. After filling our plot of land with stones, they need to be leveled with a shovel. Next, it is necessary to lay wooden beams with a profile of 100 mm x 100 mm along the pipes protruding from the ground, smeared with mastic, fastening them in the corners with standard locks. These locks, made with an ax, are also called cuts or cuts. Their options are shown in the diagram below. The future floor will rest on the described beams.
The diagram shows various types of locks for connecting beams, we use the simplest
- The next step is to build the frame of the veranda. We also make vertical racks from beams with a section of 100 mm x 100 mm. We fasten them with the perimeter of the base. After installing the verticals, we lay the flooring with edged boards with a thickness of 30 mm or more. We nail the floorboards to the beams with nails.
- We install window sill beams at a height of 1 m, while fastening them vertically. The profile of the window sills can also be equal to 100 mm x 100 mm. To connect the beams in all cases, we use the classic lock, which was mentioned above. We also use screws or nails. You can strengthen all connections with metal corners. After installing the window sill beams outside the veranda, we nail edged boards to close the space from the floor to the window sill beams.
- We make the upper strapping of the future veranda. To do this, we connect the verticals with the same beams, then we rely on this design for standard logs for mounting the roof.
Important to remember! Since a typical veranda uses a shed roof, the front verticals should eventually be lower than the rear ones adjacent to the house by about 30 cm. If we did not take this into account right away, you can take a hacksaw and file the standing beams.
The wooden frame of the veranda, in this case it is made close to the house, part of the frame rests on the foundation of the house, this option is acceptable
- To build the roof of the terrace, a crate is nailed to the logs. Then sheets of roofing material are fixed and the same solid material is laid that adorns the slopes of the common house roof. There are also other options here that will provide an exclusive architectural form. For example, frames can be mounted on logs and “filled” with especially strong glass. This solution will give additional heating of the room from the sun even in winter.
On a note. In recent years, another possibility has become widespread: it is enough to screw sheets of polycarbonate used for the construction of greenhouses with screws to the logs. This is a very comfortable and practical material. It bends well, which allows you to create arched structures. With it, it is easy to make the most unusual roof near the veranda.
- We can not fill the space for windows if an open veranda is enough for us. If it is decided that the building will be closed, it is enough to install ordinary glazed wooden frames. At the same time, window frames can be “equipped” with multi-colored glass, and exclusive stained-glass windows will be obtained, noticeable even from afar. A similar example can be studied in this photo.
Stained-glass windows in the design of a wooden veranda, the glass here is made to order
- Special attention must be paid to the installation of the door. The opening for this element is initially laid in the project on the side of the terrace. In no case should you install the veranda door directly opposite the common house entrance, otherwise drafts cannot be avoided!
Finishing floors, walls and ceilings. How to insulate and how
In our example, the lower part of the veranda is finished with boards. Such walls are easy to insulate from the inside with foam. You just need to glue the material plates with mounting glue. Outside, plank walls are easy to “sheath” with siding, it is screwed to the tree with self-tapping screws. Insulating material on the inside for additional insulation can be finished with aesthetic panels, for example, made of plastic.
There is an option to close the space between the window sill beams and the floor instead of boards with sandwich panels or OSB boards. In the latter case, it is enough to use sawdust enclosed in polyethylene as an insulating material. Plastic bags with sawdust are attached with metal mounting tape and nails. And the inner surface, after fixing plastic bags with sawdust, is finished with plywood. There are no boundaries for design ideas, the final decision depends entirely on the owner.
In conclusion, we suggest watching a video on the topic.
Video: How to attach a wooden summer terrace to the house
We have given design options and detailed instructions for the construction of a veranda, which is a continuation of a private house. It remains to add the last remark: when inventing an unusual, stylish veranda, do not forget about building codes and rules, and also try to make sure that your veranda does not spoil the overall picture of the house even at the design stage.
A closed veranda can serve not only as a beautiful extension to the house, but also as a unique place to relax or work. In it you can enjoy the view of the surrounding nature and feel comfortable in hot summers and cold winters, as well as in any bad weather.
Photo of a closed veranda built to the house:


Project development
Attention ! It is necessary to develop a project before construction, since the quality of the future premises depends on it.
First you need to determine for what purposes it is planned to build a veranda, whether you are going to use it in the winter (then full insulation will be required) or will it be only as a closed summer veranda. Then its future location and dimensions are determined.
They usually have a veranda near one of the walls of the house, and often it is built from the side invisible to prying eyes, so that you can feel alone and completely free. Inside the room there must be a door leading to the main building.
Photo of a closed veranda attached to the house:


Also, do not forget about the future view from the building and its location relative to the sun. So, for example, on the southeast side there will be more sunlight than on the north. So, if you live in the northern region, it is better to place it on the south side of the house, and for the southern region, on the contrary, it is recommended to build on the north side so that there is more shade.
The optimal size of a closed veranda is 3 m wide, from 3 to 6 m long.
Attention ! The veranda should correspond to the size of the main building, that is, if the house is large, then it should not be too small and vice versa.
Now you need to choose the design of the closed veranda. It is recommended to build it from the same materials as the dacha was built, or use the most suitable for the style of the main building, the main thing is that both buildings harmonize with each other.
The foundation of the veranda should be the same height as the foundation of the house. If it is built after the construction of the house, then the foundation is most often made on pillars. It is better to make the floor immediately insulated.
Important ! The veranda should fit snugly against the house with walls and a roof so that precipitation does not get inside or there are no drafts.
The roof should be made single-pitched and more gentle than that of the main building.
In the veranda, by definition, there should be a lot of light, which means there should be a lot of windows, at least two. You can even make the walls entirely out of windows, including sliding ones. Sliding panels can be opened remotely or mechanically.
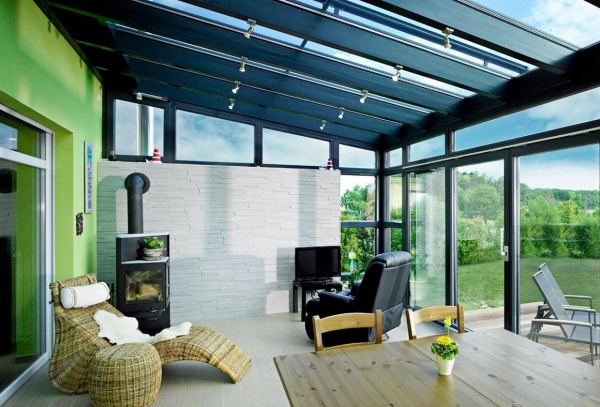
If the veranda will be used in winter, then heat-insulating double-glazed windows or polycarbonate should be installed.
You can heat a closed-type country veranda with ordinary heaters or a fireplace. Moreover, there are many varieties of fireplaces, so it can be easily chosen for any design of the veranda.
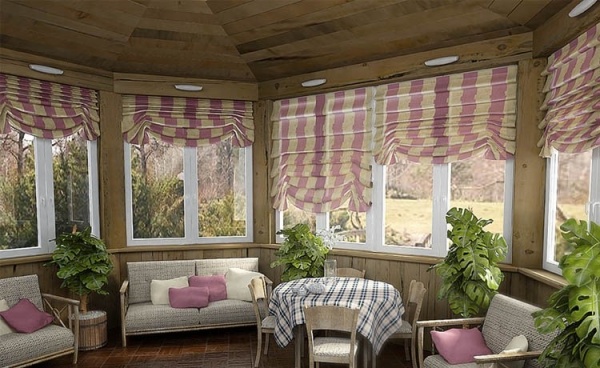
In the hot summer, you can hang blinds, curtains, or any other curtains to hide from the sun.
Photo projects of a closed veranda built to the house:


How and how to close the veranda
You can glaze the veranda in the following ways:
- wooden frames with ordinary glass;
- PVC windows
- cellular or monolithic polycarbonate.
In all of the above ways, you can close the veranda on your own. But before you start closing the veranda, you should draw a diagram of future windows, since:
- the room should be spacious and bright;
- it is necessary to determine the number of opening windows;
- take into account the location of furniture so that it does not interfere with opening windows.
Consider one of the ways - how to close the veranda with polycarbonate.
Advantages of polycarbonate:
- high strength (especially monolithic polycarbonate);
- delays UV radiation;
- low thermal conductivity;
- plastic;
- eco-friendly;
- thanks to the large color range, you can create an unusual design.
After the scheme is drawn and the materials are calculated, the frame is built. It can be made from metal profiles, wooden beams, bricks or other materials that are left over from the construction of the main building.
Important ! When calculating the required building material, consider the dimensions of the polycarbonate sheets and its minimum possible bend.
Before covering the veranda in the country with polycarbonate, you need to remember a few important rules for installing polycarbonate:
- crate step 60-80 cm;
- vertical channels of cellular polycarbonate should be located only vertically so that condensate can flow out;
- sheets are interconnected by special connecting profiles;
- the cut of the sheet at the top must be closed with a special tape and a profile, the lower cut is closed with a tape that is capable of passing moisture, and several holes are drilled in the profile for the lower part to drain condensate;
- it is recommended to fix the sheets with thermal washers, as they do not damage the coating during its expansion with temperature changes;
- also during the fastening of sheets of cellular polycarbonate, it is necessary to leave free space inside the adjacent parts (for example, profiles) for the expansion of the material;
- remove the protective film only after installation;
- you can cut polycarbonate into the necessary parts with an electric jigsaw.
Below are photos of what a polycarbonate veranda closed from the outside looks like:
Porch
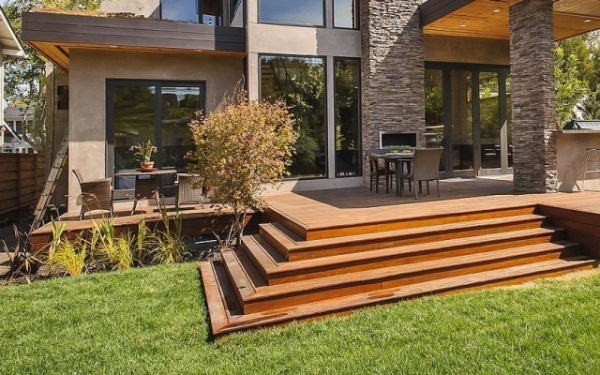
A closed veranda with a porch will look much more comfortable and attractive, and will also take on a completely finished look.
The porch can be built from wood, brick, stone, concrete mix, metal, or with the addition of metal elements.
The porch cover must be frost-resistant and non-slip to avoid bruises or injury.
Advice ! The porch should always be kept clean and tidy as it affects the whole look of the house.
The porch can be of different shapes and sizes, it all depends on your imagination and capabilities, the main thing is that it should also be combined with other buildings. All of their types are equally suitable for both closed and open verandas.
Photo of a closed and open veranda with a porch:


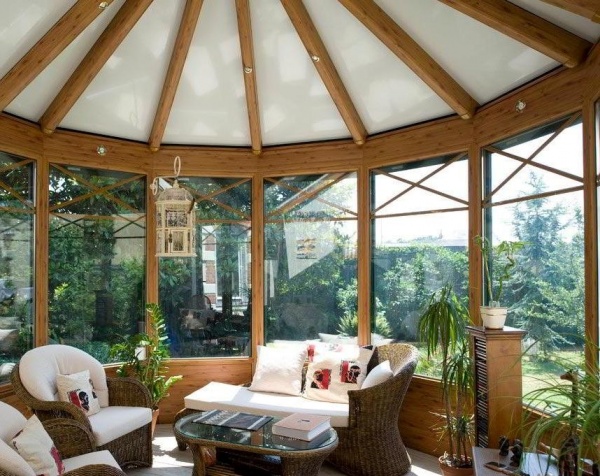
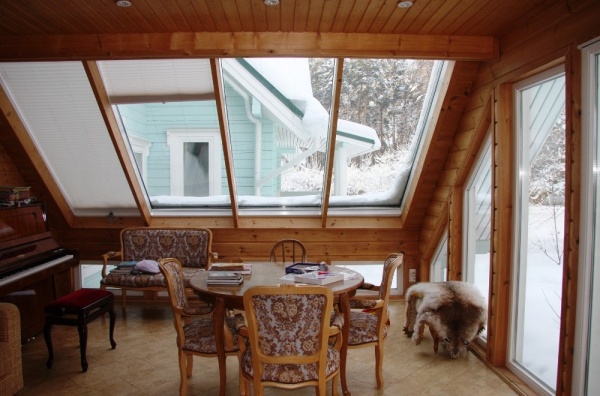
The interior of the closed veranda
After the veranda has finally been built, it's time to move on to its interior.
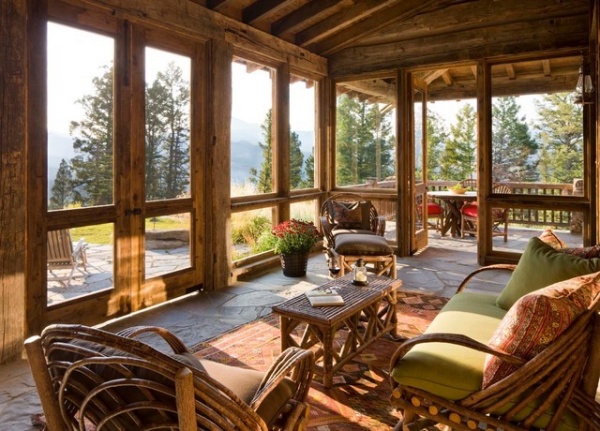
During registration, you must remember about the location of the veranda. So, if it is located on the east or north side, then the most suitable would be, for example, the British colonial style:
- wicker furniture made of rattan, mahogany or bamboo;
- linen and cotton fabrics with a floral pattern;
- many pillows with covers;
- tropical motifs (palm tree, ferns).
The floor can be covered with dark-colored material, as it will not overheat due to the location of the room.
If the building is located on the south side, then the Mediterranean style is perfect, where there is a lot of blue and white. Moreover, these colors are used not only in furniture, but also in the decoration of the room. Be sure to have a lot of fresh flowers and the presence of Roman blinds.
In each of these cases, you can apply any style with ethnic flavor:
- Oriental;
- ecostyle;
- Scandinavian;
- provence;
- country and so on.
All of them have a common feature - natural materials, that is, wood, bamboo, natural fabrics.
But whatever the style, there are universal things that will make any room even cozier and more comfortable:
- sofa cushions;
- tablecloths;
- chair covers;
- flowers in pots or trees, bouquets in vases, flowerpots;
- candlesticks, nightlights;
- paintings, photographs, panels.
Photo of the design of the closed veranda:


In addition to all this, the interior of the veranda directly depends on the purpose of its use.
A closed veranda in the country can serve as:
- hallway, porch;
- kitchen, dining room;
- living room;
- children's;
- office;
- greenhouses.
Important ! When designing a veranda, remember the main rule of designers - proportionality, that is, you do not need to force a small veranda with huge furniture and vice versa.
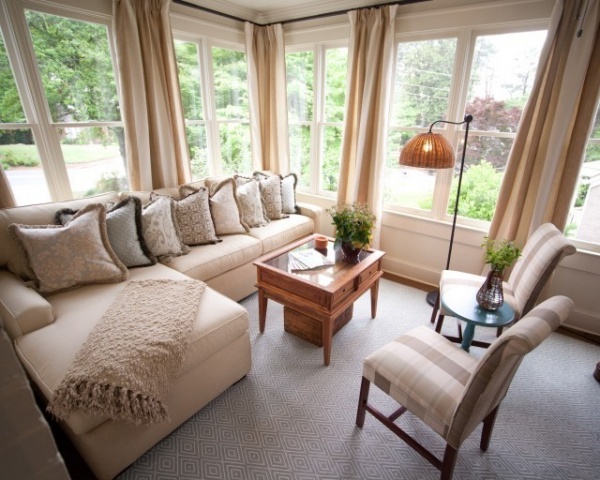
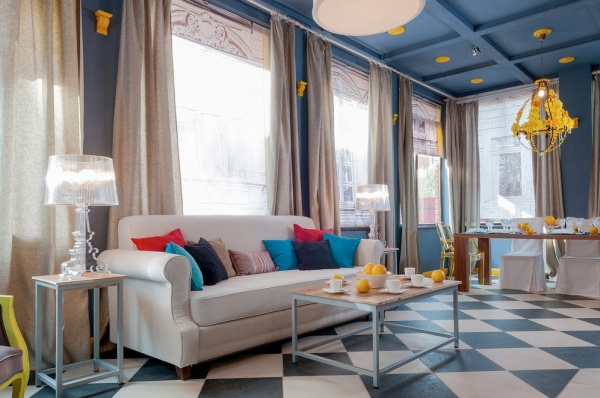
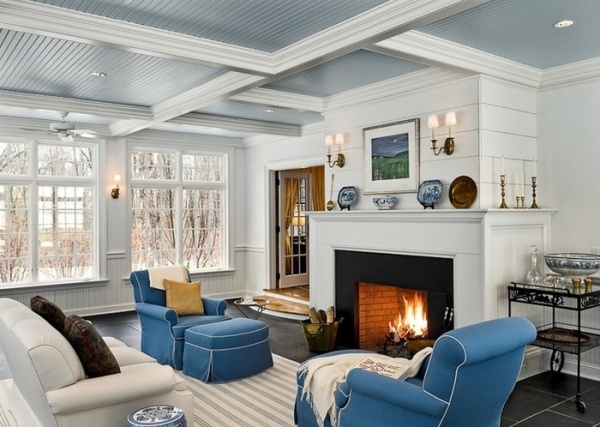
Veranda-living room
Most often, the veranda is designed as a living room. For this case, you will definitely need armchairs, chairs, a coffee table and a sofa (if the area of \u200b\u200bthe room allows). In order for each family member to use such a room, it is necessary to take into account the needs of each of them during the design.
Each furniture and element should be combined with each other in style. If furniture is arranged in groups, then comfort will be best felt.
Photo design of a closed veranda-living room in a private house:


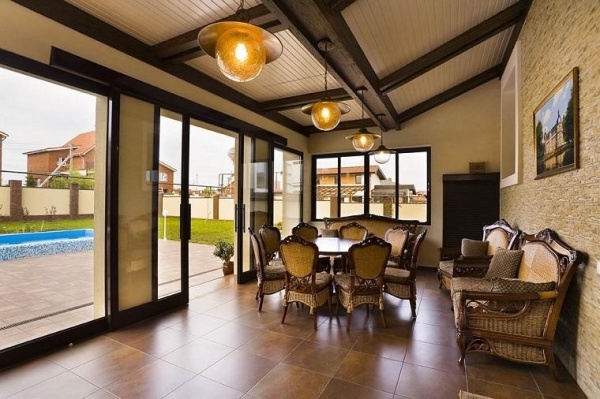
Veranda-dining room or kitchen
One of the most comfortable and pleasant places in the house. Minimalist style is perfect for this occasion. An ordinary set of table and chairs, indoor plants and textiles. And you can decorate with heart-loving details or retro style.
In any case, since this is a kitchen, you should take care of excellent lighting.
Photo of the interior of a closed veranda-kitchen in a country house:


Veranda-study
A comfortable chair, a desk, a bookcase - that's what the most important thing should be in the office. The rest depends only on your desire and the size of the room.

Children's veranda
The nursery can be decorated in the form of a ship or a princess's house. You will need a lot of colorful pillows of various shapes and characters, cozy houses, a sandbox with balls, and you can even install a swing.
A veranda is a popular home improvement that not only adds to the overall value of a property, but is also a focal point for outdoor recreation with family and friends. This is the place where barbecues, evening dinners and other social events take place. The ways of using a veranda are as extensive as the types of verandas that can be built. With this in mind, you'll want to carefully consider the available design elements that go into a veranda. Tools and materials: measuring tape, graph paper and pencil, ruler, wooden stakes, level, hammer.
Location
The size and orientation of the lot and the house itself may be limited to just one or two verandas in various locations, however, within these limits, you can have much more choice than meets the eye. You can add retaining walls, a door, make walkways, screen a porch to create a private, personal setting, you can choose from a variety of options just the one that will be most convenient for your use. The climate of the area and the view that you will observe from the future veranda are key factors to consider when deciding where to place your veranda. The north side of your house is likely to be the coolest location. The south and west side of the house is likely to be very hot in mid-summer unless an additional awning is included in the building project, or shade from growing trees is used in the location. You can avoid exposure to winds, if any, by placing your deck on the opposite side, so that the house becomes a defense. In addition, careful placement will allow you to minimize traffic noise, eliminate unwanted glances, and provide additional privacy. If you are considering adding a hot tub or pool to your veranda, privacy considerations for you and your guests can be very important.
Legal regulations
Local zoning regulations - may limit the total size of your veranda, the height of the walls, as well as the minimum distance of the veranda from your house to the boundaries of the site. Structural ordinances - may limit the appearance of a structure. Local building department - may require a building permit and ask for design plans. Local utilities - will help you find the laid pipeline, power lines and similar utility lines.
Size
You can build a veranda of any size you wish, of course within the law. However, a huge deck next to a small house will look the same as a tiny deck next to a big house - wrong. If you think your proposed deck is large for your home, break it down by creating smaller sections on multiple levels. To test your ideas, take measurements on your lawn. Install wooden stakes at the nearest corners of the proposed area of \u200b\u200bthe future veranda and install the longitudinal beam, approximately at the height of the future railing. You can install furniture on the lawn, in the proposed construction area, to visualize how the space will work. The most common mistake people make when building decks is being too small. Tip: If possible, measure your porch in various sizes, larger and smaller. You will have to purchase standard lumber anyway, and there is no point in wasting that material when you could have a bigger deck for the same amount of money.
Form and flooring
A verandah can be any shape you want, in fact, simple changes like a bevelled decking angle or a 45 degree angle can add flair to a building project. You can also add visual interest to your veranda by installing it around the corner of your house, you can install benches, build a fence or sew up the veranda. As a rule, the flooring should go within five centimeters under the front door to the house. On a sloping site, you can build your veranda with several levels of support to follow the slope. As a rule, where the height of the veranda exceeds 50 centimeters from the ground, the pillars must have additional support to avoid vibrations. A spa or hot tub can be installed on a veranda when the structure is sufficiently reinforced to support the weight of the water, for this, the veranda can be installed directly on a concrete slab on the ground. In this case, the veranda is built around and on the slab. Existing trees or rocks, as well as other landscape elements, can be integrated into the veranda by designing and coordinating the veranda around the elements. If you are building a veranda around a tree, leave at least 10 cm around the trunk of the tree, taking into account the growth of the tree. Around stationary landscape elements, such as boulders, it is necessary to leave 20 cm, since the decking can expand and contract under conditions of different temperatures and humidity.
railing
Railings are the most visible visual element of the veranda, moreover, they offer great scope for imagination and creative ideas. They can be fixed to posts that go into the ground, on the sides, from the edge of the carrier beam, or fixed directly to the deck. They can be made in wood, metal, or even rope - almost all materials are suitable, as long as they suit the building requirements and appearance. First of all, the design of your railing will be limited by building regulations that are designed to provide safety. As a general rule, posts that support railings, in accordance with building code regulations, must be no more than 40 cm apart. Railings should not have voids larger than 4x4. The durability of the railing will also depend on the design chosen. For example, the ends of your railings should be painted or coated with specialized compounds to minimize cracking and splitting.
Steps and stairs
Steps and stair structures are carefully regulated in accordance with building codes. As a general rule, steps and stairs should be at least 36 cm wide. If you want the stairs to allow two people to pass each other, the required width is 48 cm, this solution is necessary to create comfortable conditions. The increase should be no more than 7.5 cm, and the step width should be at least 15 centimeters. Building codes must also be carefully observed in the design of stairs, porch steps, support posts and the need for railings.
Structural Components: There are five main components of a traditional veranda:
Vertical racks. The posts are sunk into concrete or on piles, typically spaced 50 to 80 cm apart.
Horizontal beams. Installed on racks, parallel to the deck, must bear the weight of the veranda.
Bar. It is located between horizontal beams, as a rule, at a distance of 16 or 24 cm from each other. They distribute the weight of the veranda, allowing the deck boards to be used properly.
Flooring. Boards laid on beams, floor of the veranda.
Railing. Usually 36-42 cm. Materials used, size and distance between components are determined by local building codes.
Material selection
Materials for the construction of the veranda, not only must be resistant to destruction and damage by insects, but also withstand the effects of water and the sun. Standard wood constructions include the use of pine or spruce, which resist rot, but this is not enough in extreme weather conditions or in the sun's ultraviolet rays. You get similar strength from pressed pine, cedar, or mahogany, and they can be dyed just about any color you want. When using mahogany or cedar, remember that only the core of these trees is resistant to splitting. Colored sapwood loses its qualities as quickly as pine and spruce. If you have a general idea of the future porch, draw one or two sketches, choosing the best ideas from the many ideas. Use the veranda as part of your backyard landscaping and as a design element in your home. Use graph paper to maintain the specified dimension and get all the elements in a suitable scale. Take the sketch to your local builder's market, shop, or wood supplier, and ask for a rough estimate of the cost of the lumber.
Living in a private home convinces us that a terrace is simply vital, because it allows us to enjoy the fresh air without giving up the comforts of home.
The terrace, in fact, is a transition zone from a comfortable home to wild nature, which periodically upsets with rain, wind, scorching sun, mud and cold. For this reason, when equipping a terrace, you should take care of a roof that would protect from rain, wind protection and shading, and the cover, in turn, would keep it clean.
Before the direct construction of the terrace, it is necessary to take into account its purpose, size and shape, location, coating material. For clarity, it is recommended to draw a plan for the future terrace on graph paper.
Purpose of the terrace
 First you need to decide on the purpose of the terrace, because its appearance will depend on this. In cases where several people will use it, it can be made small in size, from one material.
If the terrace will be used for organizing picnics, which involves a large number of guests and the installation of various additional equipment, it will be necessary to build it in large sizes and use brick, stone or tile.
Terrace size
It directly depends on the size of the suburban area and the house. Small outbuildings next to a large house look rather ridiculous, and vice versa.
As practice shows, the minimum size of the terrace, which allows you to spend time in comfort, is 4 square meters.
It should be noted that the use of concrete and ceramic slabs must be considered in the project so that the need to cut tiles and cut concrete is minimal.
Terrace shape
When using wooden flooring, it is possible to play with the forms using a jigsaw for this purpose. The main thing is that the shape of the terrace is combined with the outlines of the house.
Location
After that, you need to answer the question of where to place it: from the back of the house or from the front. In this case, you need to be guided by its purpose and the location of the house relative to the cardinal points.
For example, you can make a shady terrace or a terrace that will be flooded with sunlight for a long time during the day.
It is highly undesirable to have a terrace in a windy place and near the road.
Terrace construction
 First you need to clear the area intended for the construction of the terrace, for which the natural soil layers are removed and large roots are uprooted. After such manipulations, the site must be tamped and leveled.
At the next stage, the terrace is raised, for which either wooden scaffolding or a concrete base are constructed. Boards are laid on the base, serving as a floor for it in the future. To prevent rotting, the boards are treated with special solutions. To keep the floor warm, the earth is covered with a thick layer of gravel.
 The boards are laid in a deck way; special glue and hidden fasteners with an anti-corrosion coating are used to fasten them. The thickness of these clamps is three millimeters. Such fasteners are an ideal alternative to thick screws that require closing with wooden plugs and stick out with their hats. Such fasteners are more aesthetic and practical. In addition, with hidden fasteners, the pressure on each board is reduced, and it also contributes to the preservation of the structure over a long period of time. Meanwhile, it is a fairly quick and easy installation that guarantees reusable use. Such floors can be sanded if necessary.
It should be noted that the roof of the terrace should be 0.5 meters larger than the size of the terrace itself, which protects the structure from water during the rainy season.
To finish the terrace, in addition to boards and ceramic tiles, you can use a cut lawn, which has become a popular phenomenon in recent years.
After the erection of the platform, the stage of selection and placement of garden furniture begins. It is recommended to use plastic furniture or artificial rattan for these purposes.